ADB Sideload Flashing Process - Apply Update From ADB
How to flash Android smartphone using ADB sideload commands? In this topic you will know the complete process to flash .zip files through ADB sideload mode. This process is supports most of the Android smartphone to update the phone, if you do not have SD card or unable to flash or getting errors while flashing or updating through "Recovery Mode". So if there is an option "Apply Update From ADB" on Recovery Mode, then you may use this "ADB Sideload" option to flash the phone using a PC.
To flash the phone using adb sideload, remember to download the OTA update and it should be in .zip format and do not extract the file just use the file as it is. If you download normal firmware it may not support to flash using "Recovery" and "adb sideload". So to confirm that you need to know whether the phone support OTA update through recovery mode and must confirm the firmware you download. From where you download the firmware to update the phone, just read the details on that website, it must be support to update the firmware using recovery and adb sideload mode or normal firmware or custom firmware which is repacked. If the firmware you downloaded is not a update file then you may not update the firmware neither using recovery mode nor adb sideload mode.
 |
| Recovery mode: apply update from ADB |
As we know while update/flash any firmware through recovery mode, we will get some error messages i.e. no response fail, failed to verify the system image, failed to update etc. and to copy/update the firmware we need a SD card and then you can update the phone. If the SD card or memory card is not in Good condition, the flashing process will take long time and if the read speed of SD card is slow you may get failed error message.
Requirements:
Download Minimal ADB and Fastboot Tool from the below link
Download OTA Update.zip (According to the phone's model)
Downloads:
Minimal ADB and Fastboot
How to use adb sideload to update/flash firmware?
1- Download the "Minimal ADB and Fastboot" Tool and extract it.
2- Now go to the "Recovery Mode" on the phone.
3- Then select "Apply Update from Adb".
4- Connect the phone to PC and Install ADB USB Driver.
5- Now copy the firmware in to the Minimal adb and fastboot folder
6- Now execute the following commands
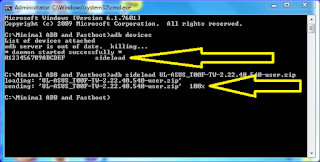
adb sideload <complete firmware file name with extension>
For Example: If you are flashing ASUS Zenfone 2 and firmware file name is "UL-Z00L-WW-1.17.40.1234-user.zip" then the adb sideload command willbe the following.
adb sideload UL-Z00L-WW-1.17.40.1234-user.zip
and then press ENTER key on the keyboard. The flashing process show in percentage and wait until the process complete.
That's the adb sideload process to apply update/flash Android smartphones, and it's very useful sometime when you face difficulty while flash using recovery mode.
Note: This topic is only for tutorial purpose and we are not responsible for any damage happen to the phone.
How to use adb sideload to update/flash firmware?
1- Download the "Minimal ADB and Fastboot" Tool and extract it.
2- Now go to the "Recovery Mode" on the phone.
3- Then select "Apply Update from Adb".
4- Connect the phone to PC and Install ADB USB Driver.
5- Now copy the firmware in to the Minimal adb and fastboot folder
6- Now execute the following commands
 |
| adb sideload flashing success on AUSU T00F-T00J |
adb sideload <complete firmware file name with extension>
For Example: If you are flashing ASUS Zenfone 2 and firmware file name is "UL-Z00L-WW-1.17.40.1234-user.zip" then the adb sideload command willbe the following.
adb sideload UL-Z00L-WW-1.17.40.1234-user.zip
and then press ENTER key on the keyboard. The flashing process show in percentage and wait until the process complete.
That's the adb sideload process to apply update/flash Android smartphones, and it's very useful sometime when you face difficulty while flash using recovery mode.
Note: This topic is only for tutorial purpose and we are not responsible for any damage happen to the phone.


0 comments:
Post a Comment
Please Share Your Thoughts