Showing posts with label HTML Codes. Show all posts

Thursday, July 17, 2025

🌍 Top 10 Stylish Google Translate Widgets for Blogger - Free Computer Tricks


 Adding a language translator to your Blogger site helps expand your reach to global audiences. Google Translate is the easiest and most effective tool—but the default widget is quite plain. So, here are 10 stylish and customizable Google Translate widgets designed for Blogger sidebars. Each includes a "Copy All" code box to easily use in your layout.


Top 10 Stylish Google Translate Widgets for Blogger - Free Computer Tricks


🔧 How to Use:

  1. Go to Blogger Dashboard > Layout.

  2. Click “Add a Gadget” in the sidebar section.

  3. Choose “HTML/JavaScript”.

  4. Paste one of the codes below.

  5. Save and you're done!


🔹 Widget 1: Clean White Box with Border


🔹 Widget 2: Dark Mode Translate Box


"Create a high-resolution thumbnail in 16:9 ratio, featuring bold text that says 'Top 10 Google Translate Widgets for Blogger', with a modern Blogger interface in the background, a Google Translate logo icon on one side, and vibrant, eye-catching colors like blue, orange, and white. Use 3D or flat icons, a clean tech blog style, soft shadows, and high contrast. Include a sidebar layout with a snippet of code and a 'Copy All' button visible. Style it to attract Blogger users and tech-savvy bloggers."


🔹 Widget 3: Rounded Soft Shadow Style


Top 10 Stylish Google Translate Widgets for Blogger - Free Computer Tricks


🔹 Widget 4: Gradient Background


🔹 Widget 5: With Flag Emoji Icons


Top 10 Stylish Google Translate Widgets for Blogger - Free Computer Tricks


🔹 Widget 6: Minimalist Box with Icon


🔹 Widget 7: Box with Hover Effect


🔹 Widget 8: Icon Header + Light Theme


🔹 Widget 9: Compact Footer-Friendly Widget


🔹 Widget 10: Card Style with Drop Shadow


✍ Final Tips:

  • You can change the pageLanguage: 'en' to your blog's main language (e.g., 'hi' for Hindi or 'or' for Odia).

  • Style and positioning can be tweaked as needed.

  • Use only one widget per page to avoid script conflicts.


✅ Use Instructions for Blogger:

  • Add it in Layout → Add a Gadget → HTML/JavaScript, or post/page in HTML mode.

  • This will show a stylish, shadowed textbox with all code ready to copy.


Tuesday, May 15, 2018

How To Add Related Post Widget For Blogger - Related Post CSS, JavaScript and HTML Codes


How to Add a Customized related post widget on your Blog? Stylish Related Post Widget HTML and CSS code, How to Edit Related Post Widget or You also called it "Your Might Also Like" Widget on Blogger?
How to add a related post widget on your blog and how you can customize it to looks better? This is very informative and best tutorial about adding related post widget below blog post, which can be understand by all the blogger whether they are expert or fresher in blogging. To add a related post widget you need to edit the HTML code of the Blogger template and add the CSS, JavaScript and HTML codding in it and here we are simplified the procedure and describe it step by step which can easily understand. Google Blog or Blogger.com has a good platform to start your blog and it's easy to customize the HTML code and you can also upload your personal or third party Blogger Template to make your blog looks better. Blogger is free for everyone so start free blogging today to share your knowledge and passion with your blog online in the Internet world www. or http or https.

What is Related Post Widget?
The term "Related Post" defines it, that means it is post/article which related to the current post/article you are reading on the blog or website. The related post widget is used on website or blog to engage visitors by showing the related articles of the post/article they are reading. For example if a visitor is reading about "Mobile Flashing" topic then the related post starts the work to show any other article of your blog which is related to "Mobile Flashing" Labels and shows it at the end of the post, and you can also set the number of post should appear in the related post widget.

Stylish Related Post Widget For Your Blog - Related Post CSS, HTML and JavaScript Code
Why Use Related Post on Your Blog?

As I said before the "Related Post" widget used for user engagement by showing related articles to the users that he or she is interested to read this. If you design the related post widget or use customized widget then this will be increase the user engagement with improved look and feel. So why are you waiting just follow the below steps and use CSS and HTML code on your blog and make your blog unique.


Steps:
1) Log in to Blogger and Choose the Blog to Edit. (Backup Blog Template before edit)
2) Then go to THEME and Edit HTML, then find </head> and paste the below CSS and JavaScrip code just above it.
Paste Related Post CSS Code Before </head> Tag Then follow the next Step
<!--Related Posts with thumbnails Scripts Start-->
<b:if cond='data:blog.pageType == &quot;item&quot;'>
<style type='text/css'>
#related-posts{float:left;width:100%;}
#related-posts a{background:#08008c; -webkit-border-radius: 5px;-moz-border-radius: 5px; border-radius: 5px;}
#related-posts h4{margin-top: 5px;background: #fe0000;font:18px Arial;padding:5px;color: #ffffff; text-transform:uppercase; }
#related-posts .related_img {margin:5px; border: solid white 2px;object-fit: cover;width:137px;height:100px;-webkit-border-radius: 5px;-moz-border-radius: 5px; border-radius: 5px;}
#related-title {color: #ffffff;text-align:center;text-transform:none;padding: 0px 5px 10px;font:16px Arial;width:137px; height: 150px;}
</style>
<script type='text/javascript'>
//<![CDATA[
var relatedTitles=new Array();var relatedTitlesNum=0;var relatedUrls=new Array();var thumburl=new Array();function related_results_labels_thumbs(json){for(var i=0;i<json.feed.entry.length;i++){var entry=json.feed.entry[i];relatedTitles[relatedTitlesNum]=entry.title.$t;try{thumburl[relatedTitlesNum]=entry.gform_foot.url}catch(error){s=entry.content.$t;a=s.indexOf("<img");b=s.indexOf("src=\"",a);c=s.indexOf("\"",b+5);d=s.substr(b+5,c-b-5);if((a!=-1)&&(b!=-1)&&(c!=-1)&&(d!="")){thumburl[relatedTitlesNum]=d}else thumburl[relatedTitlesNum]='https://blogger.googleusercontent.com/img/b/R29vZ2xl/AVvXsEhBC8j1QTnXGb-k6AQ-a1G1vvRQkafRnZ1bhqy1HQ8SsBc2TsYM9tzrgD4ywFJ6xH2pmn3pXsPWp99vg5hPvhGYmLUan5jXNBWiKu3yTOYn_YU353aYo9HJVG9lMFJmrJtdXFPgzvdzoQAe/s1600/no-thumbnail.png'}if(relatedTitles[relatedTitlesNum].length>120)relatedTitles[relatedTitlesNum]=relatedTitles[relatedTitlesNum].substring(0,35)+"...";for(var k=0;k<entry.link.length;k++){if(entry.link[k].rel=='alternate'){relatedUrls[relatedTitlesNum]=entry.link[k].href;relatedTitlesNum++}}}}function removeRelatedDuplicates_thumbs(){var tmp=new Array(0);var tmp2=new Array(0);var tmp3=new Array(0);for(var i=0;i<relatedUrls.length;i++){if(!contains_thumbs(tmp,relatedUrls[i])){tmp.length+=1;tmp[tmp.length-1]=relatedUrls[i];tmp2.length+=1;tmp3.length+=1;tmp2[tmp2.length-1]=relatedTitles[i];tmp3[tmp3.length-1]=thumburl[i]}}relatedTitles=tmp2;relatedUrls=tmp;thumburl=tmp3}function contains_thumbs(a,e){for(var j=0;j<a.length;j++)if(a[j]==e)return true;return false}function printRelatedLabels_thumbs(){for(var i=0;i<relatedUrls.length;i++){if((relatedUrls[i]==currentposturl)||(!(relatedTitles[i]))){relatedUrls.splice(i,1);relatedTitles.splice(i,1);thumburl.splice(i,1);i--}}var r=Math.floor((relatedTitles.length-1)*Math.random());var i=0;if(relatedTitles.length>0)document.write('<h4>'+relatedpoststitle+'</h4>');document.write('<div style="clear: both;"/>');while(i<relatedTitles.length&&i<20&&i<maxresults){document.write('<a style="text-decoration:none;margin:0 4px 10px 0;float:left;');if(i!=0)document.write('"');else document.write('"');document.write(' href="'+relatedUrls[r]+'"><img class="related_img" src="'+thumburl[r]+'"/><br/><div id="related-title">'+relatedTitles[r]+'</div></a>');if(r<relatedTitles.length-1){r++}else{r=0}i++}document.write('</div>');relatedUrls.splice(0,relatedUrls.length);thumburl.splice(0,thumburl.length);relatedTitles.splice(0,relatedTitles.length)}
//]]>
</script></b:if>
<!--Related Posts with thumbnails Scripts End-->

3) Now find the place where you want show the related post widget on your blog or website, in My case I used it after Author Profile. So find <data:post.authorAboutMe/> and paste the below HTML code just after it.
Related Post Widget HTML Code Paste After Author Profile
<!-- Related Posts with Thumbnails HTML Code Start-->
<b:if cond='data:blog.pageType == &quot;item&quot;'>
<div id='related-posts'>
<b:loop values='data:post.labels' var='label'>
<b:if cond='data:label.isLast != &quot;true&quot;'>
</b:if>
<script expr:src='&quot;/feeds/posts/default/-/&quot; + data:label.name + &quot;?alt=json-in-script&amp;callback=related_results_labels_thumbs&amp;max-results=5&quot;' type='text/javascript'/></b:loop>
<script type='text/javascript'>
var currentposturl=&quot;<data:post.url/>&quot;;
var maxresults=5;
var relatedpoststitle=&quot;<b>You Might Also Like:</b>&quot;;
removeRelatedDuplicates_thumbs();
printRelatedLabels_thumbs();
</script>
</div>
</b:if>
<!-- Related Posts with Thumbnails HTML Code End-->

Now save the Template and visit your blog post to see the stylish Related Post Widget that implemented on your Blog or Website. So in this way you can add a Related post widget on your blog and here you can also find the Related post widget CSS, JavaScript and HTML code for your Bog. Thanks for visit this blog and please keep visiting this Knowledge Sharing Website www.FreeComputerTricks.in.

Sunday, May 6, 2018

How To Create a Text Box or Text Area In Your Blogger Post With Examples


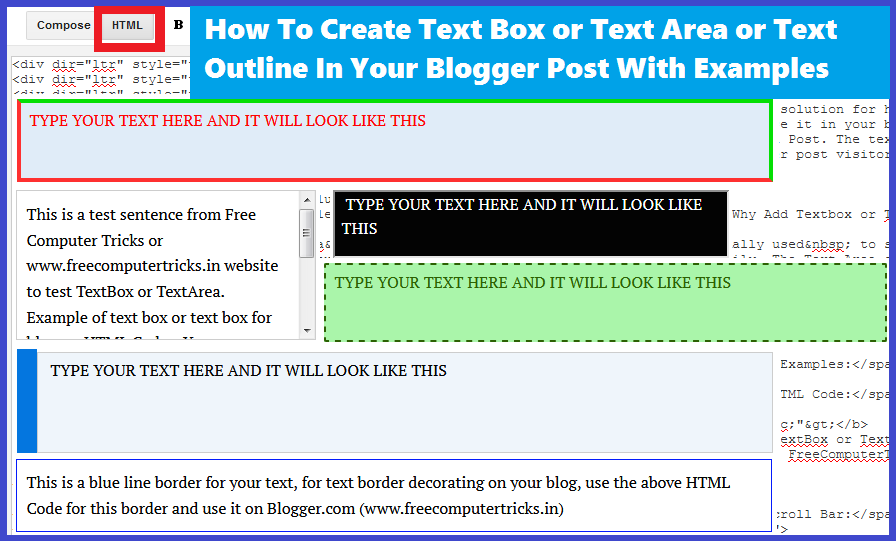
In this tutorial you will find the solution for how you can add a text box or text area inside your blog post and here we also given some text box HTML codes, that you can use it in your blog. As you know to use HTML code in your blog post you need to use HTML instead of Compose while create a New Post or Edit a Post. The text box or text area is used for specific content such as JavaScript codes, HTML Codes, CSS Codes etc. which made your blogger post visitor to find it out easily. 

How To Create Text Box or Text Area or Text Outline In Your Blogger Post With Examples
Why Add Textbox or Textarea
As I said before this is normally used  to separate a specific paragraph, text, sentence or words etc. to help your website users to find out the specific words easily. The Text Area or Text Box or what ever you call it no matter is used in Blogger or in a web page to add any type of codes or some special contents.

How To Create TextBox or TextArea In Your Blogger Post or in your website page with examples of Text Box or Tex Area or Text Outline HTML Codes For Blog and Website.

How to Add HTML Codes in Your Blog Post?
  • Go to the Blog and Create a New Post or Edit Existing.
  • Now Click on HTML Tab to edit your blog post with HTML mode and here you can add any HTML code to design your post.
  • Paste any one of these below Text Box or Text Area or Text Outline HTML Codes.
  • Then Click on Preview and Save or Publish Your Post.
Examples:

Text Box With Right Scroll Bar HTML Code:
<div style="overflow: auto; width:300px; height:150px; padding: 10px; border:1px solid #ccc;">
This is a test sentence from Free Computer Tricks or www.freecomputertricks.in website to test TextBox or TextArea. Example of text box or text box for blogger HTML Codes, You can replace this with your sentence or paragraph. Thank you FreeComputerTricks (www.freecomputertricks.in) with right scroll bar
</div>

Result of Text Box With Right Scroll Bar:
This is a test sentence from Free Computer Tricks or www.freecomputertricks.in website to test TextBox or TextArea. Example of text box or text box for blogger HTML Codes, You can replace this with your sentence or paragraph. Thank you FreeComputerTricks (www.freecomputertricks.in) with right scroll bar

Text Border With Blue Line HTML Code:
<div style="border: 1px solid #0118FC; padding: 10px;">
This is a blue line border for your text, for text border decorating on your blog, use the above HTML Code for this border and use it on Blogger.com (www.freecomputertricks.in)</div>

Result of Blue Border Text Box:
This is a blue line border for your text, for text border decorating on your blog, use the above HTML Code for this border and use it on Blogger.com (www.freecomputertricks.in)

Blue Left Border and Light Blue Background Text Area HTML Code:
<div style="border-left: 20px solid #0174df;">
<textarea cols="50" rows="3" style="-moz-border-radius: 7px; background: #eff5fb; border: 1px solid #ccc; color: black; line-height: 1.5em; padding: 5px;">  TYPE YOUR TEXT HERE AND IT WILL LOOK LIKE THIS </textarea></div>

Result of Blue Left Border with Light Blue Text Background:

Black Text Area With White Letters:
<textarea cols="42" rows="3" style="background: rgb(0, 0, 0) none repeat scroll 0% 0%; border: 2px inset rgb(204, 204, 204); color: white; height: 68px; line-height: 1.5em; padding: 0px 7px; width: 396px;"> TYPE YOUR TEXT HERE AND IT WILL LOOK LIKE THIS  </textarea>

Result of Black Text Area with White Letters:


Green and Red Border Text Area HTML Code:
<textarea cols="40" rows="3" style="-moz-border-radius: 10px; background: #e0ecf8; border-bottom: 4px solid #fe2e2e; border-left: 4px solid #fe2e2e; border-right: 4px solid #01df01; border-top:4px solid #01df01; color: red; line-height: 1.5em; padding: 5px;"> TYPE YOUR TEXT HERE AND IT WILL LOOK LIKE THIS </textarea>

Result or Green and Red Color Text Box:


Dashed Lines Border Text Area HTML Code:
<textarea cols="42" rows="3" style="background: #a9f5a9; border: 2px #295f00 dashed; color:#295f00; line-height: 1.5em; padding: 5px;"> TYPE YOUR TEXT HERE AND IT WILL LOOK LIKE THIS </textarea>

Result or Dashed Line Text Box:


Conclusion:
So in this way you can create or add a text box or text area or text outline or text border inside you blog post to separate a specific paragraph or some texts. Here in this tutorial you will get to decorate a text box with examples and also you can get the text box HTML codes.

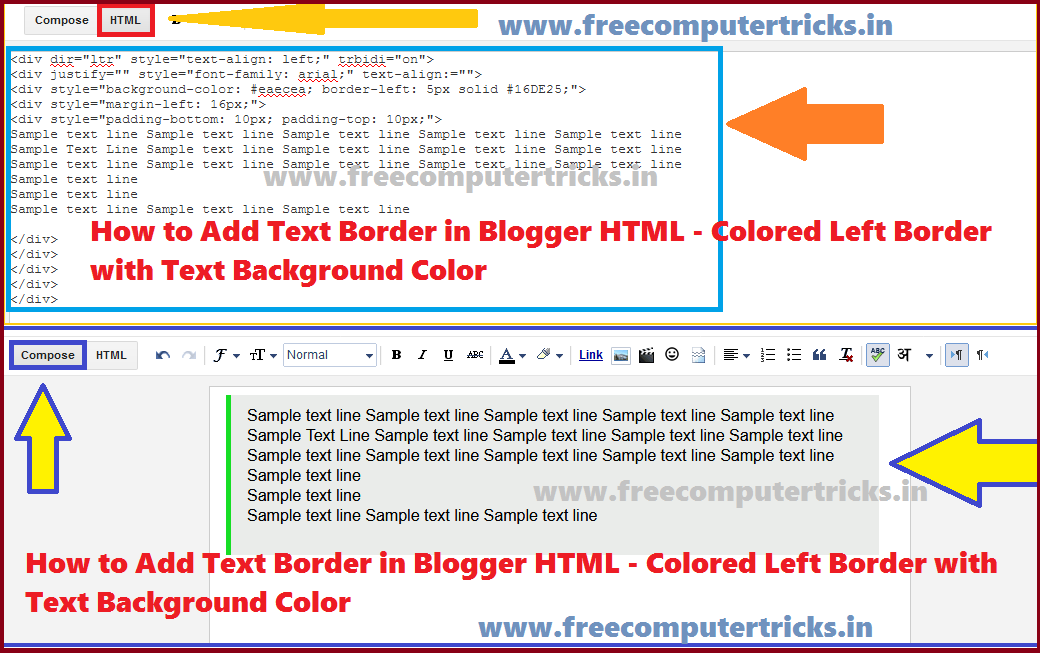
How to Add Text Border in Blogger HTML - Colored Left Border with Text Background Color


Hi Welcome to another tutorial from Free Computer Tricks, The tutorial is about HTML coding for Blogger, if you have a blog and want to customize is with various styles using HTML code, then here you can get the HTML tutorial for such customization of your Blog. Here is the tutorial about How to ad text border in Blogger with HTML code. Here is the example of how you can add a left border with color along with any text background color.
How to Add Text Border in Blogger HTML - Colored Left Border with Text Background Color (HTML Code For Blog and Website)
If you are a Blogger, then you must need this tutorial about text border. Sometimes you need to add some text lines in your blog such as HTML Codes, CSS Codes, Some Log text, Error Quotes, JavaScript Code, Special Notes etc. and you want to add a style text border and background, which is easily find out by the visitors and also it looks better on your blog. Here we will show you how to add a colored left margin and text background color with various style on your blog.

Here we will show you how to add a Colored Left Border and some text background color with text align, padding, font style, left border color, text background color and margin. To add this style text box on your blog you need to edit your blog post with HTML Mode and paste the below HTML codes in it then come back Compose Mode.

Example:

HTML Code:
<div style="border-left: 4px solid red; background-color: lightgrey;">
Sample text line 1
Sample Text Line 2
</div>

Result:
Sample text line 1
Sample Text Line 2

HTML Code: Change the Color of the Left Border
<div style="background-color: lightgrey; border-left: 5px solid #16DE25;">
Sample text line 1
Sample Text Line 2
</div>

Result:
Sample text line 1
Sample Text Line 2

HTML Code: Add Space After Left Border
<div style="background-color: lightgrey; border-left: 5px solid #16DE25;">
<div style="margin-left: 15px;">
Sample text line 1
Sample Text Line 2
</div></div>

Result:
Sample text line 1
Sample Text Line 2

HTML Code: Padding Top and Bottom
<div style="background-color: #EAECEA; border-left: 5px solid #16DE25;">
<div style="margin-left: 15px;">
<div style="padding-bottom: 15px; padding-top: 15px;">
Sample text line 1
Sample Text Line 2
</div>
</div>
</div>

Result:
Sample text line 1
Sample Text Line 2

HTML Code: Font Style and Text Align
<div style="font-family: arial; "text-align: justify;">
<div style="background-color: #EAECEA; border-left: 5px solid #16DE25;">
<div style="margin-left: 15px;">
<div style="padding-bottom: 15px; padding-top: 15px;">
Sample text line 1
Sample Text Line 2
</div>
</div>
</div></div>

Result:
Sample text line 1
Sample Text Line 2

Conclusion:
In this way you can add a decorated text border with a background color, which make your blog to looks better and it's also easy to find out by your visitor if there is any special note on your blog. So use the above HTML codes for border and text background and enjoy.

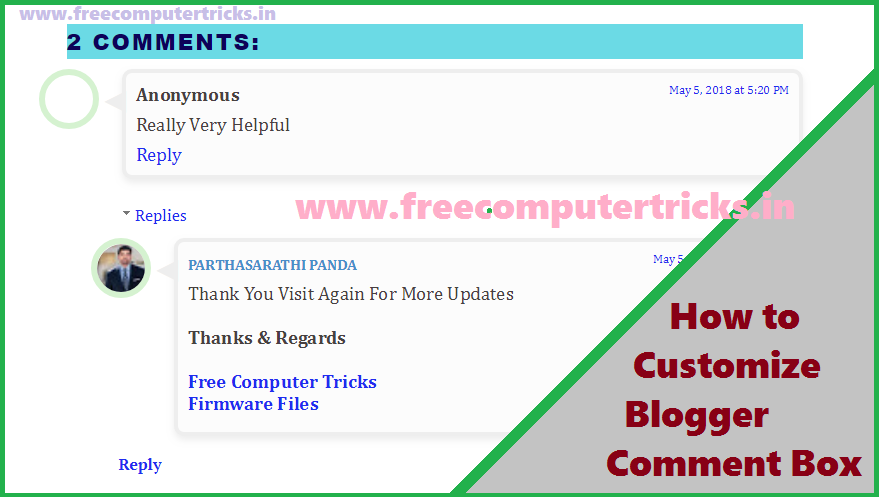
How to Customize Blogger Comment Box?


Hi friends, If you are blogging on Blogger and want to know how you can customize the comments box, then you are in right place where you can get the CSS code to design or customise the Blogger comments box. As you know the default comment box of blogger is simple and you may not like it very much, but if you can customize the comment box using CSS codes then it will look very much pretty. So why are you waiting for, please go through the tutorial and customize the comments box.

What to Do For Comment Box Customization?
Do not worry you can easily do this customization and we will briefly describe it. If you are new to Blogger and recently starts your blog, then you can also learn how to customize comment box here. For comment box customization you need to add some bunch of CSS code in your Blogger XML template then save the template and see the magic.
How to Customize Blogger Comments Box
How to Customize Comments Box Blogger?
  • Log in to your Blogger account and choose the blog you want edit.
  • Then select Theme and then click on EDIT HTML.
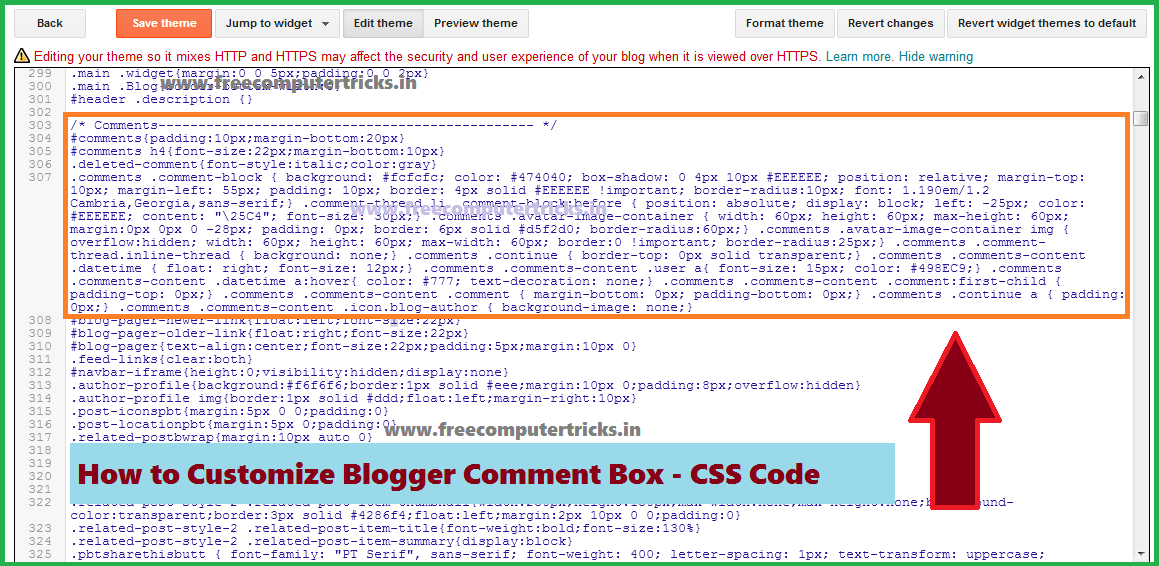
  • Now press CTRL+F and find <b:skin> and paste the below CSS code just below <b:skin>
Comments Box Source Code:

#comments h4{font-size:22px;margin-bottom:10px}
.comments .comment-block { background: #fcfcfc; color: #474040; box-shadow: 0 4px 10px #EEEEEE; position: relative; margin-top: 10px; margin-left: 55px; padding: 10px; border: 4px solid #EEEEEE !important; border-radius:10px; font: 1.190em/1.2 Cambria,Georgia,sans-serif;}
.comment-thread li .comment-block:before { position: absolute; display: block; left: -25px; color: #EEEEEE; content: "\25C4"; font-size: 30px;}
.comments .avatar-image-container { width: 60px; height: 60px; max-height: 60px; margin:0px 0px 0 -28px; padding: 0px; border: 6px solid #d5f2d0; border-radius:60px;}
.comments .avatar-image-container img { overflow:hidden; width: 60px; height: 60px; max-width: 60px; border:0 !important; border-radius:25px;}
.comments .comment-thread.inline-thread { background: none;} .comments .continue { border-top: 0px solid transparent;}
.comments .comments-content .datetime { float: right; font-size: 11px;} .comments .comments-content .user a{ font-size: 15px; color: #498EC9;}
.comments .comments-content .datetime a:hover{ color: #777; text-decoration: none;}
.comments .comments-content .comment:first-child { padding-top: 0px;}
.comments .comments-content .comment { margin-bottom: 0px; padding-bottom: 0px;} .comments .continue a { padding: 0px;}
.comments .comments-content .icon.blog-author { background-image: none;}

Now save the Template and visit a page with comments then see the comments style, it's really cool. So this the simple comments box customization code to help you to design the Blogger comments box to looks better.
How to Customize Blogger Comment Box - CSS Code

📚 You May Also Like to Read