Showing posts with label Internet. Show all posts

Monday, July 21, 2025

ऑनलाइन पैसे कमाने के 10 सबसे भरोसेमंद तरीके – 2025 में आज़माएं! || onalain paise kamaane ke 10 sabase bharosemand tareeke – 2025 mein aazamaen!


 लेखक: PARTHASARATHI PANDA (M.Com)

वेबसाइट: FreeComputerTricks.in

आज के डिजिटल युग में घर बैठे ऑनलाइन पैसा कमाना कोई सपना नहीं रहा। इंटरनेट ने हमें ऐसे कई प्लेटफॉर्म्स और अवसर दिए हैं जहाँ से हम ईमानदारी से कमाई कर सकते हैं। लेकिन सवाल यह है कि कौनसे तरीके सच में Genuine और Legal हैं? इस लेख में हम आपको बताएंगे ऑनलाइन पैसे कमाने के 10 सबसे विश्वसनीय और असली तरीके, जो 2025 में भी कारगर हैं।


ऑनलाइन पैसे कमाने के 10 सबसे भरोसेमंद तरीके – 2025 में आज़माएं! || onalain paise kamaane ke 10 sabase bharosemand tareeke – 2025 mein aazamaen!


1. फ्रीलांसिंग (Freelancing)

यदि आपके पास लेखन, डिज़ाइनिंग, वीडियो एडिटिंग, वेबसाइट बनाना, या ट्रांसलेशन जैसे कौशल हैं, तो आप Fiverr, Upwork या Freelancer जैसी वेबसाइट्स पर काम करके अच्छी कमाई कर सकते हैं।

👉 कहाँ से शुरू करें:

⏱️ समय लगने वाला कार्य है, लेकिन एक बार पहचान बन जाए तो नियमित कमाई संभव है।


2. ब्लॉगिंग (Blogging)

अपनी खुद की वेबसाइट बनाकर आप ब्लॉगिंग के ज़रिये गूगल ऐडसेंस, एफिलिएट मार्केटिंग और स्पॉन्सरशिप से अच्छी कमाई कर सकते हैं।

👉 स्टार्टिंग गाइड:

💡 थोड़ा समय और मेहनत लगता है लेकिन एक बार रैंकिंग आ जाए, तो Passive Income का सबसे अच्छा जरिया है।


ऑनलाइन पैसे कमाने के 10 सबसे भरोसेमंद तरीके – 2025 में आज़माएं! || onalain paise kamaane ke 10 sabase bharosemand tareeke – 2025 mein aazamaen!


3. यूट्यूब चैनल शुरू करें (Start a YouTube Channel)

अगर आप वीडियो बनाना पसंद करते हैं, तो यूट्यूब पर चैनल बनाकर वीडियो डालें और व्यूज के जरिए कमाई करें।

👉 कमाई के तरीके:

  • YouTube Monetization

  • Sponsorship

  • Affiliate Marketing

🎥 आपको 1000 सब्सक्राइबर्स और 4000 घंटे वॉच टाइम की जरूरत होगी मॉनेटाइजेशन के लिए।


4. एफिलिएट मार्केटिंग (Affiliate Marketing)

Amazon, Flipkart, Meesho जैसे प्लेटफॉर्म्स के Affiliate Programs से जुड़कर आप उनके प्रोडक्ट्स को प्रमोट कर सकते हैं और हर सेल पर कमीशन कमा सकते हैं।


👉 Join करें:

📈 ब्लॉग, यूट्यूब या सोशल मीडिया से बड़ी कमाई संभव है।


5. ऑनलाइन ट्यूटर बनें (Online Teaching / Tutoring)

अगर आप किसी विषय में माहिर हैं, तो आप ऑनलाइन स्टूडेंट्स को पढ़ाकर पैसे कमा सकते हैं। यह तरीका विद्यार्थियों और शिक्षकों दोनों के लिए बढ़िया है।

👉 प्लेटफॉर्म्स:

  • Vedantu

  • Byju's

  • Unacademy

  • Chegg India

📚 कम समय में अच्छा पैसा और सम्मान दोनों मिलता है।


6. कंटेंट राइटिंग (Content Writing)

अगर आपकी हिंदी या इंग्लिश में पकड़ अच्छी है, तो आप विभिन्न वेबसाइट्स, ब्लॉग्स और डिजिटल मार्केटिंग एजेंसियों के लिए आर्टिकल्स लिखकर कमाई कर सकते हैं।

👉 प्लेटफॉर्म्स:

  • iWriter

  • Textbroker

  • Freelancer

🖋️ हर आर्टिकल पर ₹300 से ₹3000 तक कमाया जा सकता है।


ऑनलाइन पैसे कमाने के 10 सबसे भरोसेमंद तरीके – 2025 में आज़माएं! || onalain paise kamaane ke 10 sabase bharosemand tareeke – 2025 mein aazamaen!


7. डिजिटल प्रोडक्ट्स बेचें (Sell Digital Products)

Ebook, प्रीसेट्स, कोर्सेस, सॉफ्टवेयर, या डिज़ाइन टेम्प्लेट्स जैसी चीज़ें बनाकर आप Gumroad या Etsy पर बेच सकते हैं।


👉 शुरुआत करें:

📦 एक बार बना लो, फिर बार-बार बिक्री कर सकते हो।


8. ऑनलाइन सर्वे और टास्क्स (Paid Surveys & Microtasks)

कुछ कंपनियां आपके विचार जानने के लिए सर्वे करवाती हैं और बदले में पैसे देती हैं।


👉 प्लेटफॉर्म्स:

  • ySense

  • Swagbucks

  • TimeBucks

💰 छोटी-छोटी कमाई होती है, लेकिन पार्ट-टाइम के लिए बढ़िया विकल्प है।


9. स्टॉक फोटोग्राफी (Sell Photos & Videos Online)

अगर आप फोटोग्राफी या वीडियोग्राफी में माहिर हैं, तो आप अपने क्लिक किए हुए फोटो और वीडियो Shutterstock, Adobe Stock, या iStock पर बेच सकते हैं।


📷 बेस्ट साइट्स:

  • Shutterstock

  • Pexels (donation आधारित)

  • Adobe Stock

📸 Creative लोगों के लिए Passive Income का बढ़िया ज़रिया।


ऑनलाइन पैसे कमाने के 10 सबसे भरोसेमंद तरीके – 2025 में आज़माएं! || onalain paise kamaane ke 10 sabase bharosemand tareeke – 2025 mein aazamaen!


10. ड्रॉपशिपिंग और ई-कॉमर्स (Dropshipping & E-commerce)

आप बिना इन्वेंट्री के खुद की ऑनलाइन दुकान खोल सकते हैं। ऑर्डर आने पर प्रोडक्ट थर्ड पार्टी वेयरहाउस से कस्टमर तक सीधा डिलीवर होता है।


👉 प्लेटफॉर्म्स:

  • Shopify

  • WooCommerce

  • Meesho App

🛍️ 2025 में तेजी से बढ़ता बिज़नेस मॉडल है।


निष्कर्ष (Conclusion)

ऑनलाइन पैसे कमाने के हजारों तरीके हैं, लेकिन आपको खुद को पहचानना होगा कि कौनसा तरीका आपके लिए सही है। शुरुआत में मेहनत ज़रूर लगेगी, लेकिन एक बार ट्रैक पर आ जाने के बाद आप घर बैठे अच्छी कमाई कर सकते हैं।


🚀 ध्यान रखें:

  • Scams से बचें

  • Genuine प्लेटफॉर्म ही चुनें

  • लगातार सीखते रहें और धैर्य रखें


✍ लेखक: PARTHASARATHI PANDA (M.Com)

🌐 वेबसाइट: https://www.freecomputertricks.in

📺 यूट्यूब: @FreeComputerTricks


✅ Top 10 SEO-Friendly Blog Titles (in Hindi + English):

  1. 💸 2025 में ऑनलाइन पैसे कमाने के 10 सबसे असली और भरोसेमंद तरीके
    Top 10 Genuine Ways to Earn Money Online in 2025

  2. 💼 घर बैठे पैसे कमाने के 10 आसान तरीके – बिना निवेश के कमाई करें
    10 Easy Ways to Make Money Online from Home – No Investment Needed

  3. 📱 मोबाइल से ऑनलाइन पैसे कैसे कमाएं? जानिए टॉप 10 तरीके
    How to Earn Money Online Using Mobile? Top 10 Proven Methods

  4. 🚀 2025 में Passive Income के 10 बेस्ट ऑनलाइन सोर्सेस
    Top 10 Best Passive Income Sources Online in 2025

  5. 🧑‍💻 Students और Beginners के लिए ऑनलाइन कमाई के 10 Safe तरीके
    Top 10 Safe Online Earning Methods for Students and Beginners

  6. 🏠 Part-Time Online Jobs: घर बैठे टॉप 10 भरोसेमंद कमाई के तरीके
    Top 10 Trusted Part-Time Online Jobs from Home

  7. 🤑 क्या आप भी ऑनलाइन पैसा कमाना चाहते हैं? जानिए 10 Best Options
    Want to Earn Money Online? Explore These Top 10 Best Options

  8. 🎯 फ्रीलांसर, यूट्यूबर या ब्लॉगर – कौनसा ऑनलाइन तरीका आपके लिए सही है?
    Freelancer, YouTuber or Blogger – Which Online Income Method is Best for You?

  9. 🔥 ऑनलाइन पैसा कमाने के टॉप 10 ट्रेंडिंग और लीगल तरीके (2025 गाइड)
    Top 10 Trending & Legal Ways to Earn Money Online – 2025 Guide

  10. 🌐 डिजिटल इंडिया में ऑनलाइन कमाई के 10 पक्के रास्ते – आज़माएं और कमाएं
    10 Sure-Shot Ways to Earn Online in Digital India – Try & Earn


ऑनलाइन पैसे कमाने के 10 सबसे भरोसेमंद तरीके – 2025 में आज़माएं! || onalain paise kamaane ke 10 sabase bharosemand tareeke – 2025 mein aazamaen!


👤 लेखक परिचय: PARTHASARATHI PANDA (M.Com)


मैं PARTHASARATHI PANDA, भारत से एक समर्पित ब्लॉगर, वेबसाइट डिज़ाइनर, यूट्यूब कंटेंट क्रिएटर और सोशल मीडिया इन्फ्लुएंसर हूँ। मैंने वाणिज्य (Commerce) में स्नातकोत्तर (M.Com) किया है और मेरा उद्देश्य है – लोगों को डिजिटल और व्यक्तिगत रूप से आगे बढ़ने में मदद करना।


मैं अंग्रेजी, हिंदी और ओड़िया भाषाओं में लिखता और बोलता हूँ ताकि हर क्षेत्र और भाषा के लोग लाभ उठा सकें। मेरी सामग्री छात्रों, किसानों, डिजिटल उपयोगकर्ताओं और आम जनता को निःशुल्क ज्ञान और तकनीकी सहायता देने पर केंद्रित होती है।


🌐 मेरे ब्लॉग्स और वेबसाइट्स:

  • 📘 FREE COMPUTER TRICKS:
    https://www.freecomputertricks.in/
    (कंप्यूटर, ब्लॉगिंग, यूट्यूब और डिजिटल कमाई से जुड़ी जानकारियाँ)

  • 🌱 HELP ODIA & PSP STUDIO ODIA:
    https://www.helpodia.in/
    (ओड़िया में शिक्षा, खेती, डिजिटल सेवाएं और समाजिक जागरूकता)


📺 मेरे यूट्यूब चैनल्स:


📣 सोशल मीडिया संपर्क:


✍️ मिशन:

"हर व्यक्ति को डिजिटल रूप से सशक्त बनाना – चाहे वह छात्र हो या किसान!"


Friday, November 20, 2020

How to check Aadhaar status and Download using mAadhaar application?


Hi friends, welcome all, in this post I will describe the complete step by step guide to download Aadhaar or E-Aadhaar on your Mobile phone using mAadhaar Application, this procedure is same for Android and iOS (Apple Device), so if you are wondering that how you can download your or yours family member's Aadhaar card then here the complete process, in this topic we cover " How to check Aadhaar Status on Mobile" "How to download Aadhaar on Mobile" "E-Aadhaar Password" etc. and also you can watch the complete video tutorial on our YouTube channel link given below.

How to  check Aadhaar status and Download using mAadhaar application? www.freecomputertricks.in

Aadhaar Card Mobile mein Kaise Download Kare? Video Tutorial Below!

https://youtu.be/oeR6CGWT5N8


Aadhaar Status check on Mobile (mAadhaar Application)

  1. Open mAadhaar app
  2. Click on "Check Request Status"
  3. Now click on "Aadhaar Status"
  4. Then enter the "Enrolment ID" "Date" and "Time"
  5. Then enter the security captcha
  6. Then Click on "Check Status"

Download E-Aadhaar on Mobile?

  1. Open mAadhaar application
  2. Select "Download Aadhaar"
  3. Then select "Regular Aadhaar"
  4. Then you can select Aadhaar Number or Virtual ID or Enrolment ID (What you Have)
  5. For example select I have Aadhaar number
  6. Then enter Aadhaar Number
  7. Enter the security captcha
  8. Click on "Request OTP"
  9. OTP will be sent to the registered Mobile number
  10. Enter the OTP and verify then download the E-Aadhaar


E-Aadhaar Password?

First 4 Letter of your Name in Capital Letter and the Year of Birth


Example:

If your name "Ramakant" and date of birth is 05-05-1987

Then the E-Aadhaar password will be RAMA1987


Tags: Aadhaar download, eaadhaar.uidai.gov.in 2020 download, download masked aadhaar card, download aadhar card, how to download masked aadhar without mobile number, masked aadhaar password, masked aadhaar meaning, is masked aadhaar valid, aadhar card download by name and date of birth, e-aadhar download, e aadhar card download app, aadhar card link with mobile number, uidai aadhar update, uidai.gov.in up, download aadhaar odisha.

Saturday, February 29, 2020

How to Enable Wi-Fi Calling on Android Smartphone?


Hi friends, in this tutorial I will describe how you can enable Wi-Fi calling on any Android smartphone, which has this feature to make free calls through Wi-Fi hotspot/Broadband with Wi-Fi router. So please go through the topic to under stand how to enable Wi-Fi calling on any Android smartphone.

As you all know, Airtel and Reliance Jio launched their free Wi-Fi calling facility, so if you are either Airtel 4G user or Reliance Jio 4G user then you can enjoy the free wifi calling to any network, using any Internet connection. To use free wifi calling facility on your Android smartphone you need to enable the wifi calling setting, so here is the complete tutorial how you can enable and make free wifi call on your Android smartphone, step by step procedure.


Enable WiFi calling on Android phone
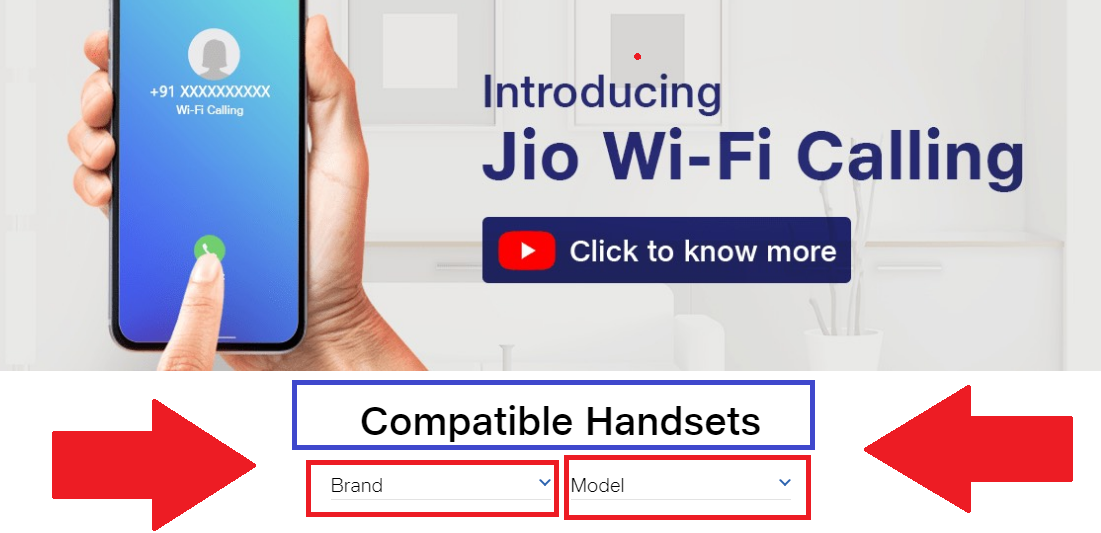
COMPATIBLE HANDSETS:

If you need to know that whether your phone supports this wifi calling feature, then here the way you can easily check the model you are using to know the device is supported or not. To check the compatibility visit the below page and select your handset brand then check the model numbers, if its there then you can use free wifi calling on your Android smartphone in India.


Wi-Fi Calling Compatible Handsets:

https://www.jio.com/en-in/jio-wifi-calling

How to Enable Wi-Fi Calling on Android Smartphone? WiFi calling compatible handsets check here

How to Enable Wi-Fi Calling on Android Smartphone?

Procedure 1:


  • Drag from the top of the screen.
  • Enable Wi-Fi Calling

Android phone Enable WiFi Calling Procedure 4

Procedure 2:


  • Go to Settings.
  • Click on Connections.
  • Click on Wi-Fi Calling
  • Then Switch on For SIM 1 SIM 2


Procedure 3:

  • Go to Settings
  • Click on Phone
  • Click on Wi-Fi Calling
  • Then Enable the switch

Procedure 4:


  • Open Phone Dial Pad
  • Click on More
  • Click on Settings
  • Switch ON Wi-Fi Calling


Android phone Enable WiFi Calling Procedure 4

In this way you can enable WiFi calling on your Android smartphone, so enable Wi-Fi calling and enjoy free wifi calling with HD voice quality on your smartphone. Thank you.

Tuesday, July 9, 2019

How to Avoid Yellow Dollar Sign On YouTube Videos ?


Hi friends, today I will show how you can avoid yellow Dollar sign on YouTube videos? Yes if you are a Youtuber and your monetization revenue became low due to yellow dollar sign near your video instead of Green dollar sign, then please read this topic or tutorial to know the perfect procedure to avoid or prevent yellow dollar sign on your YouTube videos. So friends let's begin.
My YouTube Video Has Yellow Dollar Sign How To Solve ? - Complete Solution Here

If you see yellow dollar sign or mark near your YouTube video, then your revenue became low or limited, so if you regularly upload videos and maintain the YouTube channel perfectly but still the revenue is low then this may be due to yellow dollar mark, so let's find what is the different between Yellow and Green Dollar sign on YouTube Monetization.

Different Between Green and Yellow Dollar Sign - YouTube

If your channel is monetized and you see a Green Dollar sign near your video on YouTube studio that means the content in the video is advertiser friendly and the video will get ads from all the advertising source from YouTube and which allows you to earn more revenue from your content.

But if the Dollar sign is Yellow, that means after upload video to YouTube the monetization icon or which called the dollar sign became Yellow color then your video is not advertiser friendly and the ads will be limited or no ads. And you will get the notification "This video is running limited or no ads, due to content identified as not suitable for most advertisers.

This video is running limited or no ads, due to content identified as not suitable for most advertisers.

How to Avoid Yellow Dollar Sign On YouTube ?

1) Inappropriate Language

You should not use bad language in your video, that means there must not be bad language in the video title, thumbnail image, video description and audio in the video.

2) Violence

Your video should not contain hurting yourself or others and also hurting animals, do not use accident photos in your video etc.

3) Adult Content

The video you upload to YouTube it must not have Adult content, that means your video must not include sexual content in the form of graphical, text or audio.

Yellow Dollar Sign on YouTube Studio Videos


4) Harmful or Dangerous Acts

The video should not have the actions or pranks that may be dangerous or harmful to you or others. for example hurting somebody, attack with knife etc.

5) Hateful Content

You video should not have the content that hating others, such as do not talk about other's Nationality, Religion, Age etc.

6) Incendiary and Demeaning

If somebody insulting an individual or group and video contain that, then it may not be suitable for advertising.

7) Recreational Drugs and Drug Related Content

The video should not be promote drugs or drug related items and this is not limit to sales and use of drug items.

8) Tobacco Related Content

The video should not promotes Tobacco related products, such as Cigarettes, Cigars and Chewing Tobacco etc.

9) Firearms Related Content

You should not make video on sale, assembly, missus of firearms, such as gun and ammunition etc.

10) Controversial Issues  and Sensitive Events

The should not feature the sensitive topics and events, such as War, Terrorism, Sexual Abuse etc.

11) Adult themes in Family Content

That means you make video which is suitable for general audience but contains Sex, Violence, Vulgarity etc. This should not be in your Video.

In this way you can solve no ads or limited ads on your YouTube videos. So friends, these are the important point to avoid Yellow Dollar sing in your YouTube channel videos. If follow this steps before posting a video then you must success in YouTube as a youtuber. Thank You....

For More Details You Can Visit https://support.google.com/youtube/answer/6162278

Sunday, July 7, 2019

MRT Key New Update Version 3.21 Download Here (4th July, 2019*)


Hi friends, welcome to Free Computer Tricks website, if you have MRT dongle then here the MRT Key New Update Version 3.21 Download and install to get latest features to flash phones.

Download MRT Key Update v3.21 - Free Download Direct Link

MRT KEY Ver 3.21 New update (vivo MTK 6765 cpu and huawei 8A 9E add) - 4/7/2019

Download Links

Download MRT KEY V3.21 Google Drive Link
Download MRT Key v3.21 MShared Link

Download MRT Key v3.21 Android File Host Link

Ultimate Multi Tool Box (UMT) - UMT Pro - QcFire v4.3 Download Setup


UMT latest setup download here, yes friends if you have UMT dongle then here is the download link of UMT Pro QcFire v4.3. Download and install UMT latest setup to get for features out of the dongle or box.

UMTv2 / UMT Pro - QcFire v4.3 - Nokia, LG, Xiaomi and more 15th June, 2019

Ultimate Multi Tool Box (UMT) - UMT Pro - QcFire v4.3 Download Setup - Free Computer Tricks

Supported Functions

  • Read / Write Firmware
  • IMEI Repair in FTM/Diag + Flash Mode
  • Backup / Restore QCN 
  • Backup / Reset / Restore Security (EFS)
  • Reset FRP (Google Factory Reset Protection)
  • Format UserData
  • Read Pattern Lock (Android < 6.0, Un-Encrypted Devices Only)
  • Reset Locks (PIN, Password, Pattern w/o Data Loss, Un-Encrypted Devices Only)
  • Enable Diag (Need OEM Unlock, May not work on BL Locked Devices)
  • Reboot to EDL from Fastboot
  • Reset Mi Account for Xiaomi Devices
  • Disable Mi Account for Xiaomi Devices
  • Factory Reset (sideload Mode) for Xiaomi Devices
  • Disable / Restore Locks for Encrypted Userdata
  • Motorola Boot Repair
  • Xiaomi EDL Locked Device Service 
  • Bootloader Unlock in EDL Mode for some Xiaomi Devices
  • One Click Root for Qualcomm Generic Devices
  • Forensic Functions (Read Contacts / Messages in EDL Mode)
  • Save Read Contacts to vCard Format
  • One Click Lock Reset for Vivo Phones without USERDATA LOSS (Encrypted Userdata)
  • Factory Method for Format FS

Note : Some features are device/brand specific, may not work on all devices.

What's New

Karbonn
- Aura 1


LG
- G4 (H811)


Mobicel
- Icon


Nokia
- TA-1000
- TA-1007
- TA-1024
- TA-1027
- TA-1035
- TA-1039
- TA-1044
- TA-1053
- TA-1083
- TA-1103
- TA-1116


Sony
- Xperia R1 Plus


Xiaomi
- Redmi Go
- Redmi Note 7
- MI 8 Lite
 

DOWNLOAD UMT PRO QCFIRE V4.3

UMTv2_UMTPro_QcFire_v4.3_Setup.exe" (134MB) DOWNLOAD HERE

Friday, July 5, 2019

How to Add and Remove Numbers From Blacklist - Vivo Smartphones


Hello and welcome to free computer tricks, today we will learn how to add and remove phone number from blacklist on your VIVO phone. So friends please go through the complete topic to know the procedure to manage the blacklist setting of your Android smartphone and this tutorial is for VIVO smartphones.

How to Add and Remove Numbers From Blacklist - Vivo Smartphones

If once the number added to blacklist the caller could not call you, if he/she called they got busy tone instead of ring. so this is one of the best settings if somebody disturbing you, but some times our relative phone also been added due to miss-operating, so in that case if they called you your phone will not ring and they can only here the busy tone. After removing the phone number the person will allow to call you, so here I will tell how you can add someone's number to blacklist and also remove someone's number to restore the incoming call.

How to Add and Remove Numbers From Blacklist ?

  • Go to phone Settings
  • Then go to Security and Privacy
  • Then click on Block Unwanted
  • Then click on Block Black Listed Numbers
  • Now click Add to Add a number to the blacklist
  • To remove any number from blacklist click on Edit then select the number and click on Delete.

Finally in this way you can add a number to blacklist and also remove a number from blacklist. so friends if you need to manage the blacklist this topic will definitely help you and you can also watch video, to watch video tutorial please visit here.

Friday, June 28, 2019

How to Download All Media Files From a Website - Download Hidden and High Resolution Images Used in Websites


Hi friends today I will show the procedure to download Media files from a website, yes friends you can download any images from a website and also get high resolution of the image. With this process you can download Images, Icons and any other media content used in the website. So for this you need to use Firefox browser and follow this tutorial post, you can also watch the video tutorial on the YouTube channel.

Download all images used in a website

Visit the website you need to download images and right click on it and go to VIEW PAGE INFO OR PAGE INFO, if the right click has blocked in the particular website then press ALT key and then TOOLS menu and click on PAGE INFO, after that go to Media tab and use the down arrow key to find all the images used in that website, if you need to save the image, then select and click on SAVE AS and save the image in your Computer.

Download media files used in a website - image, icon etc. using Firefox


How To Download Hidden Images From A Website?

  • Browse the website using Firefox Browser.
  • Right click and click on View Page Info.
  • or Press Alt key then go to Tools Menu and Select Page Info.
  • Now click on Media Tab and choose the image you want to download.
  • Save the image to Computer.

In this way you can find all the images used in a website and also get high resolution images to download. So friends if you want to watch the video tutorial on this topic, please visit Our YouTube channel.

Monday, March 18, 2019

How to Know Your House Number (ଘର ନମ୍ବର) Online in Odisha


Hi friends, today we will learn how to know your house number (ଘର ନମ୍ବର) online in Odisha? If you do not have the house number plate on your home wall and need to know how to get the house number online, then here is the right place to get the house number online with easy procedure and here is the example of Odisha state. So if you are belongs to Odisha and need know the House Number then please follow the below procedure to get the house number or home number or census home number for Odisha State.
How to Know Your House Number (ଘର ନମ୍ବର) Online in Odisha (Odia)

House Number Odisha, India to know the house number you need to have the Voter ID card number and visit the below website and then follow the below procedure to get the house number instant on your screen. The website is completely safe as the website is Chief Electoral Officer, Odisha official website. What you need to do is, just enter the Voter ID Number and then get the house number of yours.
How to Know Your House Number (ଘର ନମ୍ବର) Online in Odisha ଘର ନମ୍ବର ଜାଣନ୍ତୁ


Chief Electoral Officer, ODISHA

Visit the above website and then click on SEARCH YOUR NAME IN THE VOTER LIST, then select SEARCH BY IDENTITY CARD then type the captcha letter and finally click on SEARCH. Now you will get the house number of your home along with other electoral information.

House Numbering:-

House numbering is a system of giving an unique number to each building or house in a street or area. for more information you can visit Wikipedia page by visiting the link https://en.wikipedia.org/wiki/House_numbering.


How to check or know your House Number?


  • Visit - http://www.ceoorissa.nic.in/main.html
  • Then click on "Search your name in the voter list"
  • Now select "Search by identity card"
  • Now enter the Voter Id Number
  • Then enter the captcha letters and then press Search.
  • That's all now you will get the Hose number of your building or home.

ଓଡ଼ିଆରେ

  • ଏହି web ସାଇଟ କୁ ଜାଆନ୍ତୁ http://www.ceoorissa.nic.in/main.html
  • ତା ପରେ "Search your name in the voter list" ଉପରେ କ୍ଲିକ କରନ୍ତୁ.
  • ତାପରେ "Search by identity card" ସିଲେକ୍ଟ କରନ୍ତୁ.
  • ତାପରେ ଭୋଟର ID ନମ୍ବର ଏନ୍ଟର କରନ୍ତୁ.
  • ତାପରେ ସର୍ଚ କରନ୍ତୁ.
How to get House Number Without Voter ID?

  • Visit http://www.ceoorissa.nic.in/FindYourName.html
  • Then choose your Assembly constituency or District Name 
  • Then enter Elector's details means for example enter your details such as Your first Name and Last name with Relation's first name and last name.
  • Then enter the captcha letter and click on search.
How to get House Number Without Voter ID
Watch the Video Tutorial Here

https://www.youtube.com/watch?v=8SDU_i48FFc

You can also visit the http://www.ceoorissa.nic.in/FindYourName.html page and enter the voter Id number to get the Electoral details with your house number.

Tuesday, May 15, 2018

How To Add Related Post Widget For Blogger - Related Post CSS, JavaScript and HTML Codes


How to Add a Customized related post widget on your Blog? Stylish Related Post Widget HTML and CSS code, How to Edit Related Post Widget or You also called it "Your Might Also Like" Widget on Blogger?
How to add a related post widget on your blog and how you can customize it to looks better? This is very informative and best tutorial about adding related post widget below blog post, which can be understand by all the blogger whether they are expert or fresher in blogging. To add a related post widget you need to edit the HTML code of the Blogger template and add the CSS, JavaScript and HTML codding in it and here we are simplified the procedure and describe it step by step which can easily understand. Google Blog or Blogger.com has a good platform to start your blog and it's easy to customize the HTML code and you can also upload your personal or third party Blogger Template to make your blog looks better. Blogger is free for everyone so start free blogging today to share your knowledge and passion with your blog online in the Internet world www. or http or https.

What is Related Post Widget?
The term "Related Post" defines it, that means it is post/article which related to the current post/article you are reading on the blog or website. The related post widget is used on website or blog to engage visitors by showing the related articles of the post/article they are reading. For example if a visitor is reading about "Mobile Flashing" topic then the related post starts the work to show any other article of your blog which is related to "Mobile Flashing" Labels and shows it at the end of the post, and you can also set the number of post should appear in the related post widget.

Stylish Related Post Widget For Your Blog - Related Post CSS, HTML and JavaScript Code
Why Use Related Post on Your Blog?

As I said before the "Related Post" widget used for user engagement by showing related articles to the users that he or she is interested to read this. If you design the related post widget or use customized widget then this will be increase the user engagement with improved look and feel. So why are you waiting just follow the below steps and use CSS and HTML code on your blog and make your blog unique.


Steps:
1) Log in to Blogger and Choose the Blog to Edit. (Backup Blog Template before edit)
2) Then go to THEME and Edit HTML, then find </head> and paste the below CSS and JavaScrip code just above it.
Paste Related Post CSS Code Before </head> Tag Then follow the next Step
<!--Related Posts with thumbnails Scripts Start-->
<b:if cond='data:blog.pageType == &quot;item&quot;'>
<style type='text/css'>
#related-posts{float:left;width:100%;}
#related-posts a{background:#08008c; -webkit-border-radius: 5px;-moz-border-radius: 5px; border-radius: 5px;}
#related-posts h4{margin-top: 5px;background: #fe0000;font:18px Arial;padding:5px;color: #ffffff; text-transform:uppercase; }
#related-posts .related_img {margin:5px; border: solid white 2px;object-fit: cover;width:137px;height:100px;-webkit-border-radius: 5px;-moz-border-radius: 5px; border-radius: 5px;}
#related-title {color: #ffffff;text-align:center;text-transform:none;padding: 0px 5px 10px;font:16px Arial;width:137px; height: 150px;}
</style>
<script type='text/javascript'>
//<![CDATA[
var relatedTitles=new Array();var relatedTitlesNum=0;var relatedUrls=new Array();var thumburl=new Array();function related_results_labels_thumbs(json){for(var i=0;i<json.feed.entry.length;i++){var entry=json.feed.entry[i];relatedTitles[relatedTitlesNum]=entry.title.$t;try{thumburl[relatedTitlesNum]=entry.gform_foot.url}catch(error){s=entry.content.$t;a=s.indexOf("<img");b=s.indexOf("src=\"",a);c=s.indexOf("\"",b+5);d=s.substr(b+5,c-b-5);if((a!=-1)&&(b!=-1)&&(c!=-1)&&(d!="")){thumburl[relatedTitlesNum]=d}else thumburl[relatedTitlesNum]='https://blogger.googleusercontent.com/img/b/R29vZ2xl/AVvXsEhBC8j1QTnXGb-k6AQ-a1G1vvRQkafRnZ1bhqy1HQ8SsBc2TsYM9tzrgD4ywFJ6xH2pmn3pXsPWp99vg5hPvhGYmLUan5jXNBWiKu3yTOYn_YU353aYo9HJVG9lMFJmrJtdXFPgzvdzoQAe/s1600/no-thumbnail.png'}if(relatedTitles[relatedTitlesNum].length>120)relatedTitles[relatedTitlesNum]=relatedTitles[relatedTitlesNum].substring(0,35)+"...";for(var k=0;k<entry.link.length;k++){if(entry.link[k].rel=='alternate'){relatedUrls[relatedTitlesNum]=entry.link[k].href;relatedTitlesNum++}}}}function removeRelatedDuplicates_thumbs(){var tmp=new Array(0);var tmp2=new Array(0);var tmp3=new Array(0);for(var i=0;i<relatedUrls.length;i++){if(!contains_thumbs(tmp,relatedUrls[i])){tmp.length+=1;tmp[tmp.length-1]=relatedUrls[i];tmp2.length+=1;tmp3.length+=1;tmp2[tmp2.length-1]=relatedTitles[i];tmp3[tmp3.length-1]=thumburl[i]}}relatedTitles=tmp2;relatedUrls=tmp;thumburl=tmp3}function contains_thumbs(a,e){for(var j=0;j<a.length;j++)if(a[j]==e)return true;return false}function printRelatedLabels_thumbs(){for(var i=0;i<relatedUrls.length;i++){if((relatedUrls[i]==currentposturl)||(!(relatedTitles[i]))){relatedUrls.splice(i,1);relatedTitles.splice(i,1);thumburl.splice(i,1);i--}}var r=Math.floor((relatedTitles.length-1)*Math.random());var i=0;if(relatedTitles.length>0)document.write('<h4>'+relatedpoststitle+'</h4>');document.write('<div style="clear: both;"/>');while(i<relatedTitles.length&&i<20&&i<maxresults){document.write('<a style="text-decoration:none;margin:0 4px 10px 0;float:left;');if(i!=0)document.write('"');else document.write('"');document.write(' href="'+relatedUrls[r]+'"><img class="related_img" src="'+thumburl[r]+'"/><br/><div id="related-title">'+relatedTitles[r]+'</div></a>');if(r<relatedTitles.length-1){r++}else{r=0}i++}document.write('</div>');relatedUrls.splice(0,relatedUrls.length);thumburl.splice(0,thumburl.length);relatedTitles.splice(0,relatedTitles.length)}
//]]>
</script></b:if>
<!--Related Posts with thumbnails Scripts End-->

3) Now find the place where you want show the related post widget on your blog or website, in My case I used it after Author Profile. So find <data:post.authorAboutMe/> and paste the below HTML code just after it.
Related Post Widget HTML Code Paste After Author Profile
<!-- Related Posts with Thumbnails HTML Code Start-->
<b:if cond='data:blog.pageType == &quot;item&quot;'>
<div id='related-posts'>
<b:loop values='data:post.labels' var='label'>
<b:if cond='data:label.isLast != &quot;true&quot;'>
</b:if>
<script expr:src='&quot;/feeds/posts/default/-/&quot; + data:label.name + &quot;?alt=json-in-script&amp;callback=related_results_labels_thumbs&amp;max-results=5&quot;' type='text/javascript'/></b:loop>
<script type='text/javascript'>
var currentposturl=&quot;<data:post.url/>&quot;;
var maxresults=5;
var relatedpoststitle=&quot;<b>You Might Also Like:</b>&quot;;
removeRelatedDuplicates_thumbs();
printRelatedLabels_thumbs();
</script>
</div>
</b:if>
<!-- Related Posts with Thumbnails HTML Code End-->

Now save the Template and visit your blog post to see the stylish Related Post Widget that implemented on your Blog or Website. So in this way you can add a Related post widget on your blog and here you can also find the Related post widget CSS, JavaScript and HTML code for your Bog. Thanks for visit this blog and please keep visiting this Knowledge Sharing Website www.FreeComputerTricks.in.

Monday, May 7, 2018

How to Solve "Your Connection To This Site Is Not Fully Secure" On Your Blog and Websites


You may notice when your site, blog or some other website you will get this error "Your connection to this site is not fully secure" on Google Chrome and if you are using FireFox you will get "Connection is Not Secure" (Parts of this page are not secure such as images). If you have a blog and website and face this type secure connection error over HTTPS and want to solve this, then this is the right place to solve secure connection error on your website or blog. Here we will show you the step by step way to fix this error on your Internet site.

As you know Google has implemented the HTTPS for it's Blogger users, that means Blogger can upgrade the blog from HTTP to HTTPS and it's free. If you are using custom domain on your blog, there here is good news for you, that Google also no providing HTTPS fro custom domain users and now the custom domain users can also use HTTPS instead of HTTP on their domain redirecting to the blog. But you may notice after HTTPS settings get done, you will see the secure connection error saying that "Your connection to this site is not fully secure" and Attackers might be able to see the images you are looking at on this site and trick you by modifying them. What does this error means although you have successfully apply the HTTPS instead of HTTP, it means some your website content or link is not going through the secure connection and in this article I will tell you how to solve the secure connection issue on your blog or website.
How to Solve Your Connection To This Site Is Not Fully Secure -  Blogger and Websites
How to Solve Secure Connection Error on Your Blog or Custom Redirect Domain?
  • Log in to your Blogger account and select the blog.
  • Now click on Theme and backup it first.
  • Now click on Edit HTML and find http:// URLs for JavaScript and Images and replace with https://.
  • That means search for all http:// and if you find any HTTP URLs such as link to Image, Video, Audio, Script or any other Link, then change these from http:// to https://.
  • Verify all the URLs is available over HTTPS, just put the https:// URLs into a new window in your browser if everything is working fine then you can replace the http:// to https:// inside the HTML Editor of the Theme.
  • Then click Save Theme.
  • Now you can check your blog to verify that the error is gone.

If The Secure Connection Problem Persist.
Check if you are using any third party widgets.
Remove any insecure Advertisers on your blog.

Note: In my case I have removed the third party "Related Post" Widget and put a new one and now the website works fine over HTTPS connection.

Conclusion:
So in this way you can solve the secure connection problem to your Blog by changing all links from http:// to https:// inside the HTML code in the Blogger theme. For more information on this error you can visit the Blogger Help forum and for all other Blogger issue you can also visit Google Blogger Help Forum. If you have a website then you can also solve this issue by following the same process above.

📚 You May Also Like to Read