Showing posts with label Computer Tricks. Show all posts

Sunday, August 31, 2025

What ChatGPT Can Do: Complete Guide for Beginners and Experts


What ChatGPT Can Do: Complete Guide

Artificial Intelligence (AI) is transforming the way we interact with computers, and ChatGPT is at the forefront of this revolution. Developed by OpenAI, ChatGPT is a cutting-edge language model designed to understand and generate human-like text. But what exactly can ChatGPT do? Let’s explore everything in detail.

1. Understanding ChatGPT

ChatGPT is an AI-powered chatbot that uses natural language processing (NLP) to converse with humans. Unlike traditional search engines, ChatGPT can understand context, answer questions, provide explanations, and even generate creative content.

  • Conversational AI: Chat naturally like talking to a human.
  • Context Awareness: Remembers previous messages in a conversation.
  • Multi-purpose: From coding to writing, ChatGPT can assist in many tasks.

What ChatGPT Can Do Complete Guide for Beginners and Experts

2. Writing and Content Creation

  • Write articles, blog posts, and essays
  • Generate social media captions and marketing content
  • Draft emails, reports, and letters
  • Create poems, stories, and even jokes

For bloggers, ChatGPT can save hours of writing time by generating high-quality drafts quickly.

3. Learning and Education

  • Explain complex topics in simple terms
  • Solve math problems and provide step-by-step solutions
  • Teach programming languages like Python, Java, or C++
  • Answer questions on history, science, or general knowledge

It’s like having a personal tutor available 24/7.

4. Programming Assistance

  • Generating code snippets for websites, apps, or scripts
  • Explaining algorithms and coding concepts
  • Debugging errors and suggesting fixes
  • Converting code between programming languages

Whether you’re a beginner or expert, ChatGPT can boost productivity significantly.

5. Creative Design and Ideas

  • Business and startup ideas
  • Marketing campaigns
  • Video scripts and storyboards
  • Game or app concepts

It can act as a creative partner, making the ideation process faster and easier.

6. Personal Assistant Tasks

  • Setting reminders or schedules (requires integration)
  • Drafting emails and letters
  • Creating checklists or plans
  • Recommending books, movies, or travel itineraries

This makes it a versatile AI assistant for both work and personal life.

7. Entertainment and Fun

  • Storytelling and roleplay
  • Quizzes and trivia games
  • Fun conversations or jokes
  • Writing scripts for YouTube or TikTok content

It can be a fun companion for anyone curious or bored.

8. Limitations of ChatGPT

  • Can produce incorrect or misleading information
  • Limited understanding of extremely recent events (knowledge cutoff)
  • Cannot access personal or confidential data
  • Lacks true human emotions

It’s important to verify critical information before relying on it.

9. How to Use ChatGPT

  1. Visit platforms like chat.openai.com
  2. Sign up or log in
  3. Start typing your query or instruction
  4. Refine responses by asking follow-up questions

For businesses and developers, ChatGPT can also be integrated via API for apps, websites, and automation tools.

10. Conclusion

ChatGPT is more than just a chatbot. From learning and coding to content creation and entertainment, it is a versatile AI tool that can save time, enhance creativity, and provide knowledge instantly. While it has limitations, understanding its capabilities can unlock immense potential for personal and professional growth.

Friday, June 28, 2019

How to Download All Media Files From a Website - Download Hidden and High Resolution Images Used in Websites


Hi friends today I will show the procedure to download Media files from a website, yes friends you can download any images from a website and also get high resolution of the image. With this process you can download Images, Icons and any other media content used in the website. So for this you need to use Firefox browser and follow this tutorial post, you can also watch the video tutorial on the YouTube channel.

Download all images used in a website

Visit the website you need to download images and right click on it and go to VIEW PAGE INFO OR PAGE INFO, if the right click has blocked in the particular website then press ALT key and then TOOLS menu and click on PAGE INFO, after that go to Media tab and use the down arrow key to find all the images used in that website, if you need to save the image, then select and click on SAVE AS and save the image in your Computer.

Download media files used in a website - image, icon etc. using Firefox


How To Download Hidden Images From A Website?

  • Browse the website using Firefox Browser.
  • Right click and click on View Page Info.
  • or Press Alt key then go to Tools Menu and Select Page Info.
  • Now click on Media Tab and choose the image you want to download.
  • Save the image to Computer.

In this way you can find all the images used in a website and also get high resolution images to download. So friends if you want to watch the video tutorial on this topic, please visit Our YouTube channel.

Friday, September 2, 2016

How Join/Merge Audio and Video Without Quality Loss


Today I download a Video, after download complete I have two files, One is Mp4 Video file and another is M4a audio file, when try to play the video it shows only video without audio. So the problem is how you can join/merge the video and audio file to play the video with audio? To merge this audio and video file you can use any video converter but you may loose the video quality. Now the question is how to join audio and video with the best way without loosing quality.

Convert Video, Merge Audio & Video with ffmpeg
I got some ideas on Internet how to join/merge the video with audio file. But here I share the very brief details abut how you could merge Audio & Video without loosing the quality and in this way you can also convert the video format and change the audio and video format as you need.

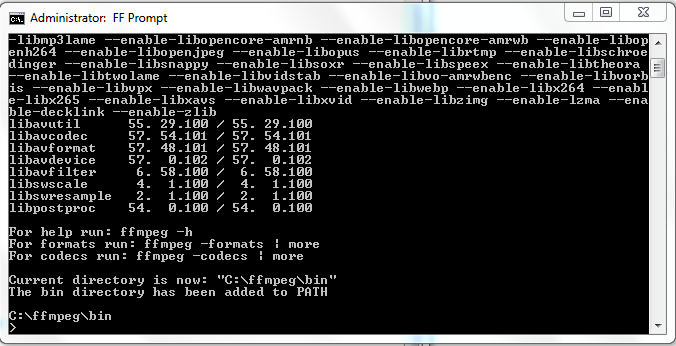
To Merge video and audio you need a software called FFMPEG and can be download from Internet. Here is the example of FFMPEG on Windows Operating System how you can convert, Join or Merge the audio and video. You can get all details on https://ffmpeg.org website but here some basic tutorials on ffmpeg to merge video & audio you need.

Merge Audio & Video With FFMPEG Commands
  • Download ffmpeg for Windows 

Download ffmpeg for windows


  • Now extract the file
  • In the extracted folder you will get a Batch file called ff-prompt
Find ff-prompt batch file on the ffmpeg folder

  • Copy the audio and video file to bin folder
  • Now open ff-prompt Batch file and execute the below commands as per your requirements.

FFMPEG COMMANDS

1) Copying or Merge audio without re-encoding

ffmpeg -i video.mp4 -i audio.m4a -c copy output.mp4

(Replace Video.mp4 with the original file name and  video format and audio format also)

Copying or Merge audio without re-encoding
2) Converting video and Audio
ffmpeg -i input.mp4 output.avi


Sunday, August 30, 2015

IDM CC Issue Fixed For Mozilla FireFox - Internet Download Manager FireFox Add-ons


How to integrate IDM CC to FireFox? the below is the complete process to integrate IDM CC to Firefox. IDM or Internet Download Manager has a CC or Add-ons for browser, which helps you to download the multimedia or document files from the Internet, It show download icon through the icon you can download files using Internet. If the add-on is not working or not compatible with the latest version of Mozilla FireFox, then it will not show the icon and you may not able to download files.


So if you update the Mozilla FireFox to latest one i.e. FireFox 40 or above, then the old IDM cc will no work with it, you have to update the IDM to solve the cc problem in Firefox.

IDM integration Firefox

If you don't want to update IDM then follow the process below to use IDM without updating on Mozilla Firefox and how to make the IDM cc will work fine.


IDM cc Integration with FireFox:

  • If you installed and use IDM don't worry
  • Now download and install latest version of idm
  • Go to C:\Program Files\Internet Download Manager and copy idmmzcc2.xpi to other folder
  • Now use the full version you have and use idm cc .xpi to solve the Add-on problem on Firefox latest version

Sunday, May 10, 2015

Utorrent Upload Speed Is More Than Download Speed - Utorrent Upload Settings


How to reduce the upload speed in Utorrent client? What the upload speed is in Utorrent? As you know when you download something using Utorrent client sometimes the upload speed is more than the download speed. If you normally adjust the upload speed, it will adjust the upload speed. For example if you set 10KBps upload speed on the torrent client, the upload speed will not limit within 10KBps, it will go high upload sometimes it goes to 150KBps to 200KBps depends on the broadband speed you have.


Utorrent Upload Speed is more than 100KBps

So how to overcome this problem? The below is some settings for Utorrent to reduce the upload speed. If you adjust the upload it will help you download something quicker then before.


How to set the upload speed U Torrent
Open uTorrent
Double click on the right button icon 
Set the upload speed as you need
Click on Save & Close


How to reduce Utorrent Upload Speed

That's all now you can see the difference in upload speed.


Utorrent Upload Speed after configuration down 6KBps

Enjoy
www.FreeComputerTricks.in

Search Key Word:
  • Upload speed is high on utorrent
  • u torrent downloading slow
  • Utorrent unable configure the upload speed
  • u torrent upload speed set but it shows 200KBps upload speed
  • How to speed the download speed in torrent
  • Utorrent exceed the upload settings
  • Torrent download I set the upload speed 10KBps but it's uploading more than 200 KBps

Wednesday, July 2, 2014

Some Keyboard Shortcuts To Make Symbols - How to Make Symbol Using Keyboard


How to make symbols using your Computer Keyboard, to use these keyboard shortcuts open any text editor on the Computer and hold the Alt Key then type the Numbers using Numeric Keypad. So here is some important symbol keyboard shortcuts you must know.


Keyboard Shortcuts

Hold the Alt Key Then Type the Numeric


Alt + 1 = ☺ (Smile Face)
Alt + 2 = ☻ (Black Smile Face)
Alt + 3 = ♥ (Heart Symbol)
Alt + 4 = ♦ (Diamonds)
Alt + 5 = ♣ (Club)
Alt + 6 = ♠ (Spade)
Alt + 7 = • (Dot Bullet)
Alt + 13 = ♪ (Eighth Note)
Alt + 14 = ♫ (Beamed Eighth Note)
Alt + 18 = ↕ (Up Down Arrow)
Alt + 24 = ↑ (Up Arrow)
Alt + 25 = ↓ (Down Arrow)
Alt + 26 = → (Right Arrow)
Alt + 27 = ← (Left Arrow)
Alt + 29 = ↔ (Left Right Arrow)
Alt + 36 = $ (Dollar Symbol)


Keyboard Shortcuts To Make Symbols


Alt + 251 = √ (Square Root)
Alt + 0153 = ™ (Trade Mark)
Alt + 0169 = © (Copyright Symbol)
Alt + 0174 = ® (Registered Trademark)
Alt + 0176 = ° (Degree Symbol)
Alt + 0177 = ± (Plus & Minus Sign)
Alt + 0182 = ¶ (Paragraph Mark)
Alt + 0215 = × (Multiplication Sign)
Alt + 0161 = ¡ (Upside Down Exclamation Mark)
Alt + 0191 = ¿ (Upside Down Question Mark)
Alt + 8721 = ∑ (Auto Sum)

Wednesday, April 2, 2014

The Story Behind Memory Card or Flash Drive Space Increase


Memory card or Flash Drive storage increase, is this right or wrong ? So today I will discuss about the matter, whether it's true or false.

How to increase the memory card or any other usb drive capacity, if you search this on the web you will get many results saying that you can increase the memory card capacity to 4GB, 8GB and 16GB etc..


What does it mean by capacity increase of MMC or Pen drive, there are various software available on Internet which can increase the capacity of your memory card, if you have a 2Gb MMC then you can convert it to 4Gb and so on. This information is totally wrong and false positive. 


Memory card capacity increase


Memory stick drive increaser/ Drive Increaser 2 and SDATA Tool are most famous tool to increase the capacity of the MMC. when you use this software it will double the capacity of the MMC and Flash drive etc.


What does these software do?


These software are just a batch file that change the properties of the MMC or Flash drive not the original space/capacity. Suppose you have convert a 2GB to 4GB then it only shows the properties of 4GB but you can only store data to the flash drive or MMC up to 2GB. One more thing you can mark that when you format the MMC it will show the original capacity that means after format the MMC it will show 2GB not 4GB. So just think if these software can increase the storage capacity then when format why it come back to the original capacity.


So we cleared that this software only write some hidden content or value to the MMC or Flash drive to show the properties value like 4GB, 8GB ,16GB etc. and this is the trick of those software.

Sunday, January 5, 2014

Gmail - Unable to Log-in As a Different User - Gmail Help - www.FreeComputerTricks.in


As we know Google has changed it's log-in/Sign-in interface i.e for Gmail, Blogger, Google+ and all other Google Products. Many of my friends and visitors asked me that when ever they try to Sign-in to Gmail it already shows an account logged in and there is no option to Sign-in as different user, in that case the password field can be entered bu you can not enter the user name because it's already showing an user name on the log in screen.


Cause: It happens when an user log in to the Gmail using your computer your browser saved the use name and when you try to open Gmail it shows that username/Email and password field is empty. 

or

If you are using a public computer i.e. in Cyber cafe or any other public computer you face this problem

or

If you not clear the browser history on the computer.


How to Solve this problem you faced:-


So here is the process how to overcome the problem you face while sign in to Gmail and how to manage Google Accounts on your computer, see the below steps.

  • Go to www.Gmail.com

  • You will find a screen like below

Gmail Sign in Help
 As you seen the picture, that already I have logged in to Gmail of any one of the Google Product and there is no option to Sign in as different user. on the above screen shot you can it has a option "Manage accounts on this device".

  • Click on Manage accounts on this device

  • Now Click on Remove

  • Click on the (X) mark near your Google account to remove the account
  • Now you will get the below screen

  • Click on Done


  • That's all now you can see the User name field and password field both are enabled on Gmail Sign in screen and now you can easily Sign in to Google using your gmail account.

Regards:

Parthasarathi Panda


Search Tags: Unable to enter user name in Gmail, How to Sign in to Gmail using another Gmail account, My Gmail Sign in page already showing an user name how to remove it, How to manage Google accounts on the computer to Log in/Sign in,  when I open Gmail it shows an account name already logged in how to remove it, Gmail Sign in Help, www.freecomputertricks.in, How to sign in to gmail as different user.


Thursday, October 31, 2013

Spooler SubSystem App has encountered a problem and needs to close. We are sorry for the inconvenience


Spooler SubSystem App has encountered a problem and needs to close. We are sorry for the inconvenience
If you were in the middle of something, the information you were working on might be lost.
For more in formation about this error, click here.


Spooler subsystem app has encountered a problem and needs to close. we are sorry for the inconvenience--- SOLVED 100%................


What does this error message mean? That means the printer spooler services has stooped due to any printer driver malfunction or in the case you share a printer over LAN on Local Network. In most cases this problem arises, if you have a Local Network Printer, when you access the shared printer from the computer connected through LAN and open printers and faxes the message will appear and at that time you could not able to print any documents.


HOW TO SOLVE THIS PROBLEM?

Spooler SubSystem App has encountered a problem and needs to close. Solved..... 100%


If you have the problem on Local Printer (Local printer means where you directly attach the Printer to the Computer)

1) Uninstall the Printer Driver ( Device Manager --> Right Click on the Printer Driver ---> Click Uninstall) To access Device Manage on your PC (Start-->Run--> devmgmt.msc)

2) Restart the Computer

3) Connect the printer to the PC it will automatically install the driver for the printer

OR

1) Go to Printers and Faxes and Delete the printer you have 

2) Reboot the PC

3) Connect the printer to Computer

If the problem arises on a Shared Printer


1) Go to any computer on your Local Network on which you have installed a shared printer.

2) Then go to Printers and faxes

3) Delete the shared printer you have

In between if your printer spooler stooped working, then go to SERVICES.MSC and start Printer Spooler and delete the printer.

4) Reboot the Computer

5) Now install the printer on the computer by accessing the main computer where the local printer attached.


Shared printer Spooler Error on Windows XP Solved !!!!!

Now you will not get any error message on your computer regarding Spooler subsystem.


Freecomputertricks.in


To know How to share a printer over LAN - Windows XP Visit Here


Monday, October 14, 2013

Your Computer Needs a Windows Certificate : (VeriSign Primary Intermediate CA Certificate) is Missing From Your Computer


If this message appear, when you install Nokia PC Suite then follow the below steps to add the Verisign primary intermediate CA certificate to your computer.


VeriSign Primary Intermediate CA Certificate Nokia PC Suite


Steps:


  • Copy the Primary Intermediate CA Certificate


  • Open Notepad and Paste there and Save as Certificate1.cer

  • Now Copy the Secondary Intermediate CA Certificate

  • Paste in Notepad and Save as Certificate2.cer

  • Now open MMC Console ( Start--> Run ---> mmc ---> OK)

  • In the Console Root Click on File Menu --> Add-Remove Snap-in

  • Click on Add --> Add Standalone Snap-in ---> Select Certificates--> Click OK --> Select Computer account--> Click Next--> Click Finish


  • Click Close on Add Standalone Snap-in --> Click OK

  • Click on the + mark left to Certificates (Local Computer)

  • Right Click on Intermediate Certification Authorities--> All Tasks--> Import--> Click Next-->Browse the Certificates you have saved and Select(Here it's Certificate1)--> Click Next--> Click Next--> Finish

Certificates Import Windows XP


  • Certificate Import Wizard, The import was Successful Click OK

  • Do the Same for Certificate2

Now Install Nokia PC Suite/Nokia Suite on the Computer


Saturday, September 28, 2013

How to Remove/Manage Trusted Certificates in Adobe Reader


If you have added a PDF document signature to trusted list and want to remove the trusted certificate and Identities or manage credentials used to trust document, then just follow the steps below.
adobe reader preferences signature trusted list and manage signatures

How to create and manage identities for signing and manage credentials used to trust documents in Adobe PDF Reader.
Steps:

* Open Adobe Reader

* Click on Edit and go to Preferences

* Now on Preferences Windows Click on Signatures

* Then Click on More Button Under 'Identities & Trusted Certificates'

* Now 'Digital ID and Trusted Certificate Settings' will open 

* Click on Trusted Certificates from the left panel

* On the Right Panel you will get the Certificate Details i.e Name, Certificate Issuer and Expires
Digital ID and Trusted Certificate Settings

* Click on the certificate you want to remove and Click on Remove


Friday, September 27, 2013

How to make Gmail load faster : Gmail Basic HTML Mode


You might be notice that when you log-in to Gmail, it takes long time to load or reach the Inbox in a slow Internet connection. In case of slow internet connection you can use a option Load basic HTML (for slow connections) which appears on right bottom side of the browser.
Load Gmail Faster


But here is a way through which you can directly log-in to basic HTML view of the Gmail, don't need to Set basic HTML as default view on your Gmail Setting. So follow the below steps to log-in to Gmail by default in HTML Mode as well as you can use the Gmail mobile URL to load faster on PC for slow connections.


Steps:

1) https://mail.google.com/mail/h/ Go to this URL for log-in Basic HTML Gmail, No need to set basic HTML default for your Gmail, just visit this URL and use Gmail as Basic HTML to load faster.


2) m.gmail.com - This is for mobile view of Gmail, you can use it on PC.


3) If you want to use standard view of Gmail Log-in Through mail.google.com


📚 You May Also Like to Read