Showing posts with label Windows. Show all posts

Monday, August 18, 2025

How to Get Windows 11 Free - Official Upgrade Guide


 About Windows 11

Windows 11 is the latest operating system from Microsoft, officially released on October 5, 2021. It is the direct successor to Windows 10 and brings a modern, clean, and user-friendly design along with enhanced performance and security features.

 Key Highlights of Windows 11

  • New Design → Centered taskbar, rounded corners, redesigned Start Menu.

  • Improved Productivity → Features like Snap Layouts, Virtual Desktops, and Direct Access to Microsoft Teams.

  • Gaming Enhancements → Support for DirectStorage and Auto HDR to improve graphics and load times.

  • Better Security → TPM 2.0 and Secure Boot are mandatory for installation.

  • Widgets → Personalized widgets for news, weather, calendar, and updates.

  • Microsoft Store Update → Brand new app store with wider app support, including Android apps (via Amazon Appstore).


How to Get Windows 11 Free - Official Upgrade Guide


 System Requirements

To install Windows 11, your device must meet certain requirements:

  • Processor: 1 GHz or faster with 2+ cores, 64-bit compatible

  • RAM: Minimum 4 GB

  • Storage: Minimum 64 GB

  • Firmware: UEFI, Secure Boot capable

  • TPM: Version 2.0

  • Graphics: DirectX 12 compatible GPU

  • Display: 9” or larger with 720p resolution


 Availability

  • Free Upgrade for genuine Windows 10 users (if hardware is compatible).

  • Can be downloaded using Microsoft’s Installation Assistant or via Windows Update.

  • Available as ISO file for fresh installations.

 Why Upgrade to Windows 11?

  • Modern, faster, and more secure experience.

  • Seamless multitasking tools.

  • Better gaming and creative workflow support.

  • Long-term updates and future-proof security.


🖥️ Windows Upgrade Check – How to Know if Your PC Supports Windows 11

Before upgrading to Windows 11, you must confirm whether your device meets the minimum system requirements. Microsoft provides an official tool to make this process simple.


 Step 1: Download Microsoft PC Health Check App

Microsoft has released the PC Health Check App to check compatibility.

👉 Official Download:


How to Get Windows 11 Free - Official Upgrade Guide


 Step 2: Run the App

  1. Install and open the PC Health Check App.

  2. Click on Check Now under “Introducing Windows 11”.

  3. The tool will analyze your hardware.


 Step 3: Results

  • If your PC meets the requirements, you’ll see:
    ✔️ “This PC meets Windows 11 requirements”

  • If not, the app will list which component fails (TPM 2.0, Secure Boot, CPU, RAM, etc.).


 Alternative Upgrade Check Methods

If you don’t want to use the official app, here are alternatives:

  • WhyNotWin11 Tool → A free open-source tool that shows detailed compatibility.

  • Manual Check → Compare your system specs with Microsoft’s Windows 11 minimum requirements.


 Minimum System Requirements for Windows 11

  • Processor: 1GHz, 2+ cores, 64-bit compatible

  • RAM: 4GB or higher

  • Storage: 64GB minimum

  • TPM: Version 2.0

  • Secure Boot: Enabled in BIOS

  • Graphics: DirectX 12 compatible GPU

  • Display: 9”+ with 720p resolution


How to Get Windows 11 Free – Official Process Explained

Windows 11 is Microsoft’s latest operating system, offering a modern design, better performance, gaming improvements, and enhanced security. If you are currently using a genuine Windows 10 PC, you may be eligible to upgrade to Windows 11 completely free of cost. In this article, we will guide you through the official Microsoft process to get Windows 11 for free.


 Who Can Get Windows 11 Free?

  • Users with a genuine Windows 10 license on their device.
  • Your PC must meet the minimum system requirements (TPM 2.0, Secure Boot, CPU compatibility, 4GB RAM, 64GB Storage).
  • Devices enrolled in the Windows Insider Program can also test Windows 11.

How to Get Windows 11 Free - Official Upgrade Guide


Official Step-by-Step Process to Get Windows 11 Free

Step 1: Check System Requirements

First, download Microsoft’s official tool – PC Health Check App – to verify if your device is eligible for Windows 11 upgrade.

Step 2: Enable TPM 2.0 and Secure Boot

Go to your BIOS/UEFI settings and ensure TPM 2.0 and Secure Boot are enabled. These are mandatory for Windows 11 installation.

Step 3: Windows Update Method (Recommended)

  1. Open Settings → Update & Security → Windows Update.
  2. Click on Check for Updates.
  3. If eligible, you will see the option: “Upgrade to Windows 11 is ready”.
  4. Click Download and Install → Follow on-screen instructions.

Step 4: Upgrade Using Installation Assistant

If you don’t see the upgrade via Windows Update, use the Windows 11 Installation Assistant from Microsoft’s official website.

Step 5: Create Installation Media (Optional)

You can also download the Windows 11 ISO file and create bootable USB installation media using Microsoft’s tool. This is helpful for clean installation.


 Benefits of Upgrading to Windows 11

  • Modern and simple user interface with centered taskbar.
  • Better multitasking with Snap Layouts.
  • Improved gaming performance with DirectStorage and Auto HDR.
  • Stronger security and performance enhancements.
  • Regular updates and long-term support from Microsoft.

 Important Notes

  • Windows 11 is free only for genuine Windows 10 users.
  • Unsupported devices may face restrictions or performance issues.
  • Always back up your important data before upgrading.

🔗 Official Microsoft Resources


📖 You Also Like to Read


👨‍💼 Written by: PARTHASARATHI PANDA (M.Com)
📌 Blogger | YouTuber | Digital Creator

Friday, July 18, 2025

25 Free and Powerful Computer Tricks to Boost Your Productivity and Efficiency


25 Free and Powerful Computer Tricks to Boost Your Productivity and Efficiency

In today’s fast-paced digital world, using a computer efficiently can significantly impact your productivity—whether you’re a student, professional, freelancer, or even a casual user. While most people use their computer every day, many are unaware of the small yet powerful tricks that can make work faster, easier, and more efficient.

In this post, we’ll explore 25 free and incredibly useful computer tricks that can help you get the most out of your system, speed up daily tasks, and enhance your overall digital experience. These are simple, effective, and don’t require installing any paid software.


25 Free and Powerful Computer Tricks to Boost Your Productivity and Efficiency


1. Essential Keyboard Shortcuts

Keyboard shortcuts are one of the quickest ways to speed up your workflow. Instead of clicking through menus, you can get things done with just a few keystrokes.

Copy, Cut, and Paste (Ctrl + C / X / V)

These are arguably the most-used shortcuts. Instead of right-clicking to copy and paste, just use:

Ctrl + C: Copy

Ctrl + X: Cut

Ctrl + V: Paste


Great for quickly moving text, images, or files around.

Undo and Redo (Ctrl + Z / Y)

Make a mistake? Undo it with Ctrl + Z. Changed your mind about undoing? Redo it with Ctrl + Y.

Find in Page or Document (Ctrl + F)

Need to locate a word or phrase in a long document or webpage? Use Ctrl + F to bring up the search bar and type what you're looking for.

Save (Ctrl + S)

This is a habit every user should adopt. Press Ctrl + S frequently while working to avoid losing progress.

Open and Close Tabs (Ctrl + T / W)

In web browsers:

Ctrl + T: Opens a new tab

Ctrl + W: Closes the current tab


Fast and intuitive for tab management.

Switch Between Tabs (Ctrl + Tab)

Cycle through open tabs in most browsers or programs with Ctrl + Tab. This works well in multitasking situations.

Minimize All Windows (Windows Key + D)

Need a quick peek at your desktop? Press Windows Key + D to minimize all windows instantly.

Lock Your Computer (Windows Key + L)

Walking away from your computer? Press Windows + L to lock it and protect your privacy.

Open Task Manager (Ctrl + Shift + Esc)

Having performance issues or a frozen app? Launch Task Manager directly with Ctrl + Shift + Esc to close unresponsive programs.

Open Run Dialog (Windows Key + R)

Quickly launch apps and settings with the Run command. For example, typing notepad opens Notepad instantly.

Refresh Page (F5)

Reload a web page or refresh the contents of a window by pressing F5.


25 Free and Powerful Computer Tricks to Boost Your Productivity and Efficiency


2. Smart Browser Tricks

Whether you’re researching, shopping, or binge-watching, browser productivity is key.

Reopen Closed Tabs (Ctrl + Shift + T)

Accidentally closed a tab? No problem. Press Ctrl + Shift + T to bring it back. You can do this multiple times to recover previous tabs.

Navigate History (Alt + Left / Right Arrow)

Go back or forward in browser history using:

Alt + Left Arrow: Back

Alt + Right Arrow: Forward


Much faster than clicking the back or forward buttons.

Zoom In and Out (Ctrl + Mouse Wheel)

Control the zoom level of your browser (or many other apps) with the Ctrl + Mouse Scroll shortcut.

Top and Bottom of Page (Home / End)

Home: Scroll instantly to the top of a webpage or document

End: Jump to the bottom


Perfect for long pages or reports.

View Browsing History (Ctrl + H)

Need to revisit a site? Open your history instantly by pressing Ctrl + H.


25 Free and Powerful Computer Tricks to Boost Your Productivity and Efficiency


3. Time-Saving Desktop & File Explorer Tricks

Being organized and efficient on your desktop can save hours over time.

Rename Files Quickly (F2)

Click on a file and press F2 to rename it immediately without right-clicking.

Take Screenshots (Windows + Shift + S / Mac: Shift + Cmd + 4)

Capture part of your screen using:

Windows + Shift + S to open Snip & Sketch

Shift + Cmd + 4 on Mac for selective screenshotting


These allow you to grab only what you need.

Search for Files & Apps Instantly

Windows: Press the Windows key and start typing the app or file name.

Mac: Use Cmd + Space to open Spotlight search.


No need to dig through folders.

Clean Up Your Computer

Improve performance with regular maintenance:

Uninstall unused programs

Clear temporary files using Disk Cleanup (search cleanmgr)

Move old files to external drives or cloud storage


A clean computer runs faster and crashes less.

Password Protect Folders

If you need to secure sensitive data:

Use free tools like 7-Zip to create a password-protected archive.

Alternatively, use built-in BitLocker (Windows Pro editions) to encrypt drives.


Note: Be cautious and don’t lose your password.


4. Bonus Tips for Advanced Users

Once you’ve mastered the basics, these next-level tricks can push your productivity even further.

Split Screen for Multitasking

Drag a window to the side of the screen (or use Windows Key + Left/Right Arrow) to snap it to one half. Then select another window to fill the second half. Great for research + writing, coding + previewing, etc.

Clipboard History (Windows Key + V)

On Windows 10/11, enable clipboard history to access multiple copied items. Press Windows + V to view them. Enable it from Settings > System > Clipboard.

Use Virtual Desktops (Windows Key + Ctrl + D)

Separate your workspaces with virtual desktops. Use:

Windows + Ctrl + D: New desktop

Windows + Ctrl + Left/Right: Switch between them

Windows + Ctrl + F4: Close a desktop


Perfect for separating work, browsing, and entertainment.

Pin Apps to Taskbar

Right-click any app and select “Pin to taskbar” for quick access. You can then open it with Windows Key + number (1 for the first pinned app, 2 for the second, etc.).


5. Maintain Your Digital Workspace

Being productive isn’t just about shortcuts—organization matters too.

Declutter Your Desktop

Avoid having dozens of icons. Use folders to group related items. Fewer distractions mean faster focus.

Use Cloud Storage

Google Drive, Dropbox, and OneDrive are great for syncing files across devices. It also protects your files from accidental loss.

Set Up Auto-Start Programs Carefully

Some apps start automatically with your computer and slow it down. Disable unnecessary ones:

Press Ctrl + Shift + Esc > Startup tab in Task Manager

Disable apps you don’t need at launch


Use a Password Manager

Remembering all your passwords is hard—and risky. Use free tools like Bitwarden or LastPass to store strong, unique passwords securely.

Update Software Regularly

Security patches and performance fixes are essential. Always keep your OS, browser, antivirus, and key software up to date.


Conclusion

By incorporating these 25 powerful and free computer tricks into your routine, you’ll soon notice a real difference in your workflow. Whether you’re managing files, navigating the web, or simply switching between tasks, these tips help you work smarter, not harder.

You don’t need to be a tech genius to take advantage of these shortcuts and tricks. Most require just a little practice, and the time saved each day adds up quickly.

Got more tips or tricks you use every day? Share them in the comments and let’s learn from each other!


Author : Parthasarathi Panda (M.Com)


Sunday, October 11, 2020

Unable to Boot and Install Windows 10 From USB Pen Drive (Rufus) - Solved


Unable to Boot and Install Windows 10 From USB Pen Drive (Rufus) - Solved

Hi friends in this video I will show the complete process to create a bootable USB drive (Windows 10) using rufus tool and if you are not able to boot or install the Windows form USB Pen Drive then this video will help you to findout the solution, so please watch the video till end (in Hindi) and create a bootable Pen drive to install Windows on your PC. Thank You!

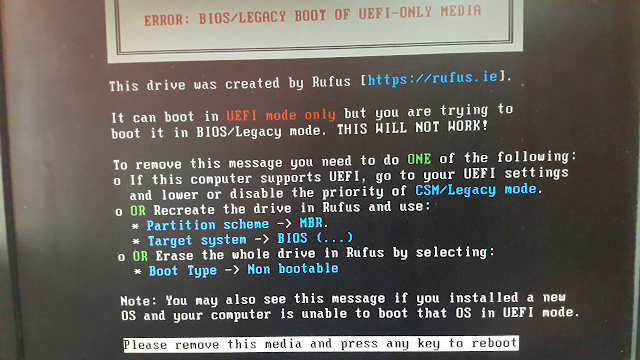
ERROR: BIOS/LEGACY BOOT OF UEFI-ONLY MEDIA


UEFI bootable USB of Windows does not boot

How to use Rufus to install Windows 10?

Bootable USB for UEFI and Legacy BIOS

How to create bootable Pen Drive Windows 10

Unable to install Windows from USB Drive - Solved

My PC does not show any Bootable PEN Drive - Solution

Can not boot from USB flash drive 100% Solution Here

How to use RUFUS to create a UEFI Bootable WIndows 10?

How to create bootable Windows USB Flash Drive?


ERROR: BIOS/LEGACY BOOT OF UEFI-ONLY MEDIA

This drive was created by Rufus [https://rufus.ie]

It can boot in UEFI mode Only but you are trying to 

boot it in BIOS/Legacy Mode. THIS WILL NOT WORK!

To remove this message you need to do ONE of the following:

If this computer supports UEFI, go to your UEFI settings and lower

or disable the priority of CSM/Legacy Mode.

OR Recreate the drive in Rufus and use:

*Partition scheme -> MBR.

*Target system -> BIOS (...)

OR Erase the whole drive in Rufus by selecting

* Boot Type -> Non bootable

Note: You may also see this message if you installed a new OS and your computer

is unable to boot that OS in UEFI Mode.

Please remove this media and press any key to reboot


Download RUFUS 

https://rufus.ie/


Windows 10 ISO Download Link

https://www.microsoft.com/en-in/software-download/windows10

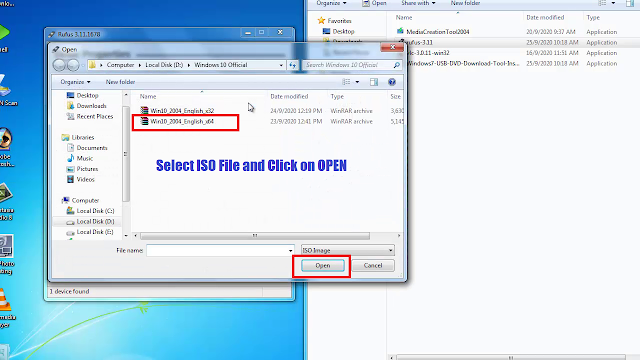
Open rufus tool and Select the Windows 10 ISO file


Choose Windows 10 ISO


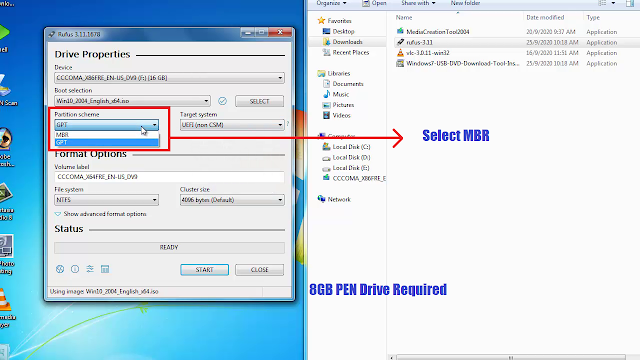
Choose MBR Here

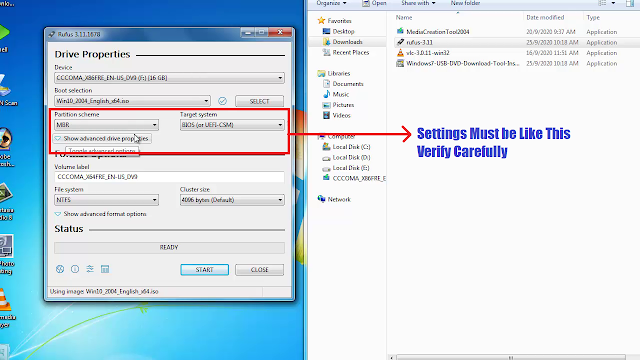
rufus settings must like this, please verify carefully

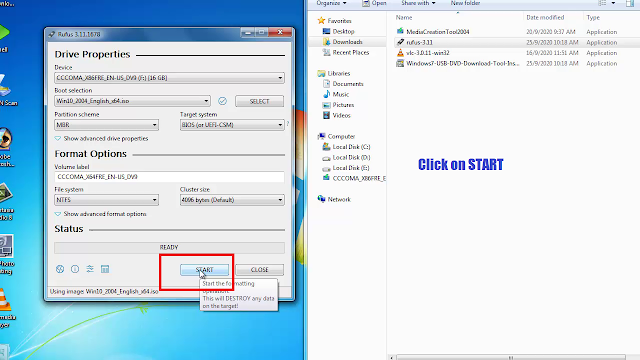
Click on Start - Minimum 8GB Pen Drive required 


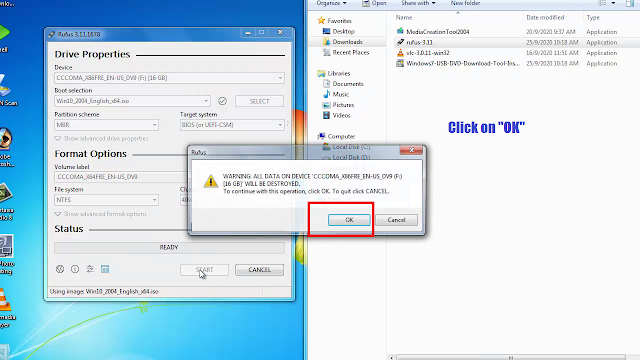
Click on OK


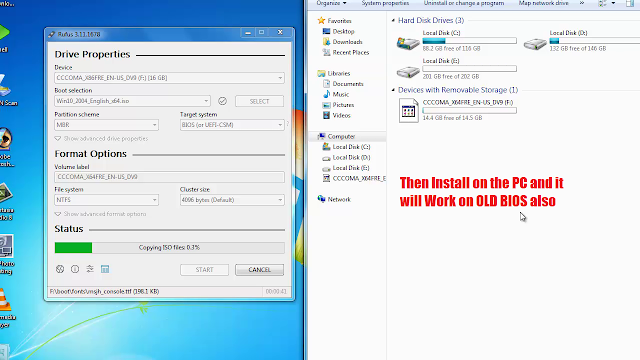
After complete it will work on old BIOS also


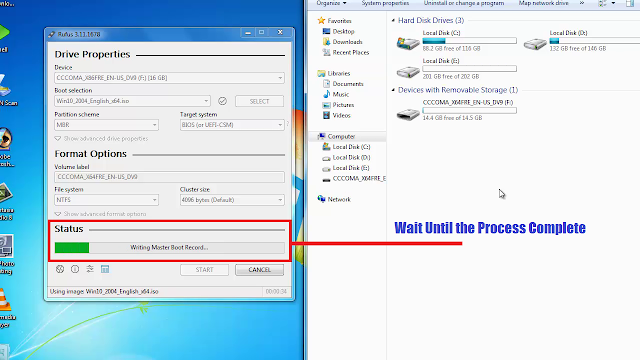
Please wait until the process complete


Thursday, February 27, 2020

Passport Size Photo Size in India FCT || Passport size photo size in pixels in Photoshop?


Here in this topic I will tell about the Passport size photos size around the world and specially in India which passport size photo size use for official purpose and how many sizes are there in Passport size photos and what the official size of passport size photos. Passport size photos crop size and dpi in Photoshop, if you have a Photo studio then please go through the below details about Passport size photo size to crop in Photo shop. Passport size photo width and height in inches for Photoshop and what is the passport size photo dpi to crop the photo to get best passport size photo.

Search Tags:

how to make passport size photo?
passport size photo maker?
passport size photo size in pixels in Photoshop?
how to print passport size photo in word?
how to print passport size photo in hp printer?
how to print passport size photo in Photoshop?
how to print passport size photo in paint?
make passport photo online free?
What is the Passport size photo dimensions in India?
Passport Size Photo Size in India-FCT || Passport size photo size in pixels in Photoshop
The most commonly used passport size photo size is 1.3 inch x 1.7 inch with 300 dpi, so if you want to crop the image then set width 1.3 inch and height 1.7 inch and dpi 300 and finally you will get the passport size photo. The above image is in the same size and in a 4x6 page you will get 8 passport size photo.

PASSPORT SIZE PHOTO SIZE?


Passport size photo size in centimeters (3.5 cm x 4.5 cm and 300dpi)


Passport size photo size in inches (1.38 in x 1.77 in and Resolution 300dpi).


Passport size photo size in centimeters and Passport size photo size in Inches?

Friday, June 28, 2019

How to Download All Media Files From a Website - Download Hidden and High Resolution Images Used in Websites


Hi friends today I will show the procedure to download Media files from a website, yes friends you can download any images from a website and also get high resolution of the image. With this process you can download Images, Icons and any other media content used in the website. So for this you need to use Firefox browser and follow this tutorial post, you can also watch the video tutorial on the YouTube channel.

Download all images used in a website

Visit the website you need to download images and right click on it and go to VIEW PAGE INFO OR PAGE INFO, if the right click has blocked in the particular website then press ALT key and then TOOLS menu and click on PAGE INFO, after that go to Media tab and use the down arrow key to find all the images used in that website, if you need to save the image, then select and click on SAVE AS and save the image in your Computer.

Download media files used in a website - image, icon etc. using Firefox


How To Download Hidden Images From A Website?

  • Browse the website using Firefox Browser.
  • Right click and click on View Page Info.
  • or Press Alt key then go to Tools Menu and Select Page Info.
  • Now click on Media Tab and choose the image you want to download.
  • Save the image to Computer.

In this way you can find all the images used in a website and also get high resolution images to download. So friends if you want to watch the video tutorial on this topic, please visit Our YouTube channel.

Monday, May 14, 2018

How To Format SD Card After Using Win32 Disk Imager - Restore SD Card Capacity


How To Format SD Card After Using Win32 Disk Imager - Restore SD Card Capacity - After Use My USB Drive With Win 32 Disk Imager It showing Less in Size - 4 GB SD card is used with this tool and after it shows only 40 MB and unable to Format and It Shows The Disk is Write Protected (Solved).
So if you have problem with your SD card or USB drive because you have used it to make bootable disk and write raw .img file in it using Win32 Disk Imager and it shows low in size and you are not able format this USB drive as it is became write protected. Please do not worry I will show you how you can recover the USB drive using easy and simple method which can be understood by everyone.

What is Win32DiskImager ? (Win32 Disk Imager) 
This is a Windows tool for writing images .img file to USB Pen Drive or SD/CF Cards and it's free to use. This tool is designed to write raw image to a removable storage and It is very useful for embedded development, namely Arm development projects (Android, Ubuntu on Arm, etc). Win32DiskImager used for writing eMMC image or boot image to your MicroSD card. After successful completion of writing eMMC backup image or boot image file to SD card you can use it on the smartphone to recover dead boot or make the SD card bootable. This tool is used for writing Disc Image File (.img) file to SD Card to make it bootable or you can write recovery or EMMC boot image file to flash the smartphone and also you can fix the dead boot of the phone. To know more about Win32 Disk Images Please visit the sourceforge Link.
The Disk Is Write Protected After Using Win32 Disk Imager
What Happen If You Use SD Card or USB Drive With Win32DiskImager?

The Win32DiskImager Windows tool is used for writing disk image file to USB drive or SD card but when you create a bootable USB disk for any purpose, the tool format the drive and make several partitions and create unallocated partition also according to the image file you use and after writing .img file it will make the drive write protected. If you use small .img file then it will show only 30 to 40 MB size of the USB drive although you have a USB drive with GB size, such as 2 GB or 4 GB or 8 GB etc. For example if you use a 2 GB SD Card to write an EMMC disk image file to recover dead boot of the smartphones, then after writing the raw image file it will used space of 36 MB with free space of 4 MB, so the total size of the SD card is 40 MB but you used a 2 GB SD card or USB drive. So once the drive is became write protected you will not able to format the drive in the normal way using Windows. When you use SD Card to write Disc Image File (.img) file using win32 disk imager after that You will unable format the SD Card and it shows This drive is write protected. But do not worry here in this tutorial you will find the easy and worthy solution for this problem and you can recover your SD card or USB storage.
After Writing eMMC Image to SD card Unable To Format Memory Card - Solved Using rufus-2.0 Usb-tool
Downloads:
Download USB Tool Rufus 2.18 | Download Link

You can Watch the Video Tutorial on YouTube | Video Link

A Few Words About Rufus Tool:
Rufus is a Windows software or tool which helps to format USB flash drives and make bootable, such as USB pen drive, SD cards or Memory sticks etc. This tool or utility especially useful for creating Bootable USB drive from bootable ISO image file to  install Operating System on the Computer Such as Windows, Linux and UEFI etc. This tool can also used for flashing BIOS or other firmware using DOS, for more details you can visit here.
Now Format the SD Card With FAT32 Using Windows Option
Steps:
  1. Download and Open Rufus Tool.
  2. Select the SD Card or USB Drive you want Format.
  3. Now click on Start and click on OK to start formatting process.
  4. When you see READY then close the tool.
  5. Now open My Computer and you will see your SD Card or USB drive is recovered and shows the actual size of the device.
  6. Now right click on the Drive and select Format, then format the Drive.

So in this way you can recover your SD card or USB drive used with Win32 Disk Imager Windows Tool. After a long search on the Internet to solve this issue I did not get the easy solution for it and here sharing the process to help others who has the same issue with their USB drive and SD cards. This process is tested and 100% working, you can try this method and post your success report using comments.

Tips Of The Day
A Lithium-ion 3.8v Battery Charging voltage is approximately 4.2 ± 0.1 volts. If the Battery voltage is below 2.5v then it will not take charge with regular charging circuit and most of the battery protection circuits cut off charging if voltage greater than 4.3 Volts. To get more details about Li-ion Battery refer to Wikipedia Lithium-ion_battery.

Sunday, May 10, 2015

Utorrent Upload Speed Is More Than Download Speed - Utorrent Upload Settings


How to reduce the upload speed in Utorrent client? What the upload speed is in Utorrent? As you know when you download something using Utorrent client sometimes the upload speed is more than the download speed. If you normally adjust the upload speed, it will adjust the upload speed. For example if you set 10KBps upload speed on the torrent client, the upload speed will not limit within 10KBps, it will go high upload sometimes it goes to 150KBps to 200KBps depends on the broadband speed you have.


Utorrent Upload Speed is more than 100KBps

So how to overcome this problem? The below is some settings for Utorrent to reduce the upload speed. If you adjust the upload it will help you download something quicker then before.


How to set the upload speed U Torrent
Open uTorrent
Double click on the right button icon 
Set the upload speed as you need
Click on Save & Close


How to reduce Utorrent Upload Speed

That's all now you can see the difference in upload speed.


Utorrent Upload Speed after configuration down 6KBps

Enjoy
www.FreeComputerTricks.in

Search Key Word:
  • Upload speed is high on utorrent
  • u torrent downloading slow
  • Utorrent unable configure the upload speed
  • u torrent upload speed set but it shows 200KBps upload speed
  • How to speed the download speed in torrent
  • Utorrent exceed the upload settings
  • Torrent download I set the upload speed 10KBps but it's uploading more than 200 KBps

Monday, October 14, 2013

Your Computer Needs a Windows Certificate : (VeriSign Primary Intermediate CA Certificate) is Missing From Your Computer


If this message appear, when you install Nokia PC Suite then follow the below steps to add the Verisign primary intermediate CA certificate to your computer.


VeriSign Primary Intermediate CA Certificate Nokia PC Suite


Steps:


  • Copy the Primary Intermediate CA Certificate


  • Open Notepad and Paste there and Save as Certificate1.cer

  • Now Copy the Secondary Intermediate CA Certificate

  • Paste in Notepad and Save as Certificate2.cer

  • Now open MMC Console ( Start--> Run ---> mmc ---> OK)

  • In the Console Root Click on File Menu --> Add-Remove Snap-in

  • Click on Add --> Add Standalone Snap-in ---> Select Certificates--> Click OK --> Select Computer account--> Click Next--> Click Finish


  • Click Close on Add Standalone Snap-in --> Click OK

  • Click on the + mark left to Certificates (Local Computer)

  • Right Click on Intermediate Certification Authorities--> All Tasks--> Import--> Click Next-->Browse the Certificates you have saved and Select(Here it's Certificate1)--> Click Next--> Click Next--> Finish

Certificates Import Windows XP


  • Certificate Import Wizard, The import was Successful Click OK

  • Do the Same for Certificate2

Now Install Nokia PC Suite/Nokia Suite on the Computer


Friday, August 30, 2013

Hp ProBook 430 Notebook PC Launched in India - Price and Specifications


The computer Manufacturer HP has launched it's new ProBook 430 Notebook PC in India, with a starting price of Rs 39,000.The entry level model of HP ProBook 430 priced at Rs. 39,000, which comes with a Core i3 processor, 4GB of RAM, Window 8 (64-bit) and a 500GB hard drive.


Hp ProBook 430 Notebook PC Launched in India - Price, Specifications, Variations- entry level model price


For other Specifications and Variations Of HP ProBook 430 Notebook PC, please see the table below.


HP ProBook 430 Notebook PCSpecifications
Product NameHP ProBook 430 G1 Notebook PC
Preinstalled Operating SystemWindows 8 Pro 64-bit
Windows 8 64-bit
SUSE Linux Enterprise Desktop 11
Free DOS
ProcessorIntel 4th Generation Dual –Core i7, Core i5 and i3
MemoryDDR3 SDRAM, 1600 MHz, two slots supporting dual–channel memory, 2/4/8 GB SODIMMs, up to 16 GB total
Internal Storage500 GB 7200 rpm SMART SATA II HDD
320/500 GB 5400 rpm SMART SATA II HDD
120 GB M.2 Solid State Drive
128 GB 2.5” Solid State Drive
Display13.3” diagonal HD9 LED–backlit anti–glare (1366 x 768)
Integrated GraphicsIntel HD Graphics 4400( Intel 4th Generation Dual–Core i7 Processor)
Intel HD Graphics 4400 or 5000 ( Intel 4th Generation Core i5 Processor)
Intel HD Graphics 4400 ( Intel 4th Generation Intel Core i3 Processor)
Audio/VisualDTS Sound+, stereo speakers, integrated dual array microphone with 720p HD Webcam
Wireless SupportHP hs3110 HSPA+ Mobile Broadband Module; HP 4112 LTE/HSPA+ Gobi 4G Module
Realtek 802.11 b/g/n, Mediatek 802.11 b/g/n , with Bluetooth v.4.0, Broadcom 802.11 a/b/g/n
v2.1 (on Linux operating system)
CommunicationsRealtek 10/100/1000 Ethernet Controller
Ports and Connectors2 USB 3.0 ports, 1 USB 2.0 port (power port), 1 HDMI, 1 VGA, 1 stereo microphone input, 1 headphone/line out, 1 RJ–45 (Ethernet), 1 power connector
Expansion SlotsMulti Media Reader Slot supporting SD, SDHC, SDXC, Memory Stick, MSXC
SecurityStandard: HP Client Security, Microsoft Defender (Win 8), HP Drive Encryption , HP BIOS Protection, Security Lock slot
Optional: Intel Anti–Theft (requires a Computrace subscription), Intel Identity Protection, HP Fingerprint reader
Power & Battery4–cell (44 WHr) Lithium–Ion battery; 65W EM Smart AC Adapter, 45W Smart AC Adapter


Tuesday, August 27, 2013

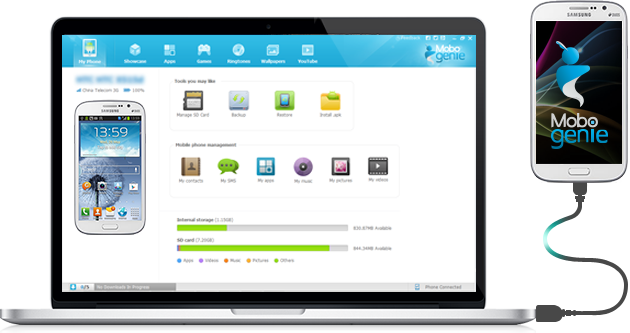
How to Transfer Media Files, Download Videos, Manage Contacts, Backup and Restore Android Smartphone : All-in-one Android Phone Management Software for PC


      If you have a Android mobile phone and want to transfer media files, Manage SMS, Backup and Restore, Download Application etc. then here is new Android phone Management software called 'Mobogenie'. Download Mobogenie and install it on your computer and connect your Android mobile phone and manage the phone from your computer.

Mobo Genie android phone management software for PC, All-in-one Android Smartphone Manager for Computer

      All Android OS and all brand Android phones is supported by the software, whether it's Samsung, Sony, LG, Micromax, LAVA etc. just connect your phone to PC, let the device driver to install, open the Mobogenie and use it to manage your phone.


      Mobogenie is the all-in-one Android smartphone management software for computer, if you are bother about how to transfer videos or other media files, manage contacts, backup your phone and restore, download and install android application etc. then this software will help you to do that, so download and install Mobogenie PC Manager for Android mobile phones.

     Mobogenie Android smartphone PC manager can simplify your Android phone with just one click, the software version 2.1.9 and released on 16th August, 2013. You can download the software from www.mobogenie.com.


Key Features of Mobogenie

  • Easy File Transfer
  • SMS Manager
  • Download videos, music and pictures
  • Backup & Restore contact list, texts, pictures, videos etc.
  • Manage Apps
  • Manage and edit contacts easily
  • Manage your Media files
  • Free Application Store to download 
  • 100% free Android phone manager

Download Mobogenie
 
Download mobogenie PC Manager Software for Android Smartphones

Saturday, August 24, 2013

How to change login screen in Windows 7 - Logon Screen Windows 7 Create/Set a Custom Background


This Tutorial will show you, how to customize the Windows 7 Logon screen background image without using any third party software. So to do this you need to make some changes in the Windows Registry and Group Policy, don't worry about that I will show you the step by step process to  change the background image of your Windows 7 Log-in screen.


Things to Remember

  • Windows Logo Key+R to Open 'Run' box, in the Run box
  • Type regedit and press Enter Key to Open Registry Editor 
  • Type gpedit.msc and press Enter Key to open Local Group Policy Editor


How to change the Log-In screen image on Windows 7

  • Go to registry editor (Windows Key+R and type regedit press Enter)

  • Navigate to HKEY_LOCAL_MACHINE\SOFTWARE\Microsoft\Windows\CurrentVersion\Authentication\LogonUI\Background

  • Double Click on OEMBackground and Change the Value data 0 to 1
Windows Registry Editor to change the login screen windows 7

If the key 'OEMBackground' not exist, right-click on the right pannel New-->DWORD Value with the name OEMBackground.
  • Go to C:\Windows\System32\oobe (if you have Windows in C: Drive or change the drive letter to your Windows installed drive).
  • Create a Folder with the Name info and create a backgrounds folder inside the info folder.
 
Create a backgrounds folder inside the info folder C:\Windows\System32\oobe to place your custom image for windows 7 log-on screen

Rename your wallpaper/image to backgroundDefault.jpg (the image file should be in .jpg format and less than 256 KB) and place it inside the backgrounds folder.
  • Now you have successfully set your custom background image for Windows 7 Log-on Screen, to check this Log-off, restart your PC or press Windows Key+L form the Keyboard and enjoy

Note: When you set a new theme for your Windows 7, the registry value may change to the default value. But you can prevent this by doing some setting in your 'Group Policy', lets have a look below process to change the Group Policy for the PC.


Group Policy Setting For Custom Login Background Windows 7

  • Open Group Policy (Windows Key+R type gpedit.msc and Press Enter)
  • Go to Computer Configuration\Administrative Templates\System\Logon
  • Find the “Always use custom login background” From the right-side panel,
 
Local Group Policy Editor to always use custom logon background Windows 7
  • Double Click on it
  • Click on Enabled then Click on OK button

Enable Always use custom logon background Windows 7 Group policy editor

So finally you have successfully changed your Windows 7 log-on screen by using Registry editor and Group policy editor and custom image.


📚 You May Also Like to Read