Showing posts with label Micromax FRP Unlock. Show all posts

Friday, November 30, 2018

Micromax Canvas 2 Q4310 FRP Unlock File and Unlock Tool Free Download


Hi friends, here is the free Account unlock solution for Micromax MediaTek Canvas 2 Q4310. Download free frp or Google account unlock file and flash tool, then follow the procedure here to unlock the phone, which is absolutely free, just download the Smartphone flash tool and FRP file and Google Account unlock.
Micromax Canvas 2 Q4310 Android 7.0 FRP Unlock File and Free Unlock Tool

Micromax Q4310 Software Info:
 

Model number: Micromax Q4310
Android version: 7.0
Android security patch: June 5, 2017
Internal Storage: 16GB
RAM: 3GB
Processor: MT6737
Baseband version: MOLY.LR9.W1444.MD.LWTG.MP.V110.5.[14,2017/06/01 21:38
Kernel version: 3.18.35 android@localhost #1
Build number: MMX_Q4310_SW_V2.0_HW_V2.0_20062017
Hardware version number: v2.0.0


Micromax Canvas 3 Q4310 Android 7.0 FRP Unlock File and Free Unlock Tool.
Micromax Canvas 2 Q4310 FRP Unlock File and Tool Free Download Here

Q4310 FRP Format Address SP Flash Tool:

Begin Address [HEX] : 0x6a00000
Format Length [HEX] : 0x100000


Q4310 FRP File and SP Flash Tool Download Here:

Password = Q4310@fct
Download Q4310 FRP Unlock File | Download Link
Download SP Flash Tool (SP_Flash_Tool_v5.1844_Win.rar) | Download Link

Q4310 How To FRP Reset - SP Flash Tool?
  • Open SP flash tool and load the Android scatter file.
  • Download Agent file select DA_SWSEC.bin
  • Now go to format Tab and select Manual format flash.
  • Now enter the begin address and format length.
  • Click on Start and connect the switched off phone to PC.
  • After format OK, remove the phone and switch on It.

Q4310 How To FRP Reset - SP Flash Tool
Watch the Video Tutorial Here 

Thursday, November 29, 2018

Micromax E455 Qualcomm MSM8929 How to Flash and FRP Unlock/Google Account Reset


How to flash Micromax E455 MSM8929 Smartphone? Here is the process to flash the phone. If you need to know how to flash the Qualcomm Micromax E455 phone, then please go through the topic and watch the video on YouTube to know complete procedure to flash the phone using fastboot Mode. Download the Micromax E455 firmware and follow the tutorial.
 
Micromax E455 Qualcomm MSM8929 How to Flash and FRP Unlock Google Account Reset


How to remove Factory Reset Protection Lock of Micromax E455? As you know the Micromax E455 has Qualcomm chip-set MSM8929 and runs on Android version 5.0.2. So if you need to unlock the Micromax phone using free tool then here is the complete and 100% working solution for this. Just download the Qualcomm Free FRP Reset/Unlock tool from the link given below and follow the tutorial to know the procedure to unlock the phone.
 
Micromax E455 Qualcomm MSM8929 Flashing and Unlock


Micromax E455 forgot Gmail id and password, how to recover the phone? If you are facing this problem, that you have forgotten the Google account id and password used in that phone, then in that case you need to unlock FRP or reset the Google account, so that you can use another Gmail account on the same Android smartphone. So to unlock the phone this topic is most useful for the users, please watch the video on YouTube and follow the tutorial to know the Free FRP Unlock Way of Qualcomm Micromax E455 Android smartphone.

Micromax E455 FRP/Google Account Unlock Free Tool.
E455 Google verification unlock using Miracle Box 2.58.
Micromax E455 After Hard reset stuck on Wi-Fi screen.
Micromax E455 after hard reset asking to Enter Gmail id and password solution.
E455 Android 5.0.2 account unlock Miracle box 2.58.
E455 Qualcomm MSM8929 Free FRP Reset Tool 2019.


Micromax E455 Firmware Download Links:

Micromax E455 Flash File
H/W VER.:LLDMO18
S/W VER.:MMX_E455_SW_V16_HW_V1.0_25082015
Download Here
 

Micromax E455 Factory Firmware Download Link:

Micromax E455 MicromaxInfo Firmware Download | Download Link

How to Flash Micromax E455?

  • Download the E455 Firmware as per the phone S/W version.
  • Extract or Unzip the flash file.
  • Now connect the phone with Fastboot Mode.
  • Go to the Firmware folder and Double Click on fastboot_all_images.bat file.
  • Now the flashing process starts and wait until the process complete.
  • After flash complete Switch on the phone.
You can watch the Video Tutorial Here

Micromax E455 Fastboot Mode:

==> First Switch off the phone.
==> Hold Volume down and Connect USB cable.

Now you will see the Micromax Logo and Check the PC Device Manager.

Micromax E455 FRP Unlock:

Micromax E455 FRP or Google account unlock can be done in the same way, just flash the phone with the given firmware using fastboot mode and the Micromax E455 is permanently unlocked and you can use any other Google account on that phone after flashing.

Monday, May 28, 2018

[Solved] Micromax E485 After Flash Blank Display


Micromax E485 after flash blank lcd, and do not showing anything on screen but phone is switch on completely and sound also coming. If you have this problem after flashing your Micromax E485 then here is the complete and 100% working solution for it. After flash Micromax you face errors such as after flash E485 only sound comes but no display, after flash e485 blank display, after flash e485 black display/lcd, after flash e485 phone is complete switch on but nothing on screen but when connect to Computer it shows MTP port and everything is fine except no display, So to solve this problem on your Micromax E485 please follow the below steps.

As we all know the Micromax Canvas 6 (E485) phone has MediaTek MT6753 chip-set and runs on Android 5.1 Lollipop Operating system. As it has MediaTek chipset, then we can flash the phone using Smart Phone Tool or so called SP Flash Tool. Here in this topic you will get to know how to solve Blank Display after flashing Micromax Canvas 6 E485.
Micromax E485 After Flash Blank LCD Solution
Download Micromax Firmware:

Model: Micromax E485
Chipset: MediaTek MT6753
Software Version: V3_25.08.16
Android Version: 5.1 (Lollipop)
Download File Size: 1.28 GB
File Name: Micromax_E485_V3_25.08.16

Micromax E485 Firmware/Flash File Download | Here

How To Solve Micromax E485 Blank Screen After Flash? (Solved)

To solve this problem on your Micromax E485, download the above firmware and flash the phone using SP Flash tool, this process is tested and 100% working, the download link will download E485 firmware zip file which includes Micromax E485 firmware or flash file, MediaTek USB driver, IMEI Rebuild Tool and SP Flash Tool.

How To Flash Micromax E485 (MT6753)? (Answered)
  • Download the firmware zip file from the above link and extract it.
  • Now open SP Flash tool and select Android scatter file inside the Firmware folder.
  • Now un-select the Preloader (Do Not Select Preloader) (Important)
  • Click on Download and connect the switched off phone to Computer.
  • After Download OK, remove the phone from PC and switch on it Manually.
In this way you can flash your Micromax Android smartphone for free, using Micromax free flash too download and firmware download, if you have a PC with Internet connection, then you can flash your Micromax Android smart phone for free using this Android flashing tutorial and Official firmware ROM for Micromax E485 MediaTek phone.

Friday, May 4, 2018

Micromax Bharat 5 Android 7.0 Free FRP Unlock and Tool DL Image Fail Free Solution


Hi and Welcome to all visitors, today we will show you how to unlock frp or frp bypass on Micromax Bharat 5 Android 7.0 MediaTek MT6735 CPU and you can also know how to solve "Tool DL Image Fail" error on Micromax B5 smart phone. To use this process you need to download Miracle Box V2.54 which is free and working without box. Download link of Miracle Box v2.54 and frp unlock and to solve TOOL DL Image Fail! error please go through the complete article below.
Micromax Bharat 5 Android 7.0 Free FRP Unlock and DL Image Fail Solution Without Using Any Flashing Box


Micromax B5 Technical Details:  
Model: Bharat 5
Brand: Micromax
H/W Version: V2.0
S/W Version: V09_20171207

CPU: MT6735
RAM: 1 GB
Internal Storage: 16 GB
Android Version: 7.0
UI Version: V2.0
Android Security Patch Level: November 5, 2017
Baseband Version: MOLY.LR9.W1444.MD.LWTG.MP.V117.P33,2017/12/07 17:45
Kernael Version: 3.18.38
Build Number: MMX_Bharat_5_SW_360_V09_HW_V2.0_20171207

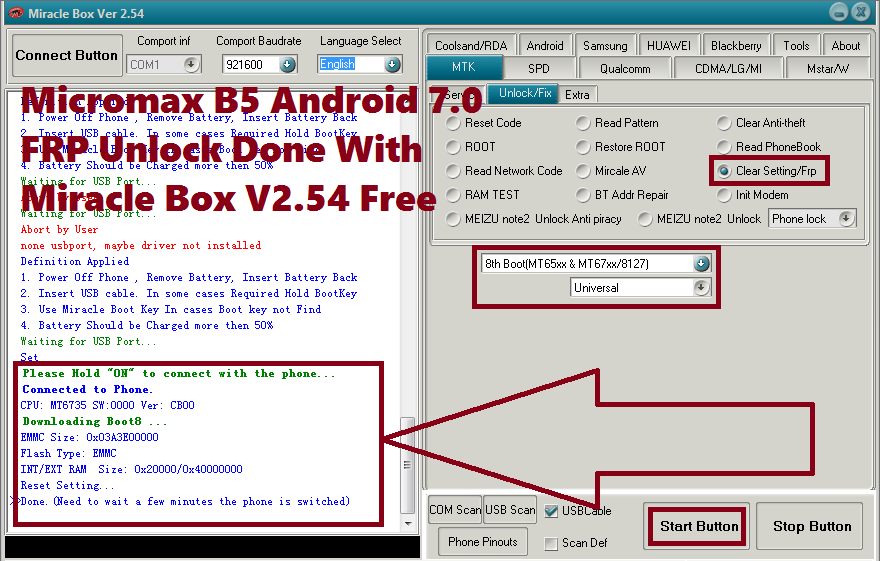
Micromax B5 Android 7.0 FRP Unlock Done With Miracle Box V2.54 Free
Micromax B5 FRP Unlock Done:
  CPU: MT6735 SW:0000 Ver: CB00
  Downloading Boot8 ...
  EMMC Size: 0x03A3E00000
  Flash Type: EMMC
  INT/EXT RAM  Size: 0x20000/0x40000000
  Reset Setting...
  Done.(Need to wait a few minutes the phone is switched)

Micromax B5 Android 7.0 After FRP Unlock  Tool DL Image Fail Solved
Micromax Bharat 5 Tool DL Image Fail Solved:
  Please Hold "ON" to connect with the phone...
  Connected to Phone.
  CPU: MT6735 SW:0000 Ver: CB00
  Downloading Boot8 ...
  EMMC Size: 0x03A3E00000
  Flash Type: EMMC
  INT/EXT RAM  Size: 0x20000/0x40000000
  Checking DL...
>>Verify...Done.


Downloads:
Download Miracle Box V2.54 100% Working Without Box 

  Micromax B5 Read Info Done:
    1. Power Off Phone , Remove Battery, Insert Battery Back
  2. Insert USB cable. In some cases Required Hold BootKey
  3. Use Miracle Boot Key In cases Boot key not Find
  4. Battery Should be Charged more then 50%
  Waiting for USB Port...
  Set
  Please Hold "ON" to connect with the phone...
  Connected to Phone.
  CPU: MT6735 SW:0000 Ver: CB00
  Downloading Boot8 ...
  EMMC Size: 0x03A3E00000
  Flash Type: EMMC
  INT/EXT RAM  Size: 0x20000/0x40000000
  Reading infr(EMMC)...
  WIFI MAC:66F90E01587C
  BT_ADDR:66E90E01587C
  IMEI1:
  IMEI2:  id:MMX_Bharat_5_SW_360_V09_HW_V2.0_20171207
  version:7.0
  model:Micromax Bharat 5
  brand:Micromax
  manufacturer:Micromax
  PROINFO  BaseAddr:0x80000  Size:0x300000
  NVRAM  BaseAddr:0x380000  Size:0x500000
  PROTECT1  BaseAddr:0x880000  Size:0xA00000
  PROTECT2  BaseAddr:0x1280000  Size:0xA00000
  LK  BaseAddr:0x1C80000  Size:0x80000
  PARA  BaseAddr:0x1D00000  Size:0x80000
  BOOT  BaseAddr:0x1D80000  Size:0x1000000
  RECOVERY  BaseAddr:0x2D80000  Size:0x1000000
  LOGO  BaseAddr:0x3D80000  Size:0x800000
  EXPDB  BaseAddr:0x4580000  Size:0xA00000
  SECCFG  BaseAddr:0x4F80000  Size:0x80000
  OEMKEYSTORE  BaseAddr:0x5000000  Size:0x200000
  SECRO  BaseAddr:0x5200000  Size:0x600000
  KEYSTORE  BaseAddr:0x5800000  Size:0x800000
  TEE1  BaseAddr:0x6000000  Size:0x500000
  TEE2  BaseAddr:0x6500000  Size:0x500000
  FRP  BaseAddr:0x6A00000  Size:0x100000
  NVDATA  BaseAddr:0x6B00000  Size:0x2000000
  METADATA  BaseAddr:0x8B00000  Size:0x2500000
  SYSTEM  BaseAddr:0xB000000  Size:0x106800000
  CACHE  BaseAddr:0x111800000  Size:0x19000000
  USERDATA  BaseAddr:0x12A800000  Size:0x278580000
  FLASHINFO  BaseAddr:0x3A2D80000  Size:0x1000000
  Done.


In this way you can bypass frp lock of Micromax Bharat 5 Android 7.0 smartphone and solve TOOL DL Image Fail error of the phone and after read info using Miracle Box you can get the FRP Base Address of the Micromax phone.

Sunday, September 17, 2017

Download New FRP Unlock/Bypass APK 2018 Here


As you know after Android 5.0 launched in the Smart phone market, there is a new option implemented on Android OS called Factory Reset Protection what we called FRP lock. If you hard reset the Android phone having Android operating system 5.0 or higher without having the Gmail id used on that particular phone then you may stuck on the re-verification screen on the smart phone, that's called FRP lock. You have to provide the same Gmail id and password used on the same handset.

By searching this website you can get some basic idea to bypass Factory Reset Protection or FRP lock, but remember if the phone does not belongs to you and you are not the actual owner of the Smartphone, then please do not bypass the FRP lock or it you are a Mobile Technician then ask for the proper bill of the phone to customer otherwise do it at your own risk.


All FRP Unlock Bypass and Account Manager APK Download

You may also interested to read the followings:


Downloads:

Download FRP Bypass and Account Manager APK from the below link.


FRP Bypass and Account Manager APK

Download New frp unlock or bypass APK and Account manager APK from the above link and bypass all Android frp lock.

Thursday, May 4, 2017

Android Factory Reset Protection (FRP) Solution With Test DPC App


How to remove FRP lock on a Android phone or tablet using a very simple way? Here we will discuss how to remove Factory Reset Protection (FRP) on an Android device. To reset FRP or to remove FRP lock you just need to install a App called "Test DPC" available on Play Store or you can direct download from any mirror link. It's so easy to remove FRP on Android using this Test DPC application and here we will describe step by step to use Test DPC app for FRP solution.
Using Test DPC app you can easily remove FRP lock on any Android device mobile phone and tablet. Basically it supports Motorola phones and Micromax, lava and on any other phone you can try this tool to solve FRP problem. Download the latest version of Test DPC or TestDPC all from the below link and install it on the device and follow the below steps to do a hard reset, OEM unlock and FRP unlock etc.

FRP Solution With Test DPC Application - FRP Unlock Using Test DPC APK

Download Test DPC APK:

Test DPC V4.0.0 APK Download Here : Mirror Link

Some of the Android phone not support the latest version of Test DPC, So please download the older version of Test DPC to work perfectly.

Test DPC V3.0.11 APK Download Here : Mirror Link
Test DPC V2.0.6 APK Download Here : Mirror Link

Download Test DPC Version 4.0.0, 3.0.11 and 2.0.6 from the above link and follow the below steps to know how to install and remove FRP lock on Android phones or Tablets.
How to Use Test DPC Application For FRP Solution on Android?

Steps:

1- Install test DPC
2- Open Test DPC Application.
3- Now Select "Set up managed profile" and Click Next
4- Then Click Finish
5- Now press the Power Key to lock the screen and press it again
6- Now drag the screen from the top side and Select Settings (Touch the Settings Icon)
7- Then go to About device and enable Developer Mode
8- Then Enable OEM Unlock and do a Factory reset of the device from the Settings Menu

Or

1- Select "Set up device owner"
2- Click Next then do Encrypt the phone ( Battery Should Be 90% or More)
3- After Encryption Switch off the phone and Switch on it again
4- Now Click on "SET UP" then Click "Set up phone" and then restart the phone (Press the "Set up phone" 3-4 times)
5- After switch on the phone, just drag the screen from the top side and select Settings.
6- Then go to About device and enable Developer Mode
7- Then Enable OEM Unlock and do a Factory reset of the device from the Settings Menu

To factory reset the device you need to enable Developer Mode, then enable OEM unlock, then do the factory reset.

Wednesday, May 3, 2017

How to Install Application on FRP Locked Android Phone or Tablet


Today we will give some basic idea about, how to install Android application on a FRP locked phone or tablet? As you know to remove FRP lock on Android phone or tablet you need to follow some useful steps ans also you need to install some apps on the device, but the question is how to install apps on a locked Android phone, which helps to remove or override the FRP lock problem. As you know if you hard reset an Android phone (Android 5.0 and above) it will ask to enter the email id and password before used on the phone.


How to Open Settings on a Locked Android Phone or Tablet
There are various way to install Android apps on a FRP locked phone and we will show almost all possible ways to go inside the phone and install the application you need on a locked phone, see the below details to know how to install apps in  an Android phone or tablet which is locked.

How to Install Apps On FRP Locked Phone or Tablet?

METHOD-1

If you are on the page where the Android phone ask to connect to Wi-Fi network, try the following.

1- Click on Add Another Network 
2- Now enter any name in "Enter Network Name" then select the word by double taping on it.
3- Now click on "ASSIST" and then it will open the selected word with Google App.
4- Then search the Application name in Google App and it will open the app or Options. 
For example:
To Open Google Chrome = Type chrome and select chrome from the list
To Open Settings = Type Settings and select it
To Open File Manager = Type file and select File Manager or My Files etc.
5- If you have apps in SD card then search "File" and select "My Files" and then install the app, If you need to download the app using Internet then Search "Chrome" in Google app and then search the app in Google Chrome and then come back to Google App then search "Downloads" and now install the app.

METHOD-2

1-Some Times you need to connect to a Wi-Fi network and click next and when it ask to enter the email id, you can follow the "METHOD-1" process from the step 3 to 5.

METHOD-3

If the phone has more then one keyboard i.e. Google Indic Keyboard, Swiftkey Keyboard and Android Keyboard etc.

1- Click on Add Network it will open Android Keyboard.
2- Try to go to the Keyboard settings using the Keyboard Settings icon. (The keyboard setting icon is hidden, but you can find it in the last line on the keyboard, just tap one by one key and hold on it to see the settings icon)
3- If not success then try to change the default keyboard to any other Keyboard available on the phone and then try to open the Keyboard settings.
4- If you are success to open the Keyboard settings, then it's easy to go inside the locked phone, just click on "About" or "FAQ" on the settings menu.
5- Now select a word from the FAQ page and Click on Search icon on the top right corner of the phone.
6- Now to install apps follow the step 4 and 5 in "METHODE-1" (above)

METHOD-4

1- If you are able to select a word and it shows SHARE option
2- Then click on SHARE then select Message
3- Now give the Number 112 and type anything then click on send
4- Now you will see a call button just above on the screen, click on Call button, it will open the dial-pad.
5- Now clear the Number and type *#*#4636#*#*
6- Now click on Wifi Information and click back button inside the option, do not use the phone softkey back button.
7- Now it will open Settings, then click on Google then click on Search & Now
8- Now click on Now Cards -> Show Cards it will open Google App and now you can follow the step 4 and 5 in "METHOD-1" above.

Friday, April 21, 2017

How to Remove FRP Lock on Micromax Q462 Without Any Box


How to unlock FRP on Micromax Canvas 5 lite Q462? here is the tutorial about how reset or remove FRP lock on Micromax Q462. Then phone runs on Android 5.1 and can be unlock using the simple steps, unlock FRP on Micromax Q462 without using any flashing box. After unlocking frp go to Settings ---> About phone then tap 6 times on Build Number to enable Developer mode and then go to Developer Option and enable OEM unlock and then Factory reset the phone, now it will not ask any Gmail id and password.

Micromax Canvas 5 Lite FRP Unlock Solution - Micromax Q462 FRP Unlock Done

Micromax Canvas Fire 4G and Canvas 5 Lite Q462 FRP Unlock Solution:

Steps:

1- Switch on the phone and connect to WIFI or Mobile Network 
2- After connecting to Internet come back to the Wifi Network
3- Now choose "SwiftKey" Keyboard ( How to Select Switf Keyboard see the below)
4- Now select "Add another network" it will open the Swift keyboard.
5- Then click and hold on 123 button ( left below of the keyboard) it will show SwitfKey Settings 
6- Now click on Settings and scroll down and click/touch on "About SwiftKey"
7- Now click on Open-source licences it will open a page regarding the licenece
8- Now select a word by holding on it and click on "Search Icon" in the top right corner
9- Then select to open with Google App
10- Now connect the phone to PC and copy to the phone
Android_5_Google_Account_Manager.apk
com.rootjunky.frpbypass-1.0.apk
11- Now search and open "File Manager" and install account manager first and then install frp by pass apk and open it
12- Then click on top left corner (3 dots) and click on browser sign in
13- Now use your Gmail account and password to log in
14- After log in complete just reboot the phone and click next .. next to complete the setup process

Note: The phone should be connected to the Internet while following the above process. The apk files can be download using Google Search, download the file below.

Downloads:

1- Android_5_Google_Account_Manager.apk Here : Mirror Link
2- com.rootjunky.frpbypass-1.0.apk Here : Mirror Link

How to Choose/Enable SwiftKey?

1- First choose the languages by holding the setting key
2- Then hold the space key and select "SwiftKey"

Thursday, December 29, 2016

Micromax All in One FRP Tool


Here is the Micromax All in One FRP remove tool, download this tool and remove FRP lock of any Micromax Android smartphones. The tool is easy to use and the FRP tool software is small in size and can be download here. The below is the details about how to use Micromax All in One FRP tool and download link.

How to Use Micromax All in One FRP Tool?

1) Boot the phone into Fastboot Mode.
2) Connect the phone to PC using USB cable and let the fastboot driver install.
3) Now open the Micromax All in One FRP Tool.
4) Press 2, and then Press Enter for FRP remove.

If the phone does not go into fastboot mode, then boot into recovery mode first then choose reboot to bootloader, after that use the tool to remove FRP lock.

Note: By doing FRP reset you may lose the user data of the phone. We are not responsibly for any damage happens to the phone, do at your own risk. This topic is only for tutorial purpose.

Micromax All In One FRP Tool Download

YU5010A and YU5010 FRP Remove Guide:

        1] Press And Hold The Vol+ Key And Connect The Device.
        2] Press 1 for Check The Device Connected Or Not.
        3] Press 2 And Then Press Enter For Remove FRP.
 
YU4711 FRP Remove Guide:

        1] Go To Recovery of Device By Keys And Select Reboot To Bootloader.
        2] Connect Device With Pc And Press 3 And Enter For Remove FRP.
 
Factory Mode Fix Guide :
 
        1] Connect Your Device With Pc And Press 4 And Enter For Fix [ADB Must]
===============================================================================

            1. Check Device.           3. Remove FRP [YU4711].

            2. Remove FRP.             4. Factory Mode Fix.


===============================================================================
Enter your choice:
This process and tool tested on some particular model of Micromax Android smartphones and can try with all Micromax model.


Micromax All In One FRP Tool

How to Download File From Google Drive

Sunday, May 1, 2016

Micromax Q332 FRP Unlock Solution


How to hard reset Micromax Q332? and how you can by pass Email verification on hard reset of the Micromax Q332 Android Lollipop version 6.0. So here is the tutorial how you can solve the FRP lock of Micromax Q332. As you know if you hard reset Android Lollipop version 6.0 and above using hard keys then it will ask for reactivation of the Email id and Password if you forgot those then it will difficult to use the phone. The below is the way to solve FRP lock, Reactivation Factory Reset and do a hard reset after that.

Note: This topic is only for tutorial purpose and we are not responsible for any damage happen to the phone.

Q332 FRP Unlock Lock Solved Miracle Box

Micromax Q332 FRP Lock Solved Miracle Box.

Open Miracle Tool
Go to MTK Tab
Select Unlock/Fix Tab
Select Clear Setting/FRP
Click on Start
Connect the switch off phone to PC using USB cable


Sunday, April 3, 2016

Micromax FRP Unlock & Gmail Bypass Solution Using Tool


Here is the tutorial about FRP (Factory Reset Protection) Unlock process, which helps you to remove the Factory Reset Protection on Android Device and unlock the device or phone to factory defaults. This feature is available on Android Lollipop or higher version of Android Operation System. If you have question, how to hard reset and remove Gmail verification on the phone then this topic will help you to do a complete Factory Reset of the device.

What is FRP?
FRP (Factory Reset Protection) is available on Android Operation System v5.0 Lollipop or higher. If the phone has this feature, when you factory reset the device and start the phone to use it again, it will ask for Gmail id and password which you have used on this particular device or phone. If you forgot the Email and Password then the device won't start and become unusable. So here is the process to unlock FRP and Complete Hard Reset of Android device.

Note: If the phone belongs to you and you forgot the Email id and Password, then use this process. In this process you will lose all data on the phone. Do not use this process or unlock FRP if the device not belongs to you.

Micromax FRP Unlock Solution:

Micromax FRP Unlock Tool
Download Micromax All In One Tool (Can be download searching Google)
Unzip the file and you will find an application Micromax
Open the application
Now put the phone into Fastboot mode and connect to PC using USB cable
First check the device on the tool by pressing 1
Now press 2 and hit Enter to Remove FRP.

Micromax FRP Unlock Tool:

* YU5010A and YU5010 FRP Remove Guide:
       1] Press And Hold The Vol+ Key And Connect The Device.
       2] Press 1 for Check The Device Connected Or Not.

       3] Press 2 And Then Press Enter For Remove FRP.

* YU4711 FRP Remove Guide:
       1] Go To Recovery of Device By Keys And Select Reboot To Bootloader.
       2] Connect Device With Pc And Press 3 And Enter For Remove FRP.

* Factory Mode Mix Guide :
       1] Connect Your Device With Pc And Press 4 And Enter For Fix [ADB Must]

Options:
1. Check Device.
3. Remove FRP [YU4711].
2. Remove FRP.
4. Factory Mode Fix.

📚 You May Also Like to Read