Windows/Android & AI Tutorials, Tips, Tricks & Tech News

Search This Blog

Powered by Blogger.

Monday, October 31, 2011

How to Submit Website or Blog To Web Search Engine : Add URL to MSN, Google, Yahoo


Here is another topic to know how you can submit your Blogs and websites to the Popular search Engines, to Visible your site in the Search Results. If you are blogger or website owner then you must need to submit your website to popular search engine on the Internet, it's help you to index your website on the search results, so users can visit your blog or webpage and ultimately it will increase your audience and finally you get more visitors day by day.

Here is the Example, How to add website URL (Universal Resource Locator) to MSN, Google, Yahoo Search Engines. Just submit the home website URL and it's not required to submit all the webpages having in your website. For example this is our website https://www.freecomputertricks.in and we have so many content or pages or posts, so in that case just submit main website URL and the search engine will do the reset. When a user search using these web search engines the search engine scan whole website and if the website have the answer then it will index your content in the search results. The search results are always ranks with good and quality content and if your website have the quality and informative content then it will show on the first or second search result page otherwise it may go to any other search result page or may to last page.
How to Submit Website or Blog To Web Search Engine - Add URL to MSN, Google, Yahoo

How to Submit Website To Google, Bing and Yahoo Search Engine?

If you want to submit your website to search engines, then here is answer to know the step by step process to submit website to most popular web search engines, please go through this article to know the complete process and visit the web search submission links below.

Add Website URL to MSN or Bing

Click Here to Submit your URL

Go to the above page and submit your site to Bing search engine. Using this method you will not receive any data Bing is willing to share about your website. You can also submit the site to Bing using Bing's webmaster tools, but here you need to register or Sign Up. If you use Bing webmaster tool then it's better then the direct URL submission, because using webmaster tool you do more and better.

Visit Bing Webmaster Tools

How to Submit Website to Google Search Engine?

You can also add your website to indexing on Google for free, just visit Submit URL Google (link given below) and Login or Sign-Up there and submit your website to one of the most popular search engine on the Internet, Google also has the webmaster tools and to add URL you must visit the Google webmaster tools page and login using your Google account and submit your website for free and as you know in webmaster tools you can track the website performance.

Google Webmaster Tools

Sign in to Webmaster Tools using your Google user name and password
Enter your URL or website address

Submit Request

How to Submit Website To Yahoo?

In the same process you can add your website or blog to Yahoo search engine. click on "Submit a Website or Webpage"Enter the URL Of website then click on Submit URL. Sign in using your yahoo account Then you will get a massage "Thank you! Your URL has been added to our list of URLs to crawl. Please expect a delay of several weeks before your URL is crawled"

Submit Your Site To Yahoo Here

In this way you can submit your site to most popular web search engines on Internet. As I said before if you have a blog or website then it's must to submit the site to search engine to grow your audience and also it very helpful to visitors to get the quality content if your webpage has.
~~~~::: SEO Tips:::~~~

To get best Search Engine Optimization (SEO) write your own content and do not copy other website content. One more thing is always give the right, good and quality articles to your visitors and the topic must be well described.

How to Recover Deleted Files on Windows PC - Using Free Recovery Tool


You have an Operating System with programs like word, Excel, Photoshop etc. when you create a Document using Microsoft Word then save, it takes a portion of Hard Drive to Save the Document and also create a pointer/index/Link to that Document. That means when you create documents and save on the hard disk it creates an icon, those icons are called pointers to those documents and the icon knows where your document is. All the Operating System like Linux, Mac, Windows etc. has this feature.

Suppose you delete a document and empty the Recycle Bin. Actually what happens the computer does not delete the document itself, its only delete the pointer/link to that document. Then the operating system does not recognize where is the document stored and no longer protects the file or document.when you create another document or installing any software  the file will be over written because it's not protected by the operating system.
How to Recover Deleted Files on Windows PC - Using Free Recovery  Tool
So, when you accidentally deleted an important file, do not use the computer, download Data Recovery software like Recuva for your Windows Computer because it's free, just open google search then type Recuva you will get it. Install the Recuva software and scan for deleted files then you will recover the file you have deleted. If you are using other Operating System then you can search Google for the suitable Data Recovery Software for the PC.

It is always safe not to install Recuva on the Hard Drive where you have deleted the file. When you deleted a file just turn off the system and pull out the hard drive then install Recuva on another system and connect that Hard Disk then scan. 

But some times you can not Recover your deleted files and the causes are :-

If you deleted a file and wait for 10 days or a month and continuously using the computer, create new files, installing some software then the file will be overwritten, in that situation you will not able to recover the deleted file.

If you are using secure file deletion software, you will not able to recover the deleted file because when you delete a file using this software it is not only delete the pointer to that document but also delete the file itself.

Downloads:
Download Free Data Recovery Software For Windows Recuva | Download Link
 

Sunday, October 30, 2011

Frequently Used Keyboard Shortcuts For Microsoft Word


As you know on Windows Personal Computer Microsoft Word is one of the best Word processing software, in which you can write, design and make chart etc. So if you are Microsoft Word or MS Word user then you must need to know some very useful and frequently keyboard shortcuts to make your work easier. If you remember some basic keyboard shortcuts for MS Word then you do not need searching for the options just do it by using the Computer keyboard, for example it you need to Bold a word or sentence then just select the word or sentence then press Ctrl+B it will make it Bold, otherwise you need to select it then click on B letter on the tool bar.

Frequently Used Keyboard Shortcuts For Microsoft Word and this is same on all version of Microsoft Word, such as MS Word XP, MS Word 2003, MS Word 2007, MS Word 2010, MS Word 2013 and MS Word 2016. If you are a beginner then it will take some time to remember these Windows keyboard shortcuts for MS Word but after it will very easy to work with.

Frequently Used Keyboard Shortcuts For Microsoft Word

CTRL + A  -> Selects all in the current document
CTRL + B  -> Bold text
CTRL + I   -> Italic text
CTRL + U  -> Underline text
CTRL + C  -> Copy the item or text
CTRL + X  -> Cuts the item or text
CTRL + V  -> Paste
CTRL + Z  -> Undo the last action or One step Back
CTRL + Y  -> Redo the last undo action
Frequently Used Keyboard Shortcuts For Microsoft Word - https://www.freecomputertricks.in
Some More Keyboard Shortcuts - MS Word

CTRL + E  -> Center Alignment (Center text)
CTRL + J   -> Justify (Align text to both the left and right margins)
CTRL + L  -> Left Alignment (Align text to the Left)
Ctrl   + R  -> Right Alignment (Align text to the Right)
CTRL + F   -> Displays the Find dialog box
CTRL + G  -> Displays the Go to dialog box
CTRL + H  -> Displays the Replace dialog box
CTRL + D  -> Displays the Font dialog box
Ctrl   + S  -> Save the Document
Ctrl   + K  -> Create Hyperlink
Ctrl   + M  -> Tab
Ctrl   + N  -> Create a new document
Ctrl   + O  -> Open Files
Ctrl   + P  -> Print

Here is Some More Keyboard Shortcuts - MS Word

CTRL + F2 -> Show Print preview
Ctrl   + ENTER -> Insert Page Break
Ctrl   + F4 -> Closes the active document window
SHIFT + F12 -> Save document
SHIFT + F7 -> Launch the Thesaurus
F7 -> Spelling and Grammar Check

Manual GPRS/3G/4G/LTE Settings For Airtel (Mobile Office, Airtel Live & Airtel MMS)


How to manually configure Airtel GPRS/3G/4G/LTE on your Airtel mobile smartphone of feature phone? This is the topic where you will know the full detailed process to configure Internet settings on Your Android smartphone or any feature phone having Airtel SIM card. If you do not get the GRPS 3G or 4G settings from Airtel then you can follow the below configuration to get connected to Internet on your Airtel phone.

As you know when you insert Airtel SIM card in a phone for first time and switch on the phone, you will receive a configuration message for Airtel Internet, Airtel Live and Airtel MMS, it will ask to save the configuration settings, just save the it and you will get all the settings done and then you will access Internet on your phone. But in some cases you will not able to receive the settings message at that time you need to configure it manually on your device, so here is the tutorial about how you can manually configure Internet settings on the Airtel phone, please go through the below topic.
Manual GPRS3G4GLTE Settings For Airtel (Mobile Office, Airtel Live & Airtel MMS) - www.freecomputertricks.in

How to Manually Configure Access Point Names (APN) Airtel GPRS/3G/4G On Your Phone?

You can manually configure GPRS or 3G or 4G or LTE Internet settings on your phone and this process is same for all Android smartphones and feature phones. To access Internet on your Airtel phone you need to configure this on your phone, go to Phone settings --> Mobile Networks --> Access Point Names and if you have Dual SIM smartphone then choose the SIM card through which you want to access Internet, then follow the below steps. In some phones the Access Point Names will be in different place in the Phone settings but the configuration process is same on all smartphones, after getting the Access Point Settings please configure it as below or confirm the settings must be like below.

Mobile Office
Account Name/Connection name – Mobile Office
Data bearer – Packet Data/GPRS
Access point Name (APN) – airtelgprs.com
User name – None
Prompt Password – No
Authentication  – Normal
Homepage – None or www.google.co.in
Use access point - Automatically
Proxy/Proxy server address – None
Proxy Port Number – 0/None

In some phones you will get an Advanced settings (Options -> Advanced settings)

Network type - IPv4
Phone IP address - Automatic
DNS address - Automatic
Proxy server address - None
Proxy Port Number - 0/None

Airtel GPRS APN Manually Settings
Airtel Live
Account Name/Connection name  – Airtel live!
Data bearer – GPRS/ Packet Data
Access point Name (APN) – airtelfun.com
User name – None
Prompt Password – No
Authentication – Normal
Homepage –http://live.airtelworld.com
Use access point - After Confirmation
Proxy – Enabled/yes
Proxy and Server Adress – 100.1.200.99
Proxy Port number – 8080
Airtel MMS
Connection name - Airtel MMS
Data bearer - Packet data
Access point name (APN) - airtelmms.com
User name - None
Prompt password - No
Authentication - Normal
Homepage - http://100.1.201.171:1002/mmsc
Use access point - After confirmation
Proxy server address - 100.1.201.172
Proxy port number - 8799

How to Check Airtel Best Offers?

You can check The Airtel Best Offers For You On the Airtel App or By Dialing *121#.

Saturday, October 29, 2011

How To Change Default Image Editor On Your Windows PC


When you install Microsoft Office 2010 the default preview of Image file is changed to Microsoft Office 2010 and the edit option also. If you right click on an image and then click on Edit options then it will open in the default image editor which you have configured or automatically on your Windows XP and Windows 7 or Windows 10 or any other Windows personal Computer Operating System.

When you install Adobe Photoshop, you want to set Photoshop as a default edit Program, that means while right click on the image then click on edit option it should automatically opens with adobe Photoshop image editor. When you want to preview images in the Windows and Fax Viewer,and when you click the edit button (or right click on the image then edit) you want the image to open in your preferred program such as Microsoft Paint Application or Adobe Photoshop Windows Application. 
How To Change Default Image Editor On Your Windows PC
How To Change Default Image Editor On Your Windows PC?

You can change the default Windows application to edit image files on your personal computer, for that you need to change the advanced setting of the file types. For clear instruction please Follow the steps below.

Steps:
  • Open My Computer -> Click on Tools Menu -> Click on Folder Options -> Click on the File Types tab.
  • Select the file type to change (this may be either JPG,JPEG,PNG or GIF etc) if you want to change JPG then select it.
  • First Click on the Advanced button Sometimes You may have a Restore button. You will need to choose Restore to change the default application and then click on the Advanced button to proceed.
  • Under the Actions, you will find Edit, Open, Preview etc. 
1) How To Set Default Image Editor On Windows?
Click on the edit action and click on the Edit button, On the "Application used to perform action" click Browse Button and select your preferred program to edit then click OK twice. 

Example:- 

For Microsoft Paint Browse C:\WINDOWS\system32\ and choose mspaint.exe
For Photoshop Browse Browse C:\Program Files\Adobe\Photoshop 7.0\ Choose photshop.exe

If the Edit is not listed Click New to add an action Type Edit for the action and browse for the program, in this way you can also set any other Windows image editor application if you installed on your Computer.

2) How to Set Default Image Open Application on Windows?
Click on the Open Action then click on Edit Button and make sure in the "Application used to perform action" box the rundll32.exe C:\WINDOWS\System32\shimgvw.dll,ImageView_Fullscreen %1 should be there, if not then copy and paste it in the box, It's for the Windows and Fax Viewer then click OK twice.

3) How to Set Default Windows Image Preview Application?
Under the "Opens With" option, make sure the Windows and Fax Viewer program is chosen. If not, then click the Change button and choose Windows and Fax Viewer and click OK.

How To Associate a File Type or Protocol With a Specific Program Windows 7?

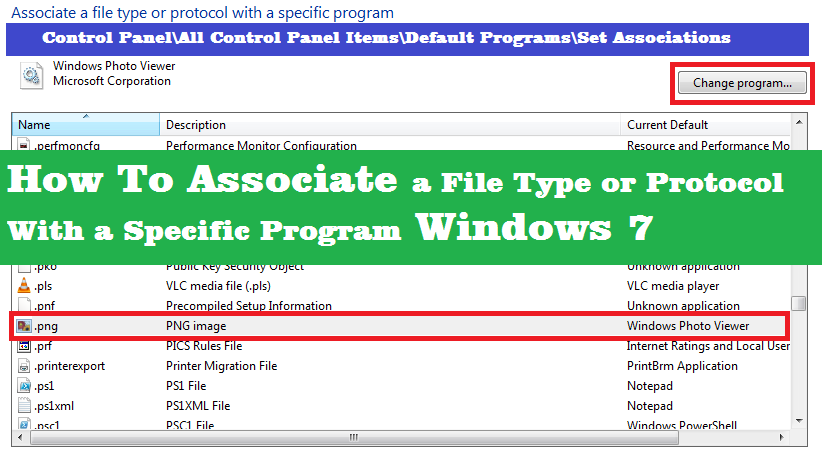
In Windows 7 it slightly difference from windows xp to set the default application or program for image editor or any other file type. To change the default program on your Windows 7 computer just follow the below steps and Click on an extension to view the program that currently opens it by default. To change the default program click change program.
How To Associate a File Type or Protocol With a Specific Program Windows 7
Steps:
  • Go to Control Panel\All Control Panel Items\Default Programs\Set Associations.
  • Now you will see all file types or extensions used on your Personal Computer.
  • For example select .png (it's one of the image format).
  • Now you will see the default program for this file such as Windows Photo Viewer.
  • To change the default program click on Change Program then choose the program you want to use to open this file.
  • If the program is not listed then click on Browse and select the program.
Now close the Folder Options window, double-click on an image to test. The Windows and Fax viewer should open showing the picture, then click the Edit option on the bottom toolbar (or right click on the image then edit) and your picture should open in your desired photo editing program.
~~~::: Did You Know :::~~~~
How to Search All Hidden Images Used By Windows?

Open the Windows Drive (C: Drive) and Type .png in the Search Box. 

It will show all the images used by Windows or any other program. Change the view type to  Details and arrange it by size, then change the view to Large Icon and you will find some stylish background images.

Friday, October 28, 2011

Change The Path or Storage Location of My Documents


Normally windows saves the "My Documents" Folder on the System Drive,where the windows is installed if it's C: Drive then the path is C:\Documents and Settings\Administrator\My Documents. My Documents is the default saving location of windows, while you save a file or download any content from the web it directly save to My Documents, if you do not use other location.

If the PC crash or You need to format C: Drive then the My Documents should be backed-up to other partition. If you forgot to take back-up, you may going to loss your documents.
Change The Location of My Documents On Windows

There is an idiom called "Prevention is better than cure", So, why not change the storage location or path of My Documents to avoid risk. If you reinstall Windows then you must loose your files inside the My Documents folder if not backed up all the files.

Change The Location of My Documents Windows XP:

Steps:
  • Just go to your Desktop and right click on My Documents.
  • Then click Properties the My Documents Properties will open.
  • Then click on Move Button it will ask to "Select a Destination".
  • Select a other Drive or Partition then click on OK then click OK again. 
  • It will ask "would you like to move all of the documents in your old location to the new location you have chosen" Click Yes.
Change The Location of My Documents Windows 7:

Steps: 
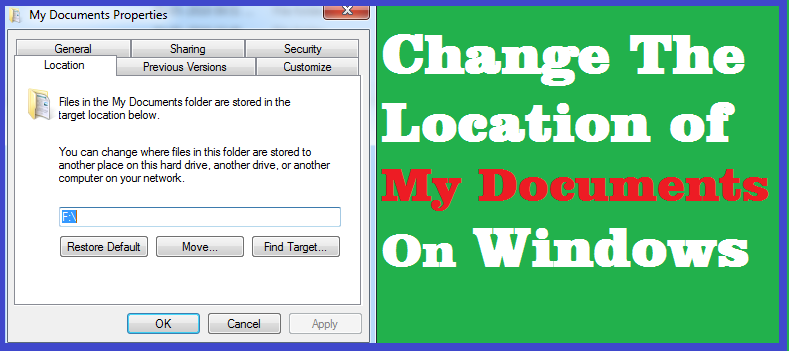
  • Go to C:\Users and choose the folder names as your Windows User Name, for example if the Windows 7 user name is MYPC then open MYPC folder then you will find My Documents folder.
  • Right Click on it and go to Properties.
  • Then Click on Location Tab and click on Move.
  • Now choose the new Location where you want to save the My Documents folder.
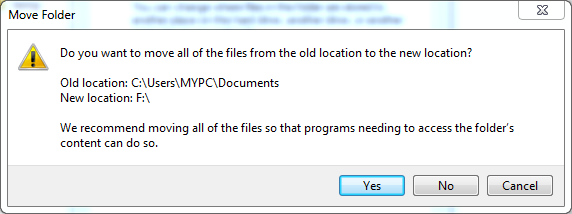
  • Now Click Apply and it will ask to move all the files from the older location to new location, Click Yes.
Windows My Documents - move all the files from the older location to new location
Now all your files and folder in the My Documents is safe, no need to take back-up My Documents while Formatting C: Drive for installing Windows Operating System.

~~~~::: Did You Know :::~~~
You Can Download Windows 10 Enterprise For Free
Download Your 90-Day Trial Of Windows 10 Enterprise Here.

How to Use Nokia 5800 Mobile as a WiFi Hotspot


Normally we use Nokia Mobiles as USB modem to access internet on Computers. Just Download OVI Suite from the Nokia website, install it on your PC, Connect the Nokia Phone with a Data Cable and get connected to the internet.

But do you know that, if you have a Nokia Mobile with Wi-Fi option then you can connect your Wi-Fi devices such as Laptops, ipod, ipad or other Wi-Fi mobiles to access internet of the mobile by turning it on as a Wi-Fi Router.
So how can we do that, here is the example for  Nokia 5800 Mobile Handset and the procedure is almost same for all Nokia Wi-Fi enabled Handset, just follow these steps bellow.
How to Use Nokia 5800 As a Wi-Fi Hotspot
You need to install an Application Called Joikuspot on the Nokia 5800 to make it a WiFi HotSpot.It's simple to download just go to store.ovi.com and register for an account, then come back to your mobile, open Ovi store Sign in using the user name and password that You have created, then make a search for Joikuspot you will get JOIKUSPOT LIGHT WiFi HotSpot Which is Free and JOIKUSPOT PREMIUM WiFi HotSpot for which you have to pay, let's go for the LIGHT download and install it.

Steps:
  • Install Joikuspot app on the phone.
  • Now open the Application and click allow sharing internet connection.
  • Set a Password on it.
  • Now you can use the phone as Wi-Fi hotspot, access the hotspot with password.
Then open the JoikuSpot it will ask to "Allow sharing your internet connection with external devices" select No, then go to Option-> Settings-> Encryption Select WEP Open select OK, then Encryption key length 64-bit which requires 5 characters or 128-bit which requires 13 characters just go for 64-bit it can be changed later if want, then Joikuspot automatically generate a Encryption key you can change it just select and give a key i.e abc12, then go back and select Start then select Yes it will ask for Access point select Mobile Office if you are using Airtel SIM or as per your service provider, now go to the Laptop search for Wifi Click Connect and give the Encryption key you have created. That's all now you can access internet on your Laptop through the WiFi.

~~~::: Nokia Launched Nokia 6.1 with Android One :::~~~
Nokia 6.1 Key Specifications:
  • Network Speed: LTE Cat. 4, 150 Mbps DL/50 Mbps UL
  • WiFi: 802.11 a/b/g/n
  • Bluetooth: 5.0
  • GPS/AGPS+GLONASS+BDS+FM/RDS, NFC
  • Operating System: Android Oreo
  • RAM: 4 GB (LPDDR 4)
    CPU: Qualcomm Snapdragon 630, octa-core, 2.2 GHz
  • Storage: Internal memory 64 GB2 eMMC 5.1
  •                    MicroSD card slot Support for up to 128 GB3
  • Display: Size and type 5.5” (13.97 cm) IPS LCD, full-HD
You can get more details on Nokia Official Website.

Thursday, October 27, 2011

Best Keyboard Shortcuts For Windows Computer and Laptop


Most of the Computer users using mouse to perform an action on the windows but sometime it takes time. Using the Keyboard Shortcuts is most useful and time saving method that makes you more efficient. Once you Practice these keyboard shortcuts, it's very useful to you while use computers every day.

If you remember these important Windows Keyboard shortcuts by practicing daily then it must be very helpful for you to work faster on your Windows computer. Instead of searching for Applications and using Mouse to open Windows applications or use Computer Mouse to copy and paste it better to user Windows shortcut keys.
Best Keyboard Shortcuts For Windows Computer and Laptop

The followings are some best keyboard shortcuts:-
Windows Key + R = Run dialog box
followed by:
cmd = Command Prompt
winword = open Microsoft word
excel = Microsoft Excel
powerpnt = Microsoft Power Point
notepad = Notepad
mspaint = paint
calc = Calculator
iexplore = Windows Internet Explorer


ALT + Tab = Switch Between Opened Windows
Alt + Esc = Switch Between Running Applications
ALT, Space, X = Maximize a Opened Window
Alt, Space, C = Close a Opened Window
Alt + Double click on file or folder = Shows Properties of that


Ctrl + Esc = Open start menu 
Ctrl+Shift+Esc = Task Manager
Ctrl+Alt+Del = Task Manager
CTRL + C = copy
CTRL + X = cut
CTRL + V = paste 
Ctrl + Z = Undo
Ctrl + Y = Redo 


Windows Key = Open start menu
Windows key + Pause Break = System properties
Windows key + F = Search
Windows key + D = Show Desktop/Show open windows
Windows key + M = Minimize all open windows
Windows key + Shift + M = Undo minimize all open windows
Windows Key + E = Explorer

~~~::: Blogging Tips :::~~~
If you are a Blogger and want to get best Search Engine Optimization (SEO), then the best and primary way is write your own content and should be well described. Write long content and don't try to copy paste other blog or website content.

Wednesday, October 26, 2011

How to Block Websites On Your Windows Computer Without Using Any Software


Do you know you can block any website you don't want to open on your Computer browser. For this you do not need to use any website blocking software or application on your Windows PC. To block websites on your Windows computer just follow a small trick which is so easy and everyone can do this on their Computers. This technique is very useful if you have Computer in your home and your family members are using it. For example if you have limited Internet connection then you can block all download websites or online video websites.

Block websites with few simple steps no need to use any software sometime its very useful to you. Please follow these below steps to block or restrict access to websites that you do not need.
How to Block Websites On Your Computer Without Using Any Software

Block Websites On Your Windows Computer - Solution
  • Brows C:\WINDOWS\system32\drivers\etc (where C: is your system Drive)
  • Double click on the file named "hosts"
  • It will ask Choose the program you want to use to open this file Choose notepad then click OK
  • In the notepad you will find something like below, it may be differ in your case.
-------------------------------------------------------------------
# Copyright (c) 1993-1999 Microsoft Corp.
#
# This is a sample HOSTS file used by Microsoft TCP/IP for Windows.
#
# This file contains the mappings of IP addresses to host names. Each
# entry should be kept on an individual line. The IP address should
# be placed in the first column followed by the corresponding host name.
# The IP address and the host name should be separated by at least one space.
#
# Additionally, comments (such as these) may be inserted on individual
# lines or following the machine name denoted by a '#' symbol.
#
# For example:
#
#      102.54.94.97     rhino.acme.com          # source server
#       38.25.63.10     x.acme.com              # x client host
127.0.0.1       localhost
-----------------------------------------------------------------------
  • Don't worry about that, all you have to is add the website just bellow of "127.0.0.1  localhost" and that site will no longer accessible.
Example:-
127.0.0.1      localhost
127.0.0.1      *****.com (The website address)
  • Then save it (File menu save or Ctrl+s) 
  • So now put the address you have given in your browser it will show "unable to connect". 
  • You can add more websites like that.
You may also interested to know what is the concept, how it block the websites. Actually while you enter 127.0.0.1 (is the Loopback Address) then at-least one space and the website name. It simply redirect the website to the IP 127.0.0.1 which is a loopback address of your PC, so there is nothing to show and finally the browser can't display the web page or website.

~~~::: Computer Tips & Tricks Of The Day :::~~~
Press Windows Key + R Then Type msinfo32 and Press Enter Key - It Will Show the System Information, where you will get to know the Configuration of the Windows PC or Laptop such as Processor, RAM, Windows Version, System Model and System Manufacturer etc.

How to Backup and Restore Windows Registry


While you are searching the web for computer problems or tricks you may get some solution that told you to Edit or modify the Registry, before you going to do that the whole registry must be backed up, because if you make any mistake and forgot the steps that you have made then its difficult to recover the registry for which you will face some problems in your PC. If there is a wrong entry or delete a wrong Registry key then the Windows Computer may fails to work and sometimes it may not Start and continuously restarts. So why not backup the whole registry first, to do that please go through the below article.

In this tutorial you will get to know how to Backup the Windows Computer Registry and in case any wrong happens to the Windows Operating System then you can restore the same. Please go through this article to know the process of backup and restore Windows Registry.
How to Backup and Restore Windows Registry

How to Export or Backup Windows Registry:-
  • Click Start, then click Run or (Windows Key + R)
  • In the Run dialog box type regedit then click OK.
  • The Windows Registry Editor will open.
  • Now Click On the File Menu then Click Export.
  • In the export registry file save in box chose the the location and type a file name such as Windows Registry Backup then click Save.
  • You can also select the button at the bottom,whether you want to export all or selected branches of the registry.
  • Its always better to back up whole Windows registry so let's do it. 
How to Restore the Windows Registry:-

To restore the registry keys just double click the .reg file that you have saved and click Yes to confirm or Open the registry editor, on the file menu click import then select the .reg file and click on Open.

~~~::: Tips Of The Day :::~~~
Useful Windows Keyboard Shortcuts
=> Windows key + D = Shows The Desktop
=> Windows key + M = Minimizes All Open Windows
=> Windows key + Shift + M = Maximizes All Open Windows

Tuesday, October 25, 2011

Windows Run Commands or Shortcuts To Access Windows System Utilities


As you know Windows Run commands help the user to access Applications and other system utilities or system tools directly executed from the RUN dialogue box and no need to search Windows Applications or where to get the system configuration tool. That means if an user wants to access or open Computer Management, using Run command what you have to do is just open the Run dialogue box (Windows Key + R) then type compmgmt.msc then press Enter Key it will open Computer Management Window for you but if you want to access it through the Windows then what you have to is Right click on My Computer or Computer and click on Manage, then it will do the same thing. So if the user know these Windows RUN commands then he/she can access Applications or Utilities very fast. Some important Run commands for windows, type these commands in Run dialog box and press Enter.

Windows run commands - easy to access system utilities/tools and Windows Applications

If we take another example if you want to Open Group Policy, let's use the first option using the RUN COMMAND open Run dialogue box (Windows Key + R) then type gpedit.msc and hit Enter it will open the Local Group Policy Editor for you but if we do not know the command then we have to follow the Second option, such as first go to Control Panel then search for Group Policy  then you will find the search result Edit group policy  under Administrative Tool and it's really takes time. So better if you know the Run commands the shortcut way to open Windows Applications and Windows Tools/Utilities, Let's have a look at the below Run commands which really very useful for Computer User.

Some Important Run Commands For Windows:
Run Commands Results
compmgmt.msc To Open Computer Management
cmd It Will Open Command Prompt
devmgmt.msc To Open Device Manager
diskmgmt.msc It Will Open Disk Management
eventvwr.msc It Will Open Event Viewer
fsmgmt.msc It Will Open Shared Folders
gpedit.msc It Will Open Group Policies
perfmon.msc It Will Open Performance Monitor
secpol.msc It Will Open Local security Policy
services.msc It Will Open Services Monitor
msconfig It Will Open System Configuration Utility
regedit It Will Open Registry Editor
msinfo32 It Will Show System Information
win.ini Windows Loading Information
winver It Will Shows Current Version of Windows
mailto Opens Default Email Client

These are the Commands that's commonly used in Run dialogue box to access Windows system utilities. In this way you can also access or open Windows applications such as to Open Microsoft Word use winword in Run dialogue box and press Enter key.

-:Today's Quote:-
Be Happy Today and Always Remain So

Monday, October 24, 2011

How to Prevent Access to Drives of My Computer


Sometimes we need to prevent users to access the hard drives in My Computer, for that most of the people use various third party software, but Microsoft windows has it's own inbuilt option to do that. If you enable this setting in "Group Policy" user cannot open folders and access the contents of these Drive, Also they cannot use the Run dialog box to view the files and folders on these drives. To lock or block your computer hard disk use the following setting in Group Policy and it helps you to lock the drive and without your permission nobody can access it.

Log in as Administrator on your Windows PC and then do the Group Policy settings to prevent access to the drives. When you set this as Administrator no other user can turn it off and can not access to the Hard Disk Drives in your My Computer, after enabling it other users can see the drives but can not open it so your all personal and important computer data are safe. Prevent access to drives of My computer using group policy, is the inbuilt feature of Windows operating system and you do not need to use any third party applications to lock My computer drives. Please go through the below steps to lock the drives of your computer which completely free on Microsoft Windows Personal Computer.
How to Prevent Access to drives of My Computer - Lock or Hide Hard Disk Drives


To use this settings go through the following steps:-
  • Click on the start button then run or simply hit Windows key + R on the keyboard type gpedit.msc in run dialog box then press Enter.
  • The Group Policy window will appear double click on Administrative Templates under User Configuration.
  • Then Double click on Windows Components then click on Windows Explorer and from the right panel double click on the "Prevent access to drives from My Computer" select Enabled and chose a combination from the drop down box you can select Restrict All drives to restrict all drives or select one of the combinations.
  • Then click Apply & OK.
How to Disable It?
If you want to disable this feature or Windows, then just follow the above steps instead of selecting "Restrict All Drives" or any other particular drive just select "Do not restrict drives" or as you can there are 3 options "Not Configured" "Enable" and "Disable" just select Disable and click on Apply then OK. In this case all users can view files and folders which you have in your Hard Disk Drive and also they can modify it.

Lock My Hard Drive or Hide My Drive Using Software:

You can also lock or hide your drive by using third party software available on Internet. Here we are giving  some links to popular My Computer drive locker software for Windows PC such as Lock My Drive Free Locker, Disk Drive Security and HDD drive lock free.

Lock My Drive Free Locker | Download
Disk Drive Security 3.6 | Download
Hard Disk Drive lock | Download
    Conclusion:
    So if you want the Computer user should not access your Hard Disk Drives, then you can do it without using any special software or application on your PC. Use the above settings in the Group Policy and prevent access to the Computer drivers. You can stop access to the all Hard drive partitions such as C: Drive, D: Drive, E: Drive etc. and if you need to prevent access to a particular drive choose the option "Restrict C drive only" or Restrict D drive Only" and so on. If you want to prevent access to all drives just select the option "Restrict all drives". This feature is very helpful for those who has important data on the computer and computer has several users.

    Saturday, October 22, 2011

    Task Manager Has Been Disabled By Your Administrator - Solved


    This is the most common error for the computer users. When you press the Ctrl+Alt+Delete to manage your tasks or to open Task Manager you get the error massage "Task Manger has been disabled by your administrator". When you right click on Windows Task Bar and Start Task Manager it will show you an error message that "The task manager has been disabled by your administrator although you have single PC on your Room and there is no other Administrator that control the Computer, then why this error comes? You will face this error if your Computer System infected with Virus or Spyware etc. Here in this article I will show you how you can easily solve "Task manager has been disabled by your administrator" on your Personal Computer.

    Why This Error Comes?
    As you know if you are using a Windows PC and then your must have Antivirus application on it, otherwise the PC will get infected with several computer virus, malware, spyware or adware etc. and you will get this type of error that your task manager has been disabled and you will unable open the task bar on your Computer, not only this problem you will face many other problems it the PC is getting infected with viruses. So it happens due to Virus, Mal-ware, Spyware affected the PC or in some cases someone has made this changes in Group Policy.
    Task Manager Has Been Disabled By Your Administrator - Windows 7

    How to Solve Windows Task Manager Disabled?
    You can solve this issue or error on your Windows PC by following the below steps, where the detail process to solve Task Manager issue on Your Windows Computer has been described. So you need to setup the GROUP POLICY of Windows to re-enable the Task Manager, which so easy and anyone can do it it he/she has a basic Computer knowledge, please follow the steps below.

    If You want to enable Task Manager just follow these steps: 
    • Go to Start -> Run and type gpedit.msc it will open Windows Group Policy.
    • On the Local Computer Group Policy Editor Window will appear. 
    • Double click { or Click on the Plus (+) Sign left side of the option} on Administrative Templates under User Configuration.
    • Then Double click on "System"
    • Then click on "Ctrl+Alt+Del Option" 
    Task Manager Has Been Disabled By Your Administrator Working After Follow this process
    On the right side panel you will see "Remove Task Manager" double click on that then click on "Disabled" Then Apply it and finally click on OK button. If it's Enabled or Not Configured then also select Disabled and Apply. 

    Close the group policy, press Ctrl+Alt+Del you will see the Task Manager. 

    Remember if its enabled that means your task manager will not work, sometimes it shows the state "Not configured" in that case it may not work, it should be Disabled to work perfect.

    -:Tips Of The Day:-
    The Kaspersky Lab has released  Kaspersky Free Antivirus edition for Windows, Which gives Free and Fast Protection For You and Your PC - Download Kaspersky Free Antivirus Here.

    Thursday, October 20, 2011

    Free Download Photoshop 5x7 Backgrounds


    Photoshop Backgrounds free download and edit your personal photos. Free Photoshop HD Backgrounds download and enjoy studio backgrounds. Download Photoshop 5x7 beautiful background for Photo editing, by using these backgrounds you can edit a photo with Photoshop or any other photo editing software and change the photo background to look the photo attractive.

    Here we provides Photoshop background images with a size of 5 inches width and 7 inches height or 750 x 1050 pixels with resolution 96 dpi. As the background images are available with the size of 5x7 you can crop it to any other size you need. You can change a photo's background by using Adobe Photoshop Windows Software or you can also use any other photo editing software.

    As you know you can edit and make your photo looks better by using Photoshop and one of the basic photo editing tips is to change the background of the photo. When you click a photo with Digital camera or Smartphone at that time you may not find the proper background to shoot the photo but you can change the background by using the photo editing software like Adobe Photoshop CC, Cyberlink Photodirector, Adobe Lightroom Classic CC, Adobe Photoshop Elements, DxO Optics Pro, Apple Photos for mac OS, Corel Paint Shop Pro etc.
    Free Download Photoshop 5x7 Backgrounds
    Download Most Beautiful Photoshop Backgrounds (5X7):

    As you can see the above image, it's a sample image of all 10 stylish studio background images. You can download the full resolution background images form the below links. 


    Studio Bluer with pendant Style Background | Download
    Change Photo Background With jewelry and Other object mixed | Download
    Photo background image with temple pillar and flowers mixed | Download
    Background image with victor style tree and light green mixed | Download
    Stylish designed Blue background image with jewelry | Download
    Photoshop background with flower bunch and bluer border | Download
    Background portrait with flower and mix green background | Download
    Photo editing background with flower and waterfall mixed | Download
    Victor style image with flower background for photo editing | Download
    Background image with flower on the pillar and other mixed | Download

    The above are some new and styled Photoshop backgrounds for photo editing and make you photo to looks better. Download photo editing background images to change the photo background using any photo editing software.