Showing posts with label Mobile Flashing Software. Show all posts

Wednesday, May 6, 2015

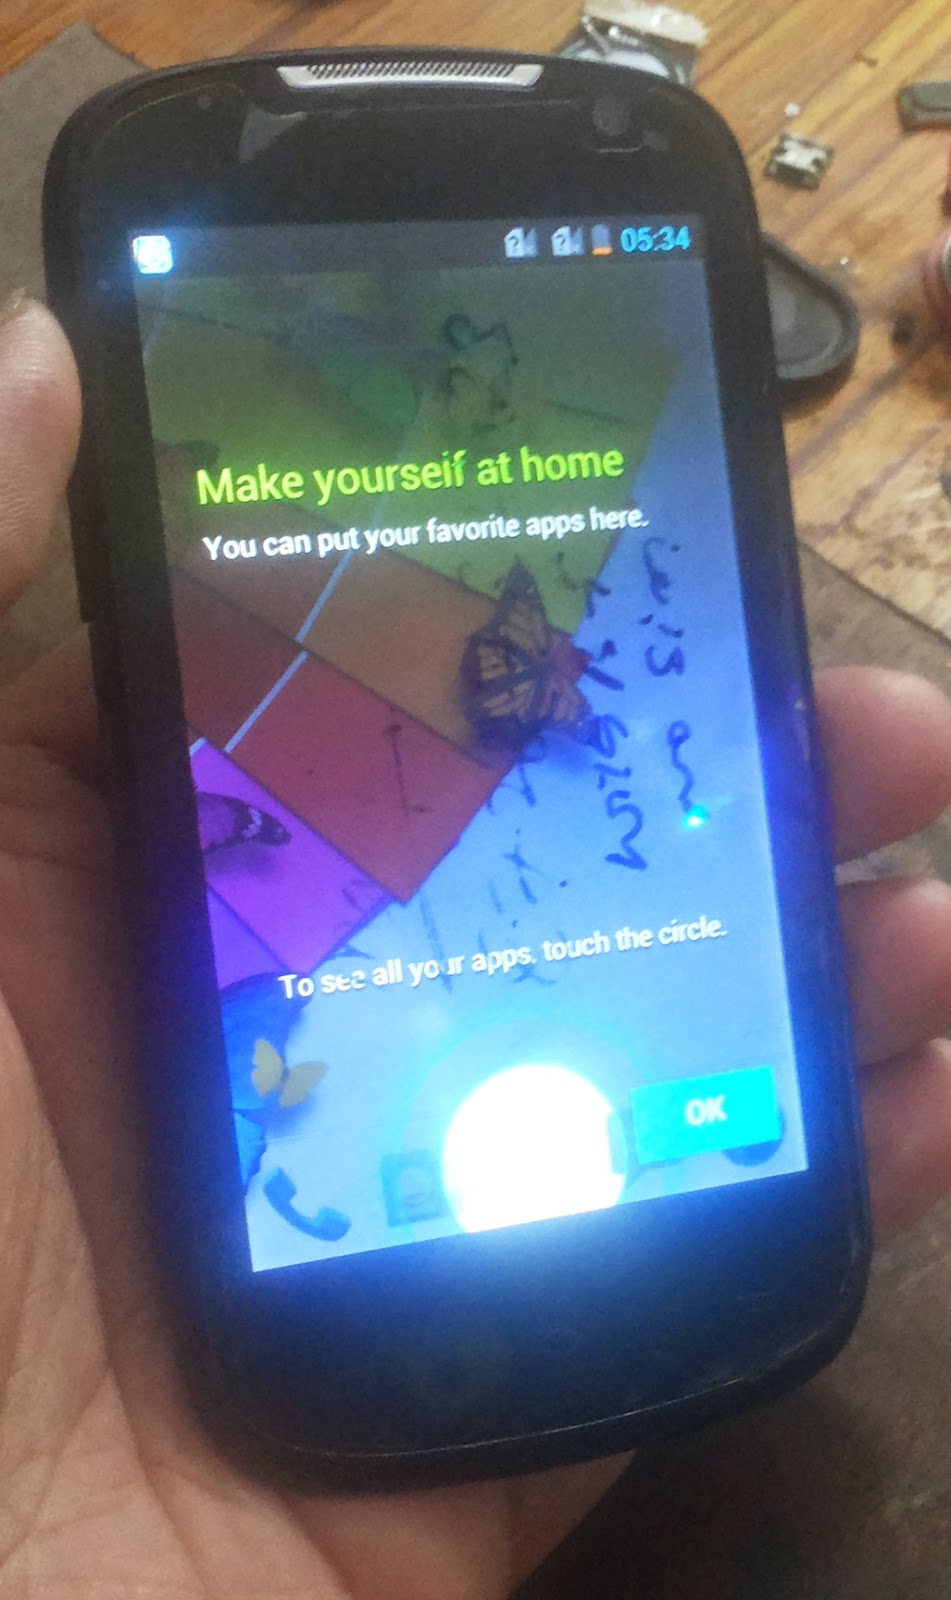
How to Flash Intex Aqua N15 With SmartPhone Flash Tool


Here is the process to flash Intex Aqua N15 using SP flash tool, to flash the phone you need to download Intex Aqua N15 Firmware and SP flash tool latest version. 

Intex Aqua N15 Flashing Will help you to solve the hang problem of the Intex Aqua N15, it will also the restart problem of the phone, see the below point how the Intex Aqua N15 flashing helps.


Intex Aqua N15 Software/Firmware Faults and Solution
Hangs on Logo
Restarting Problem
Blinking Problem
Gallery not opening
Menu options not work properly 
Suck on Intex Logo etc.

All the above problems may be due to Firmware issue or software issue or flashing issue, so download the firmware and flash the phone using SP flash tool, the phone problems will solve.

Downloads:
Intex Aqua N15 Firmware
Smartphone Flash Tool 


Intex Aqua N15 Flash with SP flash tool V5

How to flash Intex Aqua N15
  • Open sp flash tool 
  • Load MT6582_Android_scatter.txt
  • Click on Download
  • Now connect the switched off phone PC using USB Cable

Saturday, April 25, 2015

How to Flash Xolo A500 With Update Tool - A Complete Flashing Procedure of Xolo A500


How to flash Xolo A500 with flash tool? here is the full step by step procedure to flash Xolo A500. The phone has a Qualcomm CPU and can be flash with update tool. Here you can get the download link, file version and flashing process of Xolo A500. Xolo A500 hangs on logo and restart problem can be solved by flashing the phone using update tool.


Xolo A500 Flashing Procedure

Downloads
Xolo A500 Firmware 
Xolo-A500-S013-2013-01-30.zip
Xolo A500 Driver (Must Install)
XOLO A500 USB Driver 32bit ver2.0.rar


Xolo A500 Flashing Procedure
  • First install the Xolo A500 USB Driver (Important)

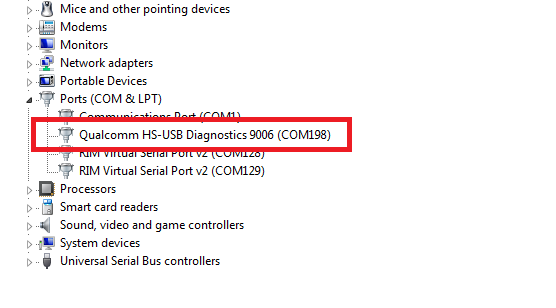
Xolo A500 Qualcomm CPU Driver Successfully Installed

  • Now extract the flash file or firmware you have downloaded
  • Go to the firmware folder, then open Update Tool
  • Select Repair Mode and Select rawprogram0.xml in the SW -->modem folder
  • Connect the phone using USB cable by holding the Both Volume Key


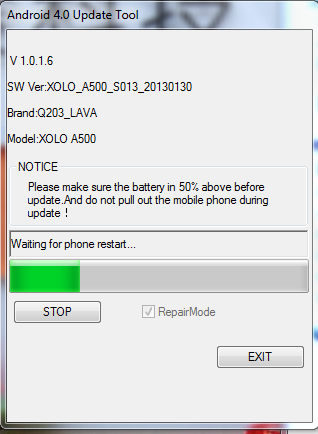
Xolo A500 Update process starts

  • Now Click on Start and wait till finish the process

Xolo A500 Successfully Update with update tool
Note: Battery should be 50% or above. As the above procedure to flash Xolo A500 is tested and working fine but try at your own risk, we are not responsible for any damage to your phone.

Monday, February 9, 2015

Volcano Latest Setup 2015 Download - Volcano Tool V2.9.2


Download the latest setup of Volcano Utility 2015 V2.9.2, which has many more updates and fix. The below is the details of New Volcano Tool V2.9.2 and download link. So download the latest volcano tool and enjoy the mobile flashing. This version is specially included MTK CPU features and many more New MTK CPU is added, it's a MTK special update which help you to flash latest MTK Android smartphone with NAND and EMMC features.


Volcano Tool V2.9.2


What's new ? Volcano Tool V2.9.2


  • World's 1st MTK Android added new Boot
  • Totally new method for read/write
  • MTK Android Read maximum size 32G
  • Greatly improved Read speed
  • Support some phones which could not Read/Write in the past
  • In Android tool add new Boot file
  • MTK6571+NAND add new flash support and optimize Read/Write
  • MTK6572+NAND add new flash support and optimize Read/Write
  • MTK6573+NAND add new flash support and optimize Read/Write
  • MTK6575+NAND add new flash support and optimize Read/Write
  • MTK6577+NAND add new flash support and optimize Read/Write
  • MTK6571+EMMC add new flash support and optimize Read/Write
  • MTK6572+EMMC add new flash support and optimize Read/Write
  • MTK6577+EMMC add new flash support and optimize Read/Write
  • MTK6582+EMMC add new flash support and optimize Read/Write
  • MTK6589+EMMC add new flash support and optimize Read/Write
  • MTK6592+EMMC add new flash support and optimize Read/Write


Friday, February 6, 2015

DISKO K3 SPD SC6531 Read Flash and Format Success With Volcano Tool V2.9.1


How to format and read flash of Disko K3 Mobile phone, which has a SPD 6531 CPU. The below is the process to flash the phone using Volcano Tool.

DISKO K3 CPU Details
CPU TYPE:SC6531 [65310001]
FLASH ID: 00C8006000180000
Size:0x1000000(16MB)


First do the read flash and then select the flash file and format the phone using volcano utility.

Disko K3 Format With Volcano Tool V2.9.1
  • Open volcano tool
  • Go to SPD tab
  • Select Boot 15 SC6531
  • Select Format
  • Select the read flash file
  • Click on Start


DISKO K3 SPD SC6531 Chip Format Success With Volcano Tool
Disko K3 Volcano Tool Log:
Detection initiated...
  Vcc: null
  Gnd: 5
  Analyzing D+ and D-...
  D+ = 3, D- = 2
  Detection D+/D- with 1.20 seconds.
  Continue to detect BOOT pin...
  Found [SPD] USB device: SCI USB2Serial,(VID_1782&PID_4D00)
  BOOT(Pull Down) = 4
  Setting...
  Find USB device:SCI USB2Serial (COM12), (VID_1782&PID_4D00)
  Pinouts setting complete!
   
  Internal version: SPRD3
  Boot downloaded.
  Start boot please wait a moment....
  Spreadtrum Boot Block version 1.2
  CPU TYPE:SC6531 [65310001]
  FLASH ID: 00C8006000180000
  Size:0x1000000(16MB)
  Set to Factory successfully.

Saturday, January 24, 2015

X2-02 China Read Flash and Read Unlock Code Done With Volcano Tool


How to flash x202 china mobile with volcano tool? X2 02 china has a Coolsand RDA Chip-set (RDA8851A) and can be flash with volcano utility. The below is the complete process to flash the phone using volcano box.


X2-02 Read Unlock Code With Volcano Tool

  • Go to Coolsand_RDA Tab
  • Select Unlock Code
  • Tick on Auto Detect Pinouts
  • Click Start
  • Connect the phone with Volcano JIG and press power button.


X2 02 China Read Unlock Code Done With Volcano Utility V2.9.1

Download X2 02 China Flash file 
Password for the Zip file = x202fct


Thursday, August 7, 2014

How to Update Mxkey Online - Get Mxkey Latest Updates


As you know Mxkey Latest update and setup file is mobileEx_setup_v3.5_rev2.6(20130509), but after installation of the setup you can update Mxkey to get important file by synchronizing files online, that means you can get some important updates for Mxkey. The below is the process to update Mxkey online.


Mxkey Update Online

  • Open Mxkey mobileEx 3.5 (rev2.6)
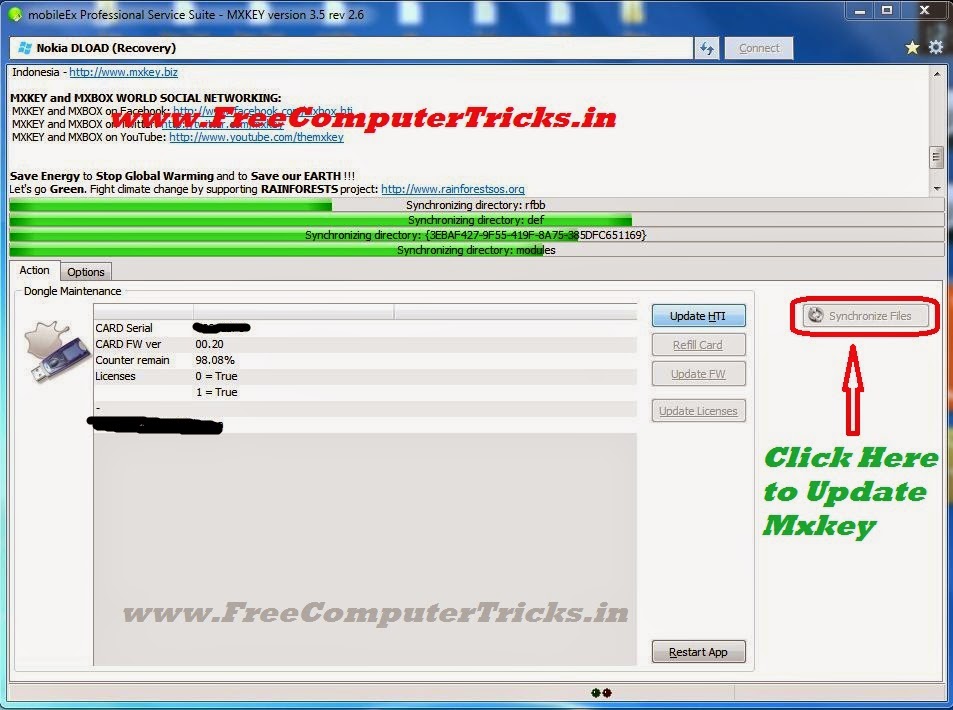
  • Click on Synchronize Files

Mxkey Update Online Process

  • Then Click on Update

MXKEY - Update Sync

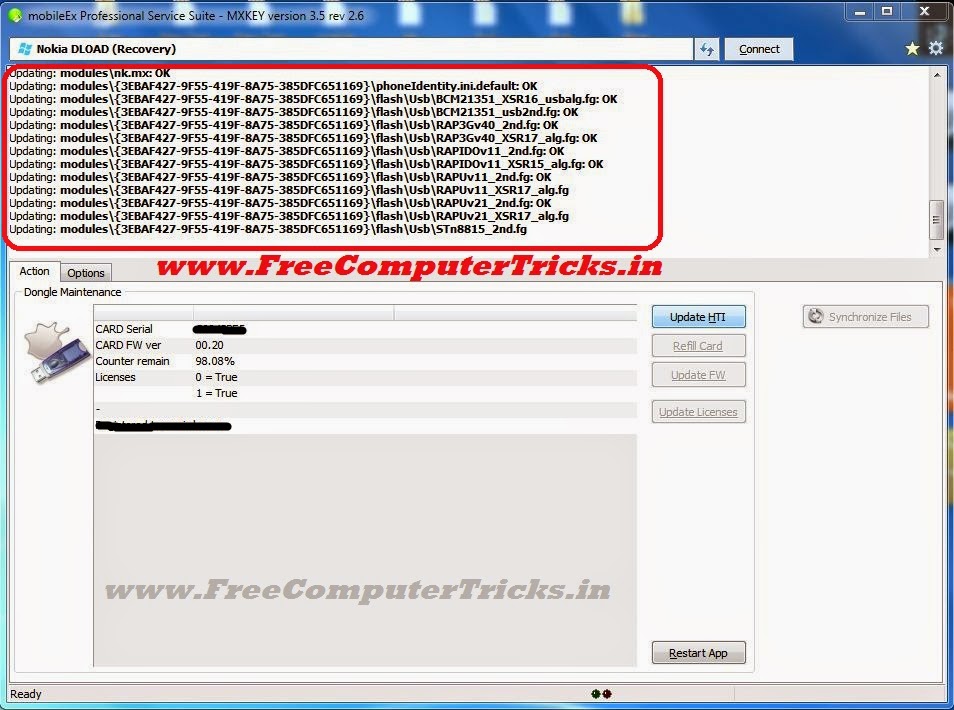
  • Now Important files are Updating, wait till finish

Mxkey Updating Online

  • Now Click on Yes restart application

mxkey update complete restart application click yes


That's all now you have successfully update Mxkey to the latest setup, enjoy mxkey.

Mxkey No Security Dongle Detected Windows 7 Solved


Mxkey no security detected problem on Windows 7, if you are facing this problem then this guide will help you to completely solve the "Mxkey no security dongle detected" issue. Here you can know about the step by step procedure to overcome the problem and get solution. The below is the procedure to solve 'No security dongle detected' for Windows 7.


Mxkey No Security Dongle Detected Windows 7
Mxkey No Security Dongle Detected Solution

1) Uninstall any old version of Mxkey and Install New Version
2) Do not download the Mxkey setup from other site, always download from official site of Mxkey.
3) While Installing Mxkey, Install all drivers you prompt at the time of Installation.
4) To update Smart Card Drive always use the path C:\mobileEx\3.5
5) After Installation Restart the Computer.

Mxkey Latest Version mobileEx_setup_v3.5_rev2.6(20130509)

Follow the above steps for installing Mxkey on Windows 7, then you will be solved the problem of No security dongle detected.


After installing Mxkey software connect the Mxkey to the computer and check device manager for the drivers are installed or not. In mxkey two driver must install automatically 1) USB Token Device 2) USB Token Holder, if these driver is not installed then you may have the problem in setup, just reinstall the Mxkey setup downloaded from official site, your problem will be solved.


Mxkey No security dongle detected Windows 7 Solved 100%
If these two driver are installed successfully then you can use Mxkey and the no security dongle detected problem will solve. If you want to install Smart card driver, then just update the driver and give the path C:\mobileEx\3.5, the smart card will automatically install.


Note: If there is no light blinks in the Mxkey dongle, that means the Mxkey device is not working and it's a hardware fault.

Saturday, July 5, 2014

How to Flash Samsung C3303 With Flash Loader


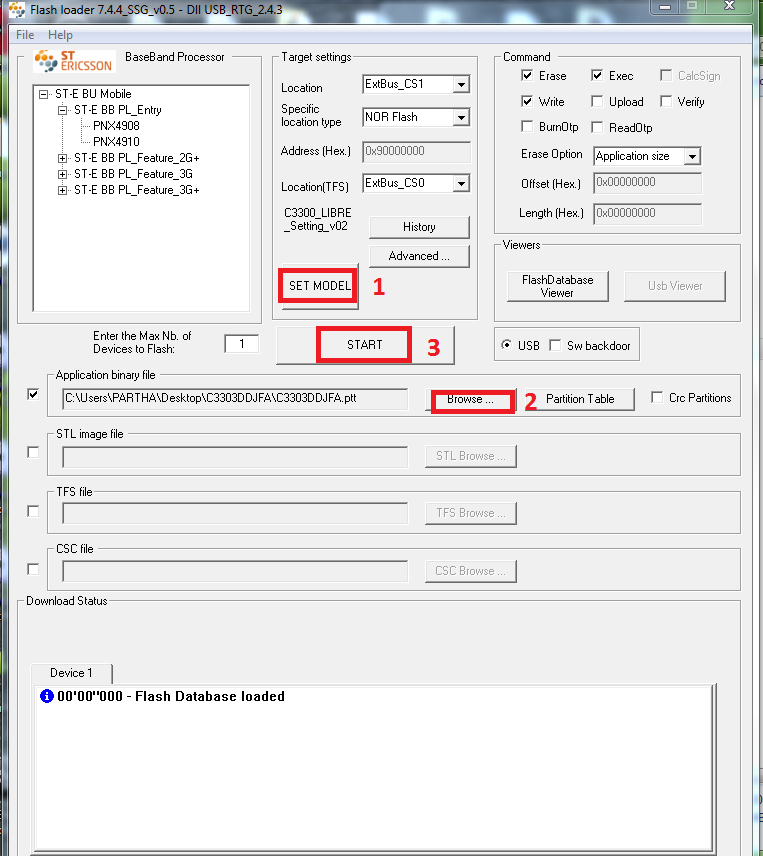
Here is the step by step tutorial to flash Samsung C3303 using Flash Loader (Flash_loader_7.4.4_SSG_v0.5). So in this topic you will know how to flash Samsung C3303 Champ without using any Box only use a USB Cable.

Samsung c3303 Flash with Flash Loader settings


Download

  • Samsung C3303 Firmware (C3303DDJFA)
  • Download C3300K_Flash_loader_7.4.4_SSG_v0.5
  • Download C3300_LIBRE_Setting_v02.mdl

Flash C3303 With Flash Loader (How to and Settings)


How to Flash C3303 With Flash Loader

  • Open Flash loader 7.4.4_SSG_v0.5
  • Click on SET MODEL and Select C3300_LIBRE_Setting_v02.mdl
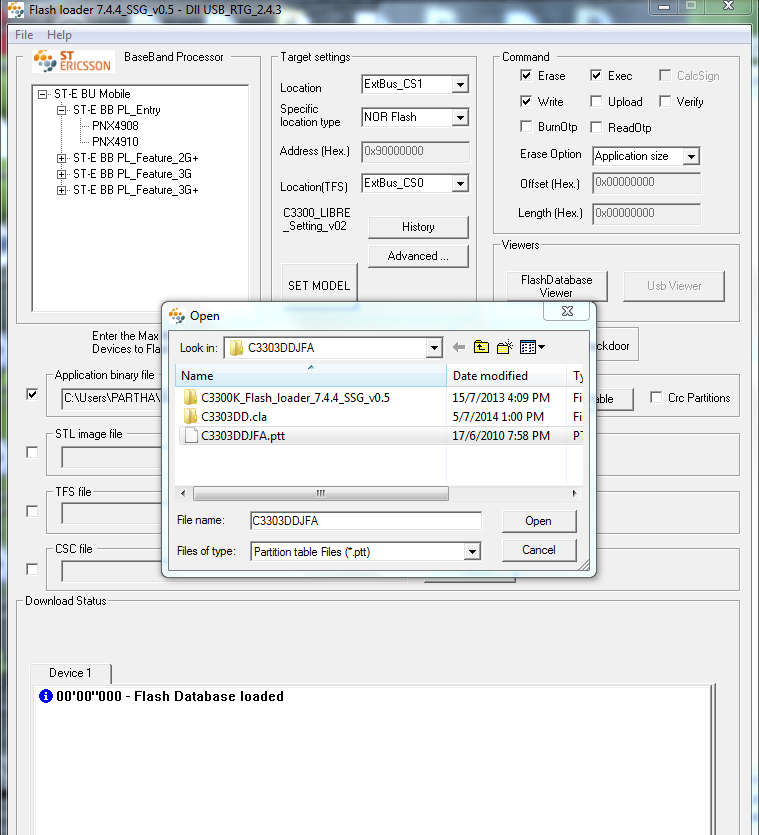
  • Click on Browse and Open C3303DDJFA.ptt
  • Now Click on Start 
  • Then Press Volume Down + Lock key then connect USB Cable


Search Tags: flash c3303 flash loader, Flash Sam Champ C3303 by Flash Loader, Samsung c3303 i flashing, how to flash c3303 flash loader, how to flash Samsung champ c3303 using flash loader, c3303 flash without box.


Friday, July 4, 2014

How to Flash Samsung S5360 With Odin - www.FreeComputerTricks.in


Here is the complete process or step by step process to flash Samsung S5360 with Odin. Samsung S5360 Restart problem solved by flashing with Odin3. Download the Samsung Firmware for S5360 and Odin3 V1.84 with totoro_0623.pit file and flash with Odin, the below is the process to flash S5360 with Odin.


Required Files To Flash S5360

  • Samsung S5360 Flash File
  • Odin 3 with Pit File
  • A micro USB Cable


Samsung S5360 Flash with Odin


How to Flash S5360 With Odin


  • Open Odin3_v1.84
  • Click on PIT Tab and Select totoro_0623.pit
  • BOOTLOADER = DefaultCalDataWithBoot_S5360XXKK5_REV05.tar
  • PDA = PDA_S5360XXKK6_REV05.tar
  • PHONE = MODEM_S5360XXKK5_REV05.tar
  • CSC = GT-S5360-MULTI-CSC-OXEKK1.tar
  • Put the S5360 into Download Mode and connect with USB Cable (Download Mode S5360 = Volume Down + Home + Power then Volume Up)
  • Now Click on Start


How to flash S5360 with Odin (Odin Flashing Process S5360)

Let the Flash finished, when you see All threads completed and PASS! that means you have completed the flashing of S5360.

Wednesday, May 14, 2014

How to Flash Karbonn A1+ With Upgrade Download Tool - A Complete Procedure


Here is the complete tutorial to flash karbonn a1+ mobile phone using Upgrade Download Tool. In this topic you will able to know the flashing procedure of karbonn a1+ and the CFT Calibrate & IMIE Issue of the phone and also know how to create a modified USB cable for the Karbonn A1+.

Firmware and Tools To Download

  • A1 Plus_Download Tool_Latest
  • PZ286FM_KMOEB_karbonn_A1_FOREIGN_V2.0.8
  • A1 PLUS-IMEI & CFT Issue
These Karbonn A1+ Tools and Firmware can be download from moulnisky website, so first download these files and extract using unzip software then follow the steps below to flash the phone.


1) How to Flash Karbonn A1+ Using Upgrade Download Tool?


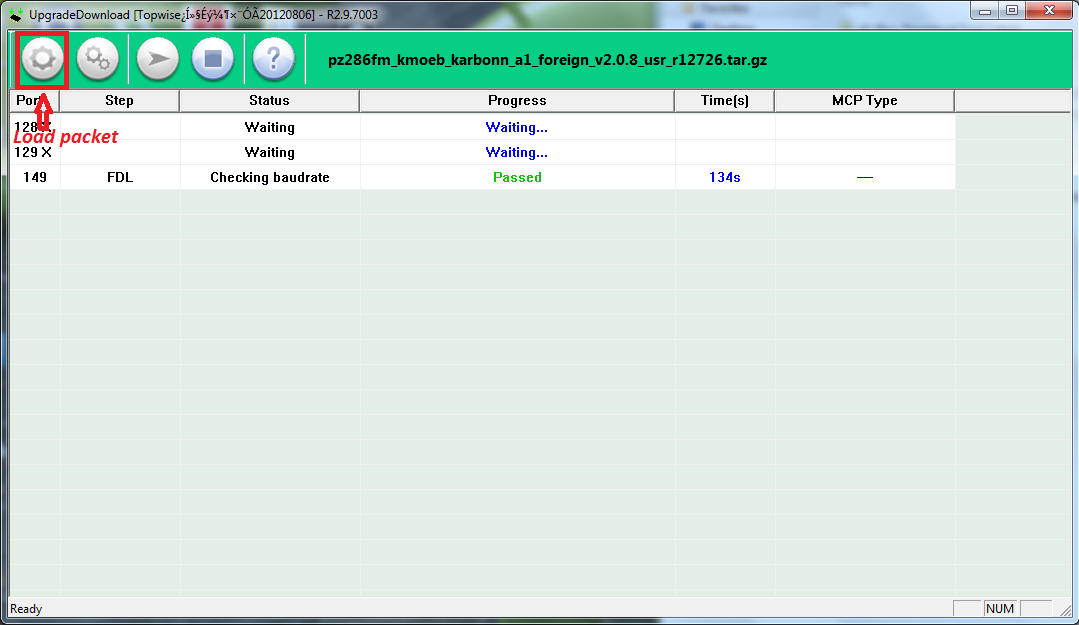
  • Open Upgrade Download Tool
  • Choose the PAC File (Load Packet -->PZ286FM_KMOEB_karbonn_A1_FOREIGN_V2.0.8_usr_r12726.tar.gz.pac File)
  • Then choose the HWInfoImg (XYL_XYL635143-1B_ILI9487_35_CMO_KMOEB_PZ286_DZTX_HW_info)
  • Connect the Karbonn A1+ to Computer with Modified USB Cable
  • Then Click on Start Downloading

karbonn k1+ Flash With Upgrade Download Tool

After flash success switch On the phone, you will get some error message on screen i.e. No IMEI and CFT Not Calibrate, don't worry about this see the below step to solve this.

2) Karbonn A1 PLUS IMEI & CFT Issue

  • Open The Folder A1 PLUS-IMEI&CFT Issue
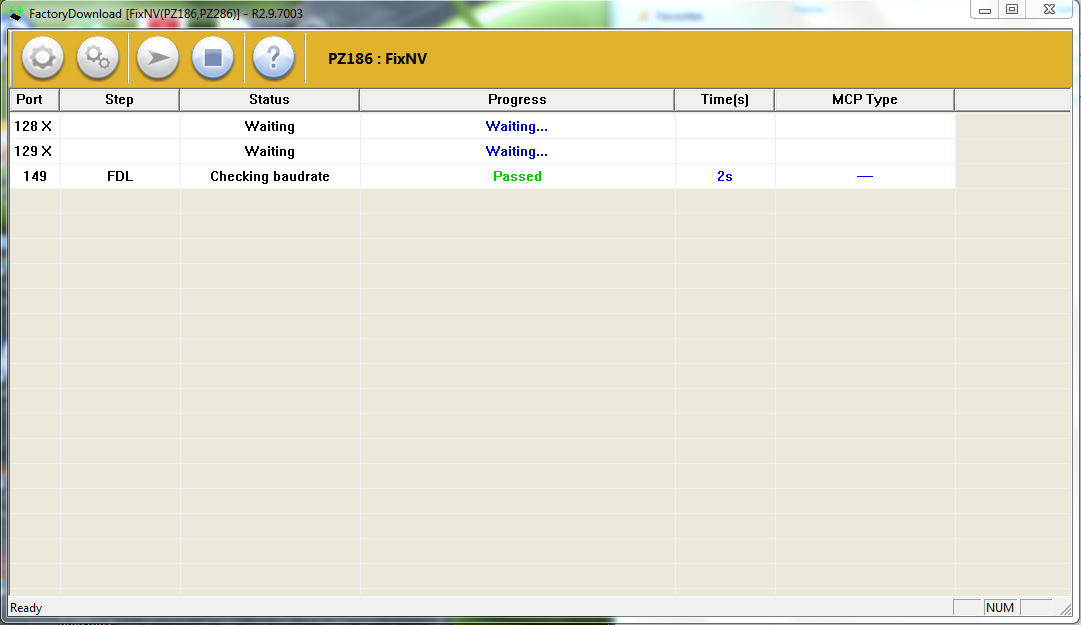
  • Then Open FactoryDownload.exe
  • Just Click on Ok on Download Settings
  • Connect the phone to PC
  • Click Start Downloading
  • Wait till you see Passed

Karbonn A1+ CFT Not Calibrate/No IMEI Issue Solved


Karbonn A1+ IMEI Solution

  • Switch on the phone
  • Connect with Normal Micro USB Cable 
  • Set the COM Port and Click on Write
Karbonn A1 Plus IMEI Solution


How to Create Modified USB Cable For Karbonn A1+?

Take a Nokia CA-101 USB Cable
Pin - 1= VCC
Pin -2= D-
Pin -3 = D+
Pin -4 = Empty
Pin -5 = GND

Just Joint the Pin 4 and 5 to Create the Android Modified Cable

(Sold one wire with Black color wire PIN-5 and another wire to the empty PIN then short the both wire)

Modified USB Cable For Karbonn A1 Plus and all other Feature-phones & Smartphones

This Cable is useful for Feature Phone and Android Smartphones

Sunday, May 11, 2014

Download Latest Version Of Volcano Tool V2.6.4 - Volcano Box Updates


Volcano Box release it's latest update again, The Volcano Tool V2.6.4 which has many more things in it and fix some bugs also. So here is the latest Volcano tool V2.6.4 download and enjoy with Volcano Box.


Volcano Tool Latest Setup V2.6.4


What's New In Volcano Tool V2.6.4


  • MTK Android Tool Fixed 6573 BUG format
  • MTK Android Tool Fixed 6575 BUG format
  • Adjust the MTK6573 to read flash
  • Adjust the MTK6575 to read flash
  • Adjust the MTK6572 to read flash
  • Adjust the MTK6589 to read flash (Beta)
  • Adjust the MTK6572 write flash
  • Adjust the MTK6583 write flash (Beta)
  • Spreadtrum Android added new flash support
  • Adjust the SC6531 to read flash
  • MTK IMEI new algo added


For more information visit gpgindustries forum

Saturday, May 3, 2014

Volcano Tool V2.6.3 SPD 6531 Dead Problem Solved and Added CDMA Tool 1.0


Volcano Box Latest Update has been released, Volcano Tool V2.6.3 the latest Tool version of Volcano Box which has many more new things in it. Download Volcano Tool v2.6.3 Latest Setup 2 May, 2014.


Volcano Tool V2.6.3 What's new ?


  • Solved SPD 6531 Read Flash Makes Phone Dead
  • Solved SPD 6531 Format Makes Phone Dead
  • Solved SPD 6531 Read/Write
  • Added Coolsand RDA8851E 27LQ128 Support
  • Added New Flash IC For SPD Android 6820/8810
  • MTK Android Added New CPU MT6592 Read/Write
  • MTK Android Added New CPU MT6592 IMEI Repair


Volcano Tool V2.6.3 SPD 6531 Dead Solution and CDMA Tool v1.0


Volcano Tool Added CDMA Tool 1.0


CDMA Phones Supported List


Huawei
C2829, C2830, C2831, C2835, C2839M, C2856, C2930T

Alcatel
C131, OT-255c

Haier
C2030, C380, C5000, C5100, CG220, OL2110

Huawei Modem
EC122, EC150, EC156, EC1260, EC1261

Karbonn
B121

Lava
L661

LG
LG6210, RD3500, RD3510, RD3530, RD3540, RD3550, RD3600, RD3610, RD3630, RD3640, RD6100, TS3520

Micromax
3xx Modems, C100, C111

Samsung
B119, B139, B159, DE26, B159, DE28, B189, B199, B209, B219, B229, B229,
FD09, B259, B269, B279, B309, B319, B339FM, B619, F219, S189, S259, W169

ZTE
C132, C332, F285, M131, N600+, N788, S100, S130, S160, S1602, S165,
S170, S183, S185, V9A, V9C

ZTE Modem
MF190


Download Volcano Tool Latest Setup v.2.6.3 from the below link


Tuesday, April 22, 2014

VolcanoTool_v2.6.2 Latest Volcano Tool Update For Volcano Box Users as on 21-04-2014


VolcanoTool_v2.6.2 Latest Volcano Tool as on 21-04-2014, Good news for Volcano users, Volcano Tool V2.6.1 and Volcano Tool V2.6.2 is ready to download in support area of Gpg Industries.

 
VolcanoTool_v2.6.1

World's 1st Support Added for MTK 6595

Word's 1st Support Added for MTK 6592

World's 1st Added "Install all the apks in your selected folder to the data partition


World's 1st Added "Install one apk to the data partition

World's 1st Added "Install one apk to the system partition

World's 1st Added "Backup all the apk from the data partition to the PC

World's 1st Added "Backup all the apk from the system partition to the PC

MTK6260 Some Bugs Solved 


Volcano Tool V2.6.2 Volcano Latest Updates


VolcanoTool_v2.6.2


Removed Read info from All SPD Tabs Except SPD Android

Removed Read Password & Imei from All SPD Tabs


Added Support Area Button in Top of the Software


Solved MTK6260 Read Flash Auto Software Close Problem


Added Support for New Flash ic of MTK6582


Improved Read Flash of MTK Full Flash


Added Support for New MTK Android Flash Type


Added New Algo to Root Android Phones


Added New way to Root ADB Android Phones


Improved SPD6531 Read Flash & Dead


Improved SPD6500x Read Flash


Improved SPD6500x Write Flash 


Tuesday, April 15, 2014

Micromax A36 Hard Reset and Pattern Unlock Android Mutitool


How to hard reset Micromax A36 to remove pattern lock? Just put the Micromax A36 in Fast Boot Mode then Open Android Multitool and press 8 on keyboard then press Enter. See the below procedure.


Micromax Hard Reset or Wipe Data/Cache On Fast Boot Mode


  • Press Volume Down + Power Button Until See Fast Boot Mode

  • Then Open Android Multi Tool
  • Connect the Micromax A36 to PC Using USB Cable
  • Enter 8 on keyboard
  • Then Press Enter
  • After Wipe Data the device will restart automatically 


Micromax A36 Wipe Data on Fast Boot Mode Android Multi Tool


That's all now you have successfully remove the pattern lock on Micromax A36, remember all data will be erased.


Tuesday, April 8, 2014

How to Flash Micromax A67 With Flash Tool and Volcano Tool


In this topic I will show you how you can flash Micromax A67 with Flash Tool and with help of Volcano Tool. Let's have a basic idea about the flashing procedure of Micromax A67, for this you need a tool called Upgrade Download and LCD Download Tool, which can be found on web. Then you need a Flash Tool Box to set the pinouts i.e. Volcano Tool or China King Box. So below is the step by step procedure to flash the Micromax A67 using Flash Tool and Volcano Tool.


File need to download

A67 Service Tool (Flash Tool and LCD Download Tool)
Micromax A67 Firmware/Flash File according to your phone's HW version(Remove battery and see the sticker)

PA287AN_KMOEB_DM451_Micromax_A67_FOREIGN_V1.1.8
or
PA287AN_KMOEB_DM451_Micromax_A67_FOREIGN_V1.1.7


Note: Do it at your own risk, we are not responsible for any kind of damage to the phone. If you are expert in Mobile software then you can easily do that.


Step By Step Procedure To Flash Micromax A67

We have three Main Steps

1) Set the Pinouts
2) Upgrade Download  with Flash Tool
3) LCD Download with Tool


Micromax A67 Upgrade Download With Flash Tool

Open Upgrade Download.exe
Click on Load Packet (First Icon From Left)

Micromax A67 Flashing Procedure with Flash Tool

Select the Flash File .pac format and Click Open then Click on OK
(PA287AN_KMOEB_DM451_Micromax_A67_FOREIGN_V1.1.8_user_r22644.tar.gz.pac)
Now Click on HWInfoImg and choose YXD_Y82917-06_ILI9806C_45_IVO_SPI_KMO_SH_SHT045382BA_msg2138a_pa287_KMOEB_A67_HW_info

Open Hardware Info Image Micromax A67 Flash


Click on Open then Click on OK

Don't do any thing just let it be like that Now Open Volcano Tool and Set the Pinouts.


Setting Pinouts Micromax A67 with Volcano Tool

Open Volcano Tool
Go to Detect Tab
Select [D+/D-]MTK USB find boot
Manually Set the Pinouts
Pin 1= Pull Down
Pin2= USB D-
Pin3= USB D+
Pin5= GND
Then Click on Set Pinout

No Need To Press any Boot Key 
Use Box Power and Jig Cable

Micromax A67 Set Pinout to Flash with Flash Tool
Now go back Flash Tool and Click on Start Download
After Download finished you will see Passed on the flash tool

Micromax A67 Flashing Done or Download Passed
Now Click on Stop Button and Close the Flash Tool

You are not finished yes, after firmware download you have to do LCD Download other wise you will not see anything on the Micromax A67 Screen.

LCD Download Process

Open LCD Download Tool
Click on Load Packet and Choose the .pac file then click OK(Like Upgrade Download)
Now Click on HWInfoImg and Choose
YXD_Y82917_ILI9806C_45_HSD_SPI_KMO_SH_SHT045382BA_msg2138a_pa287_KMOEB_A67_HW_info
Click Open and then click OK


Choose LCD Hard Ware Info Image File For Micromax A67

Then Click on Set Pinout again on Volcano Tool
Now Click on Start Download

Micromax A67 LCD Download Passed
After finish click on Stop and close the LCD Download Tool


Now you have successfully flashed the Micromax A67 with Loader/ Flash Tool.


📚 You May Also Like to Read