Showing posts with label Samsung. Show all posts

Thursday, February 23, 2023

Samsung Firmware Update


Samsung firmware

Samsung firmware refers to the software that runs on Samsung devices, including smartphones, tablets, and other electronic devices. The firmware includes the operating system, device drivers, and other essential software components that enable the device to function properly.

Samsung releases firmware updates periodically to improve the performance, security, and stability of their devices. Firmware updates can also introduce new features and functionality to the device. These updates are usually available through the device's Settings app, and users can manually check for updates and download them over Wi-Fi or mobile data.

It's important to keep your Samsung device's firmware up to date to ensure optimal performance and security. However, it's recommended to back up your important data before updating your device's firmware, as updates can sometimes cause data loss or other issues.
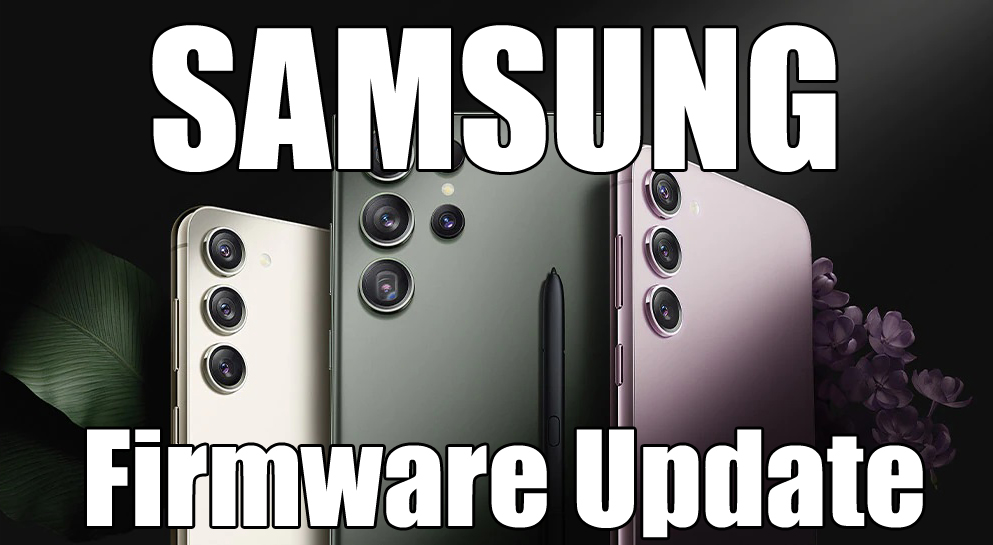
Samsung Firmware Update

Samsung Firmware Update

To update your Samsung firmware, follow these steps:


  1. Connect your Samsung device to a Wi-Fi network or mobile data network.
  2. Go to your device's Settings app.
  3. Scroll down and select "Software update" or "System updates."
  4. Tap "Download and install" or "Check for updates."
  5. If an update is available, tap "Download and install" to start the update process. Depending on the size of the update, it may take some time to complete.
  6. After the update is downloaded, your device will automatically restart and install the update.


Note: Make sure your device has sufficient battery life before starting the update process. If your device's battery is low, connect it to a charger before starting the update. Additionally, it's recommended to back up your important data before updating your device's firmware, as updates can sometimes cause data loss or other issues.

Thursday, February 27, 2020

How to Enable Wi-Fi Calling on J7? How to Make Wi-Fi Call Samsung J7


Hi friends, in this tutorial I will show how you can enable Wi-Fi calling on your Samsung J7 with step by step procedure to make a Wi-Fi call using your Android Samsung J7 smartphone, so please go through the post to know how to enable Wi-Fi calling on your Samsung J7 and how to make Wi-Fi calls on your Samsung J7 and this procedure is completely same on any Samsung smartphone with has Wi-Fi calling feature.

As you all know Wi-Fi calling has started in India and if you are using Reliance Jio or Airtel SIM card on your 4G Volte enabled handset then you can easily get the Wi-Fi calling from your operator and it's completely free of cost. So to use Wi-Fi calling you need to have a supported device with Jio or Airtel SIM card.

Samsung J7 Enable Wi-Calling? Samsung J7 Wi-Fi Call Testing

Wi-Fi calling is also called Voice Over Wi-Fi (VoWi-Fi) which allows you to make called through internet you have connected and this can be any operator Internet or broadband, just you need to connect to the Internet through the Wi-Fi and enable the option/setting then enjoy free Wi-Fi calling.


How to Enable Wi-Fi Calling on J7?

Procedure 1.

  • Open the Dial pad
  • Then click on More
  • Then click on Settings
  • Then enable Wi-Fi calling

Samsung J7 Enable Wi-Fi Calling Step By Step Procedure

Procedure 2.


  • Drag from the top
  • Then click on Wi-Fi calling


How to enable Wi-Fi calling on J7 Procedure 2

After enabling the Wi-Fi calling option you will see the Wi-Fi calling icon on your dial pad, remember which SIM has volte enabled that SIM only work for Wi-Fi calling and you must connected to the Internet.


Samsung J7 Wi-Fi Calling || Samsung J7 VoWiFi Calling || Free Wi-Fi Calling in India

Thursday, October 17, 2019

Samsung Clear All Apps Cached Data in One Click


In this topic you will find the solution and the procedure to clear or delete all Android applications cached data (something like Android temporary files) in one click using the inbuilt application and this procedure is tested on Samsung J7 and it may works on any Samsung Android smartphones.

Samsung Clear All Apps Cached Data in One Click

To delete all applications cached data in one click please follow the below steps on your Samsung android smartphone.

Samsung Clear All Apps Cached Data in One Click

  • Open smart manager.
  • Click on Storage.
  • Click on Details.
  • Then click on Internal Storage.
  • Click on Cached data.
  • Then click on Delete.


In this way you can delete all cached data on your Android smartphone and this procedure helps you to free more space in Internal storage. If you are facing low space warning then follow this procedure to increase the Internal storage capacity by deleting the apps cached data, and here is the procedure to clear or delete cached data in one click.

Thursday, August 23, 2018

SM-J210F Touch Not Working After Upgrade|Hard Reset|Copy Combo LCD [Solved]


Galaxy J2 (2016) SM-J210F Touch Not Working Solution Here, SM-J210F Touch Not Working Solved Without Data Loss, Samsung J2 2016 Touch not working after Hard reset Solution here, J2 6 touch not working after update solution here, Samsung J2 2016 touch do not work done with a small file, download the file from the below link and flash using Odin 3 Samsung flash tool, flash the file using Odin3 and then check the Galaxy touch will work fine, it's tested and 100% working, so we share this with you. In this way no need flash the phone with full firmware which causes personal data loss, just use the small file and there is no risk of losing your user data on the smartphone.or in case you are using copy J2 2016 combo and touch not working then follow this tutorial you will solve the issue. j2 2016 compatible LCD with touch not working and the final solution here.

SM-J210F after flash or after hard reset or after upgrade touch not working issue is solved here, if you are using copy LCD (combo) then this problem comes, so below is the download link for touch working flash file which is 10 MB in size, just download that and flash with odin3.
Galaxy J2 (2016) SM-J210F Touch Not Working Solution Here
 Download the file given below and follow the Video tutorial, Samsung J2 2016 touch not working solved using a small flash file which can be flash using Odin 3 Samsung flash tool and no need to flash full firmware, just flash this small file and after that touch will work fine, it has been tested and working fine for us. Flashing with this file there is no risk of data loss, so follow the procedure and recover the Samsung J2 2016 which has touch working issues.


Downloads

J210F Touch Not Working Flash File [Download Link]
Password = fctj210f

Download Odin3 Samsung Flash Tool Free [Download Link]

Friday, November 17, 2017

Samsung J2 (SM-J200G/DD) Hang On Logo Solution Here


Today we will discuss about, one of the common problem on Samsung J2 SM-J200G/DD, which is hang on logo or stuck on logo and how to solve it. So here we will show you how to find out the proper solution for the Samsung J2 hang on logo.


Samsung J2 SM-J200G Hang on logo solution

Let's Understand:

When you switch on a working Samsung J2 phone you will see two boot screen or logo of Samsung, the first boot logo is "Samsung Galaxy J2 Powered By Android" and the other one is "SAMSUNG" which you will see just after a few seconds  of the first boot screen. The second boot logo comes with a animated effect and you will here the boot sound of Samsung, So here we know and clear that there are 2 types of logo appear on the Samsung J2 screen when we switch on the phone.

First Logo is "Samsung Galaxy J2 Powered By Android"
Second Logo is  "SAMSUNG"

So when you try to find out the solution for the hang on logo problem on Samsung J2, first check the problem whether it's stuck on the first boot logo or on the second boot logo. If the phone stuck on first boot logo then it's 100% due to hardware problem and if it's suck on the second boot logo then it's the software problem, in that case you can flash the phone with latest Samsung J2 firmware and recover the phone.

Samsung J2 Hang On Logo Due To Hardware Fault:

How we can check that the Samsung J2 hang on logo problem is due to hardware fault? as I said before if the phone hang on the first boot logo then it's the hardware fault, to confirm that you can check the below.
  • You will not able to boot in to Recovery mode.
  • If you remove the LCD connector you will hear the boot sound and the phone will switch on.

How to Solve Samsung J2 Hang on logo:

If the phone hang on second boot logo that means it's having some Firmware or Software issue, in that case you can flash the phone and it will be OK for you. If you have the hardware issue, it can be solved by replacing LCD and Touch. You can also clean the touch connector and try.

Tuesday, October 3, 2017

J710F Use The Emergency Recovery Function - Solved


You may know about the error comes while flashing Samsung J710F or J710FN called "an error has occurred while updating the device software use the emergency recovery function on Smart Switch" or an error has occurred while updating the device software use the emergency recovery function on Kies". Here we will discuss the error use the emergency recovery function on Samsung Android phones with Android version 7.0. If you flash the J710FX with lower version or try to do FRP unlock then this error comes. If the phone has Android 7.0 then this topic will help you recover your phone by downloading a small flash file and flash with Odin3.

J710F recover with Smart Switch PC software or recover with Samsung Kies, you need to download the complete firmware which is large in size about 1.6GB but here in this process you need to download only the J710FN boot loader file which is only less than 2MB and flash with Odin flash tool.

Important:
   
This process is tested on Samsung J710F with the following details:
  • The phone should be runs on Android 7.0
  • Baseband version: J710FXXU38QH2
  • Build number: NRD90M.J710FXXU3BQI8
Note: Although this process is work fine, but we are not responsible for any damage happens to the phone.

J710F Emergency Recovery Solution:

1- Download J710F Bootloader BL file Here
2- Now put the phone to Download Mode (Volume Down+Home+Power Key then Volume Up)
3- Open Odin3 Flash Tool Select the Boot file in "BL Tab" and Click on Start
BL_J710FXXU3AQF8_CL11698064_QB14008367_REV03_user_low_ship.tar.md5
4- Wait until the flash process complete and it will reboot the phone.
5- Odin3 can be download using Internet Search Here and Download Odin3_v3.11.1

Recovery Success J710FXX an error has occurred while updating the device software use the emergency recovery function on Smart Switch PC Software

After complete the process the phone will reboot and now you can check it will not ask to connect Kies or Smart Switch to recovery the phone. If you are still not success then please download the complete J710F Firmware Android 7.0 then flash the phone with Odin3.

Search Tags:

j710f emergency software recovery
an error has occurred while updating the device software use the emergency recovery function j7
an error has occurred while updating the device software j710f
an error has occurred while updating the device software Samsung
j710 frp
j710 frp bypass
j710 frp reset file
Samsung j710f frp reset file download
J710FXXU3AQF8_OXY3AQF2
J710FX Errors Emergency Recovery
emergency function on smart switch pc software
Samsung j200g an error has occurred while updating the device software
Use the Emergency recovery function in the Smart Switch PC software

Sunday, September 17, 2017

Samsung SM-J700F J700FXXU4BQE3 Android 6.0.1 FRP Bypass - Solved


How to remove frp lock on Samsung SM-J700F/DD? Here in this topic you can get 100% solution for Samsung J7 FRP lock and know how to unlock FRP with simple steps. Here is the example of Samsung SM-J700F runs on Android 6.0.1 and how you can easily remove frp lock on the device. Please see the below step by step process to unlock frp on J700F.

SM-J700F Version Info:

Model No.: J700F/DD
Android Version : Marshmallow Android 6.0.1
Version Info:
J700FXXU4BQE3
J700FODD4BQE1
J700FXXU4BQF4 

Requirements:

SM-J700F Samsung Smart Phone FRP Locked
1 SD Card at-least to have 30-40 MB apk file
Android_6_Google_Account_Manager.apk (Download from the below link)
New_FRP_Bypass_2018.apk (Download from the below link)
Battery must be 50% charged or more
Internet Access Using WiFi
SM-J700F FRP Unlock Solution:

1- Copy the below 2 files to SD card and insert it in the phone and switch ON.
2- Then click Next until it ask to connect to WiFi stop there.
    and First connect to your WiFi  and then
    click on "MORE" then "Add Network"
3- Now type anything in "Network Name" and select it and click on "Assist" icon.
4- Now the Google App will open, then type settings and click on it to Open "Settings".
J700F FRP Unlock Solution Android 6.0.1
 5- Now scroll down to "Storage" and open it.
6- You can see both storage 'Internal Storage' and 'SD Card'.
7- Now touch on "Internal Storage" to open it and then click on "Explore" at the end of the screen.
8- Now click on "Back Arrow"  (Top left side on the screen)
9- Now open "SD Card" and first install Account Manager APK and then Install FRP Bypass APK and Open it.
10- Now it will ask to "Re-Type password" then click on 'Browser sign-in' (click on 3 dots at the top right corner on the screen)
11- Now enter any Gmail ID and Password and sign-in, after sign-in it will automatically closed the page, don't worry just restart the device and click next ...next and finish. The phone should connected to the Internet.

File to be copied in SD Card:

Android_6_Google_Account_Manager.apk
New_FRP_Bypass_2018.apk

You can download frp unlock and account manager apk from the below link.

Downloads:

Download All FRP Unlock/Bypass APK Here

Please read this Samsung J7 J700F/DD FRP Unlock or FRP Bypass topic carefully and then follow step by step to unlock or bypass frp lock your device, it's 100% tested and working fine.

Thursday, November 24, 2016

Samsung J2 2016 (J210E) FRP Unlock Solution


In this topic we will show, how to FRP unlock or bypass FRP of Samsung J2 2016 Android Version 6.0.1 new security. If you forgot the Gmail account user id and password then this process will help you to recover your device using new Gmail id and password. This is a long process but don't worry, just have patience and follow the steps carefully.

Downloads:
  • Android_6_Google_Account_Manager.apk Here
  • com.rootjunky.frpbypass-1.0.apk Here
Both can be download here

Requirements:
  • First download the above two Android apps
  • Now Copy these files to a pen drive and a OTG Cable
  • 2 SIM Cards with PIN Lock
J2 2016 FRP Lock Reset OK

How to FRP Reset Samsung J2 2016 ?
  • Switch on the phone and connect to WiFi then switch off the phone
  • Put 2 SIM cards (With PIN Lock) and switch on the phone again
  • Now it will ask Unlock SIM
  • Enter the SIM 1 PIN Number and Press OK and wait until it shows signal (Only SIM 1 PIN)
  • Select Emergency Call and touch the Emergency Call icon (Down Left Corner) you return to the Lock screen don't worry just do it again and now you also come back to the lock screen
  • Now just put the second SIM PIN Number and press OK
  • In this step you will the SIM Card Manager on the phone, Press DONE
  • Now you will see the Contacts
  • Now to call, just select any one contact and end the call suddenly and Immediately Click on Message Icon (Select your contact number) If you do not save any contacts in the SIM then you must do it before.
  • Now type a Message like this asdfg@mail.com and send
  • Now you will see the email id underline on the message
  • Click on the Email id and Click on Send email
  • It will ask to Open With, Select Email
  • Now it will ask to Add new account (here you should give the working Gmail id and password)
  • Enter the Email Address and click on password box then click on Next, now enter the password click on sign in, click on Allow and wait until the process complete
  • Now the email will open, click on ATTACH, select OTHER (Bottom right corner)
  • Now select My Files (Now your are here My Files > Device Storage)
  • Just touch the My Files (on the top left side) to go back to the storage option (do not use the down right soft key to go back)
  • Now put the pen drive using OTG cable and click on device storage and come back again by touching the My Files
  • Now open the USB Storage, First install the Android_6_Google_Account_Manager.apk, there will be no open option just click on Done and come back and install com.rootjunky.frpbypass-1.0.apk and open it
  • Now you will see Re-type password, here you just select the Browser sign in on the top right corner
  • Now enter the Gmail id and Password, after sing in compete just restart the phone
Now it will not ask any Gmail id and after switch on the phone reset the device using settings options.

Friday, April 1, 2016

Samsung Galaxy Note 3 SM-N750 Flashing Success With Z3x - Samsung Tool v19.0


The Samsung Galaxy Note 3 Neo SM-N750 hangs on logo, restart or reboot and hanging problem solve by flashing the phone with latest firmware, and here is the process to flash the phone with Z3x Samsung Tool V19.0. The phone runs on Android Lollipop 5.1, so download the latest version firmware of N750 and flash with Z3x. The firmware of the phone can be download using z3x shell or search Google for "Galaxy Note 3 Neo Firmware Indian Version", download the firmware is about 1.3GB and follow the instruction to flash the phone with Z3x box.

SM-N750 Firmware Download shell Z3x
Galaxy Note 3 Neo Flash Done With Z3x box:

Open z3x Samsung tool v19.0
Choose model SM-N750
Choose the flash file you have downloaded 
Now put the phone into Download mode (Volume Up+Home+Power Key)
Connect the phone using USB cable
Now click on Flash button


N750 Flash done With Z3x

That's all just wait until it finished the flashing process, now your Galaxy Note 3 Neo is flashed successfully.

Wednesday, August 13, 2014

Samsung GT-S5560 Blinking Problem Solution - Flash With Multi Loader


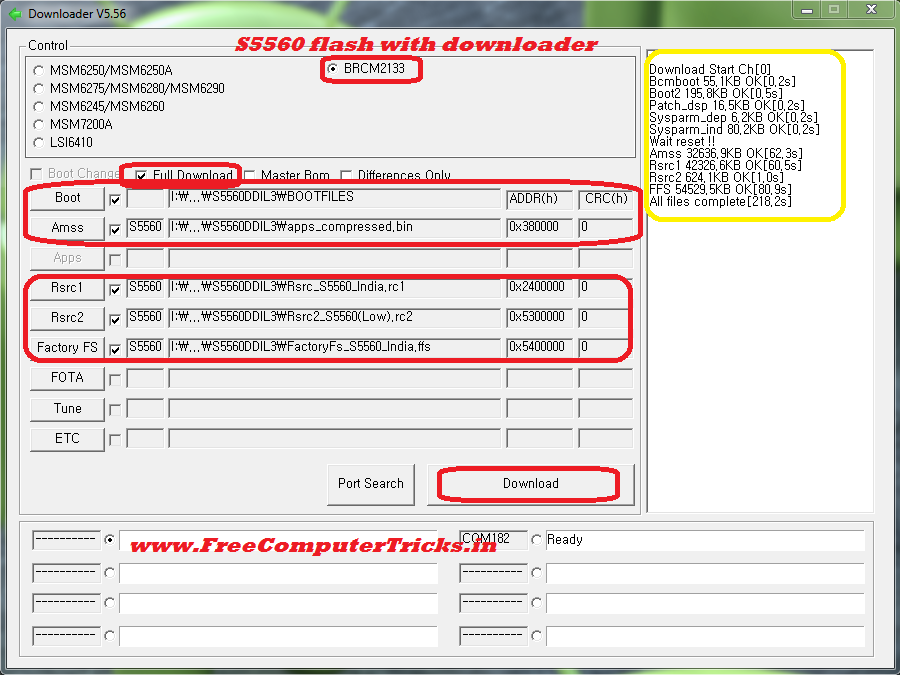
Samsung GT-S5560 blinking problem or restart problem solved, to solve this problem flash Samsung S5560 with Multiloader. See the below steps to flash Samsung S5560 with Multiloader V5.65.

Downloads For Flashing Samsung S5560

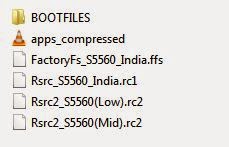
Download Samsung S5560 Firmware (S5560DDIL3)
Download MultiLoader V5.56

Steps to Flash S5560 With Multi Loader

  • Open MultiLoader V5.65.exe
  • Select BRCM2133 and Tick on Full Download
  • Now Select the S5560 Flash Files


Samsung S5560 flash done with Multi Loader


  • Boot = BOOTFILES path .....\S5560DDIL3\BOOTFILES
  • Amms = apps_compressed.bin
  • Rsrc1 = Rsrc_S5560.rc1
  • Rsrc2 = Rsrc2_S5560(Low).rc2
  • Factory FS = FactoryFs_S5560.ffs
  •  
     
  • Now put the S5560 into Download Mode ( Volume Down + Home + Power Key)
  • Connect the phone to PC using USB Cable
  • Click on Download


That's all, wait until the flash process complete after that the phone will restart automatically and you have done. The Samsung S5560 has been successfully flashed with MultiLoader or Downloader.

S5560 Multi Loader Flash Log:

Download Start Ch[0]
Bcmboot 55.1KB OK[0.2s]
Boot2 195.8KB OK[0.5s]
Patch_dsp 16.5KB OK[0.2s]
Sysparm_dep 6.2KB OK[0.2s]
Sysparm_ind 80.2KB OK[0.2s]
Wait reset !!
Amss 32636.9KB OK[62.3s]
Rsrc1 42326.6KB OK[60.5s]
Rsrc2 624.1KB OK[1.0s]
FFS 54529.5KB OK[80.9s]
All files complete[218.2s]

Friday, March 28, 2014

How to Flash Samsung E1220T With Z3x - www.FreeComputerTricks.in


To flash the Samsung E1220T using Z3x follow the process below.

Samsung E1220T Flash with Z3x

Steps:

  • Open Samsung 2G Tool
  • Select Model E1230
  • Select COM Port
  • Speed : 460800

  • Then Choose the Flash files
  • Click on Firmware
  • Now connect the J750 cable to phone and press Power on button


Samsung E1220T Flash success with Z3X

Wednesday, March 26, 2014

Samsung SCH-W259 Flash Done With Z3x and Samsung PST - www.FreeComputerTricks.in


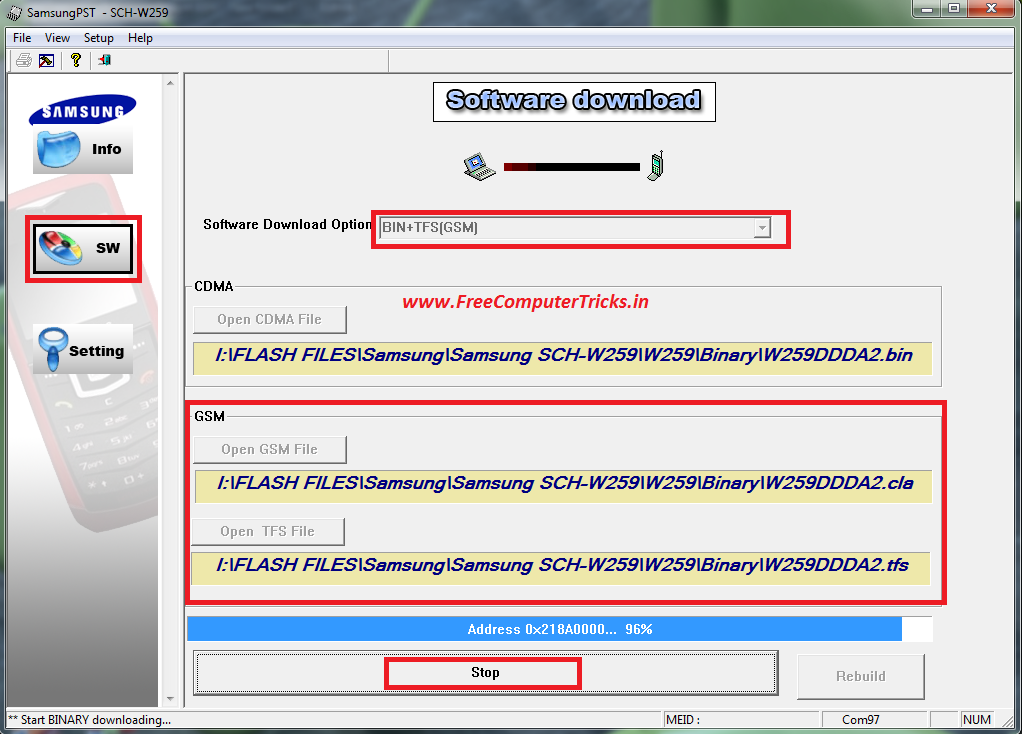
Here is the way how you can flash Samsung SCH-W259 Duos CDMA + GSM using Z3X and Samsung Phone Service Tool (PST) and the below is the procedure to Flash the phone.


Samsung W259 Flashing Problem Solved !!!!


Tools and Firmwares to Download for Samsung SCH-W259


SamsungPST_W259 For India
SamsungPST Setup
Samsung Firmware Binary W259DDDA2


Steps:


Flashing the GSM Part on Samsung W259


  • Connect the Z3x box to the computer and see the COM port in Device Manager
  • First install SamsungPST setup and Samsung PST_W259 For India.msi
  • Then Run SamsungPST.exe (C:\Program Files\Samsung Electronics\SamsungPST)
  • Click on the Model SCH-W259
  • Go to SW Tab and choose software download option BIN+TFS(GSM)
  • Select the GSM Flash file and Click on Start Software Download
  • It will ask to select the COM Port Choose the Z3x COM Port and Click on OK
  • One pop up will open just click OK
  • Now connect the Phone to Z3x Box using RJ45 Cable an Press the Power Button (E210 Cable)
  • The download process will start and takes about 30 minutes to complete

Note: Don't click on Rebuild.


Samsung SCH-W259 Flash done with Samsung PST and Z3x


Flashing the CDMA Part Samsung W259

  • After complete the GSM Flash Close the Samsung PST and Open it again
  • Then Select EMERGENCY(CDMA)
  • Open the CDMA File W259DDDA2.bin 
  • COM port setting should be the Modem COM Port (Setup-->Port Setting)
  • Click on Start Software Download
  • Now connect the USB Cable to the phone by pressing 9


Note: 

Use E210 USB Cable to flash CDMA Part
Use E210 UART Cable to flash GSM Part

Thursday, January 16, 2014

Samsung M8800 Flash Done With MultiLoader_V5.56 - How to Flash Samsung M8800 With Downloader - www.FreeComputerTricks.in


Here is the process how you can flash the Samsung M8800 using Multi_Loader, the flashing process of Samsung M8800 is given below.


Samsung M8800 Flashing with MultiLoader

Steps:


  • Download MultiLoader_V5.56 (Search MultiLoader_V5.56.exe and Download)

  • Download Samsung Firmware (M8800DDIG1)

  • Open the Downloader V5.56

Choose Control MSM6275/MSM6280/MSM6290

Amss File : amss_compressed.bin

Rsrc1 : Rsrc_M8800_Open_Europe_Common.rc1

Rsrc2 : Rsrc2_M8800(Mid).rc2

Factory FS : FactoryFs_M8800_Open_Europe_Common.ffs


Samsung M8800 Flashing Done with Multi Loader V5.56


  • Press Volume Down + Camera then switch on the phone for Download Mode


  • Connect the Samsung M8800 to the Computer using USB Cable

  • Then Click on Download Button 

Samsung M8800 Download Mode (Volume- + Camera + Power Switch)


Wait for sometime to finish the process and now the Samsung M8800 has been successfully flashed, remove the USB Cable and Battery and put the battery back to the phone and switch on.

Saturday, January 11, 2014

How to Skip Screen Align on Samsung i780 After Format/Hard Reset - www.FreeComputerTricks.in


Normally when you format/hard reset the Samsung SGH-i780 it will ask to align the screen on first step. If you are unable to do the screen align then you must have a hardware problem on the phone, but don't worry about that you can easily skip the screen align by following the below steps. 


Steps:

  • First make a new text file using the computer and rename it to (Welcome.not) .not is the Filename extension

  • Copy the Welcome.not file to the root of the SD Card (Don't put the file inside any folder)


Samsung i780 Align Screen - How to Skip


  • Insert the Memory card to the Samsung i780 mobile phone


  • Wait until the format process complete

  • Now the device will not ask to align the screen on the Samsung i780

(Note: First Insert the Memory Card to the Mobile and then hard reset)

This trick has been tested on Samsung SGH-i780 and it's success.


!!Enjoy!!


How To Hard Reset Samsung i780 - www.FreeComputerTricks.in


How to format or hard reset the Samsung SGH-i780 using the key pad?

Steps:


Samsung i780 hard reset with keys

  • Switch on the Phone (Samsung SGH-i780)

  • Now Press and Hold Call + End Call Button


  • Just Press the Reset Button and release ( Don't Release Call and End Call Button)

  • Now you will get [Format Mode]

1. Format and Reboot - Press Space

2. Skip - Press any other keys

Samsung i780 Format Option

  • So to format the Samsung i780 press Space after format complete the phone will be restart 
That's all now your Samsung i780 hard reset/format has been successfully Done.


Thursday, January 9, 2014

Samsung Galaxy S Duos S7562 Pattern Unlock - S7562 Pattern Lock Solution Without Using any Box


Here is the way how you can hard reset the Samsung Galaxy S Duos S7562 to remove all user data including remove the pattern lock. The below is the process to remove pattern unlock for the Samsung S7562 mobile phone.


Samsung S7562 Pattern Lock Solution - www.freecomputertricks.in


Steps:

Switch off the Samsung S7562

Now Press and hold Volume UP + Volume Down + Menu Button

Then Switch on the mobile


When it's vibrate release the power button only

Now you will get the recovery option

Enjoy 


Samsung S5222 Restart Problem Solved - www.FreeComputerTricks.in


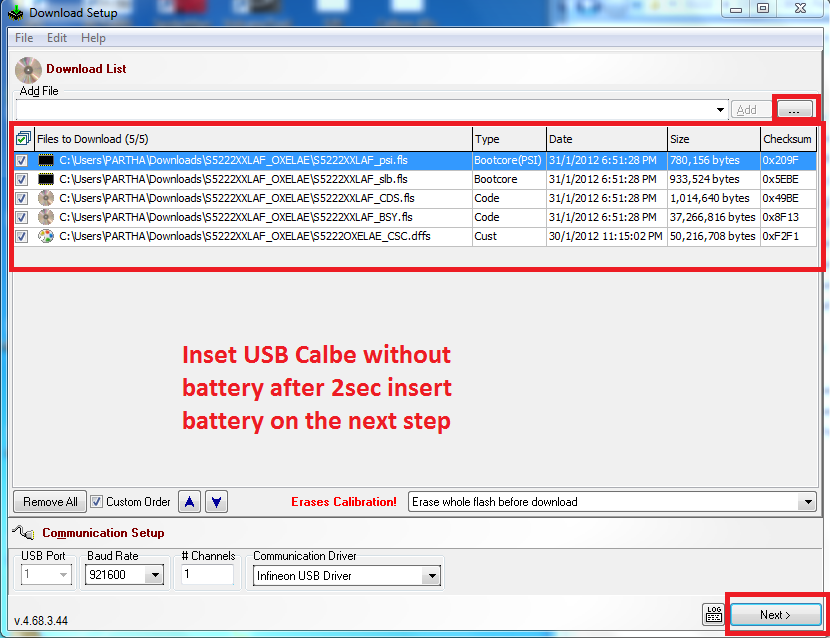
Today I faced a problem on Samsung S5222 Mobile, it restarts when you trying to call that Mobile number the Samsung S5222 restart. SO if you have the same problem then you can easily solve this problem by flashing the phone with Flash Tool E2, the below is the process how you can flash the Samsung S5222 with out using any box.


Steps:

  • Download Flash Tool For Samsung S5222 { C3750_C3650_FlashTool_E2_XMM2150 }

  • Download Samsung S5222 Firmware { S5222XXLAF_OXELAE } 

  • Open the Flash Tool {FlashTool_E2}

  • Choose the Flash Files: See the Below Screen Shot


Samsung S5222 Flashing Without using Any Box

  • Click Next
 
Samsung S5222 USB Flashing
  • Click on Start USB1


  • Remove the Battery From the phone and connect it to the computer after 2-3 seconds Insert Battery to the phone.

That's all now the restart problem of Samsung S5222 solved.


📚 You May Also Like to Read